Elan Glam Salon - Web Application Documentation
Introduction
Welcome to the Elan Glam Salon Web Application. This comprehensive management system is designed to streamline salon operations, from appointment booking and staff management to inventory control and detailed financial reporting. Our goal is to provide a seamless digital experience that enhances efficiency for staff and improves the overall service quality for our valued customers.
User Roles
Login/ Logout
 |
Sign In
|
fig:logout1 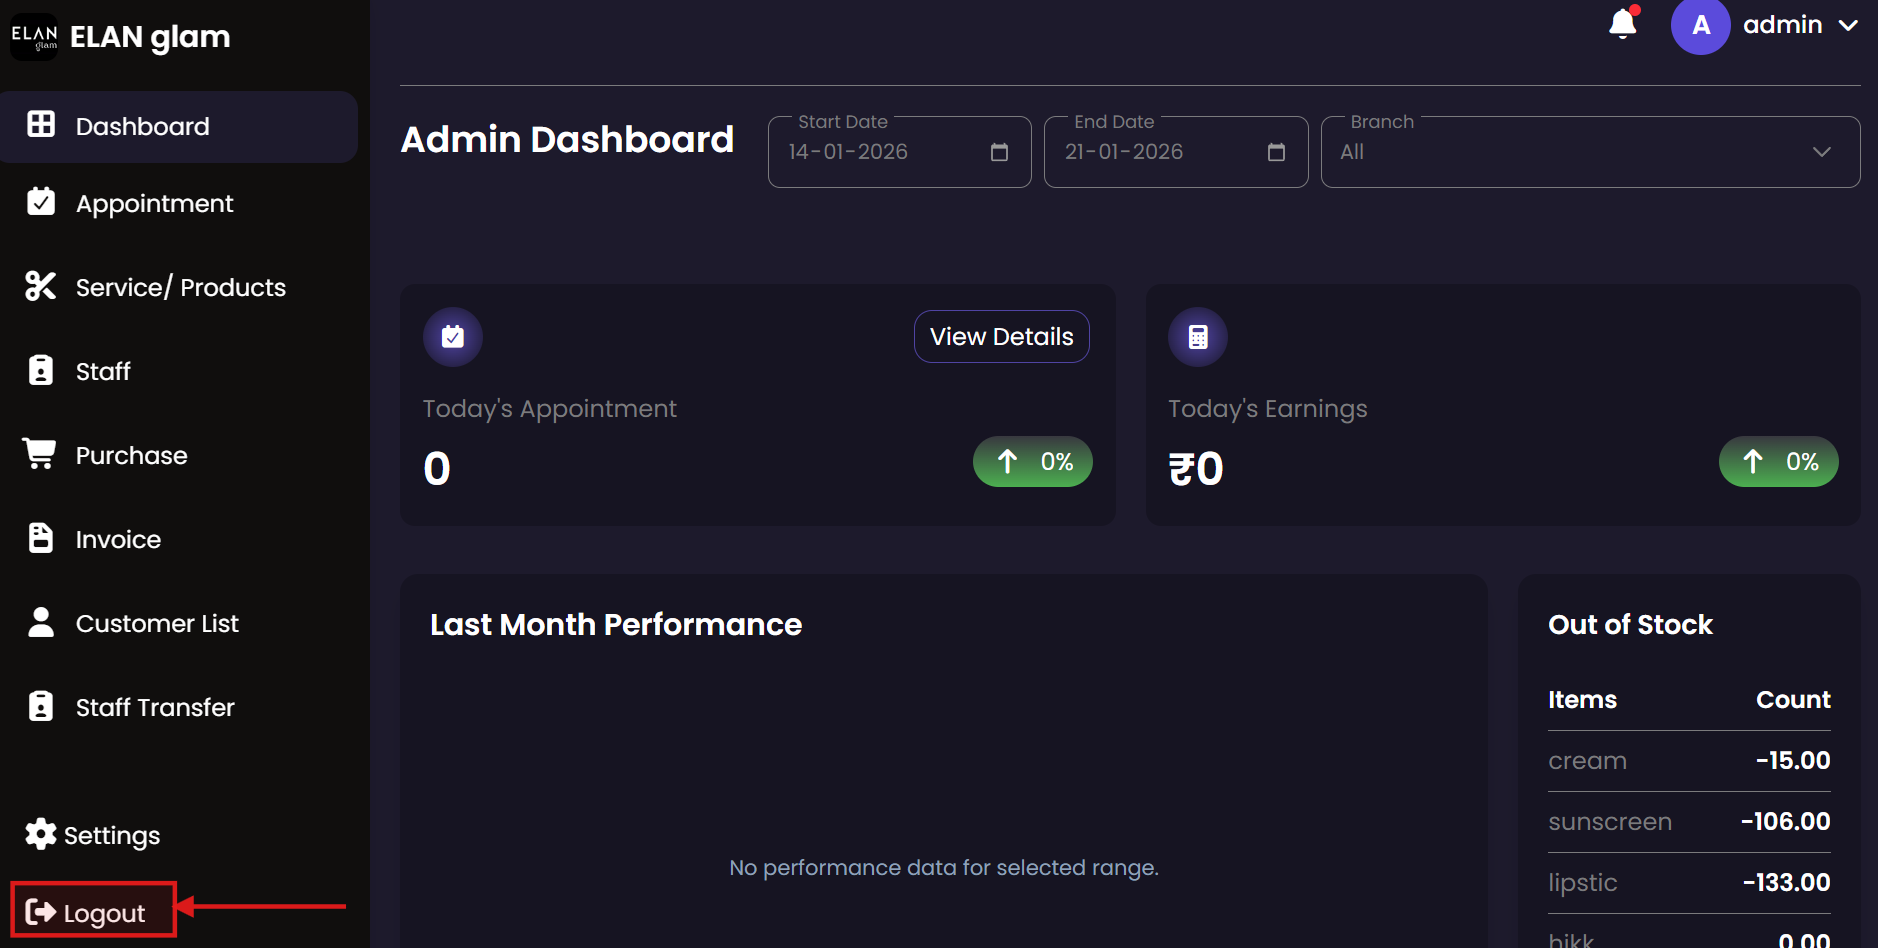 fig:logout2
 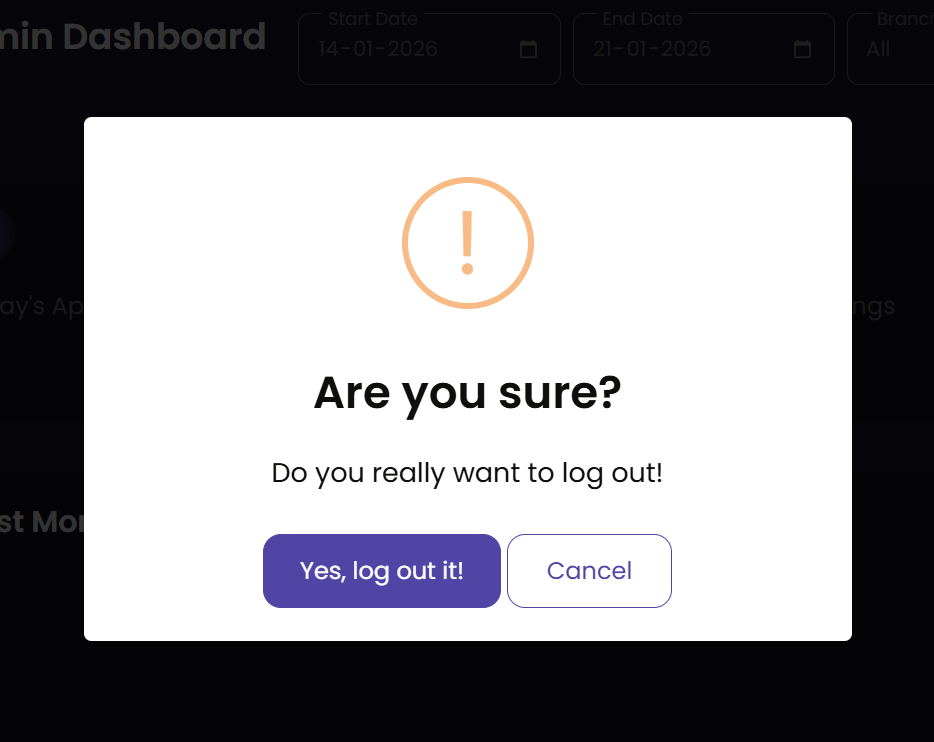 |
Sign Out
|
Admin Module
The Admin module provides full oversight of the entire salon system. Admins can manage all branches, configure core settings (taxes, units, categories), handle personnel records, and access comprehensive financial reports across the organization.
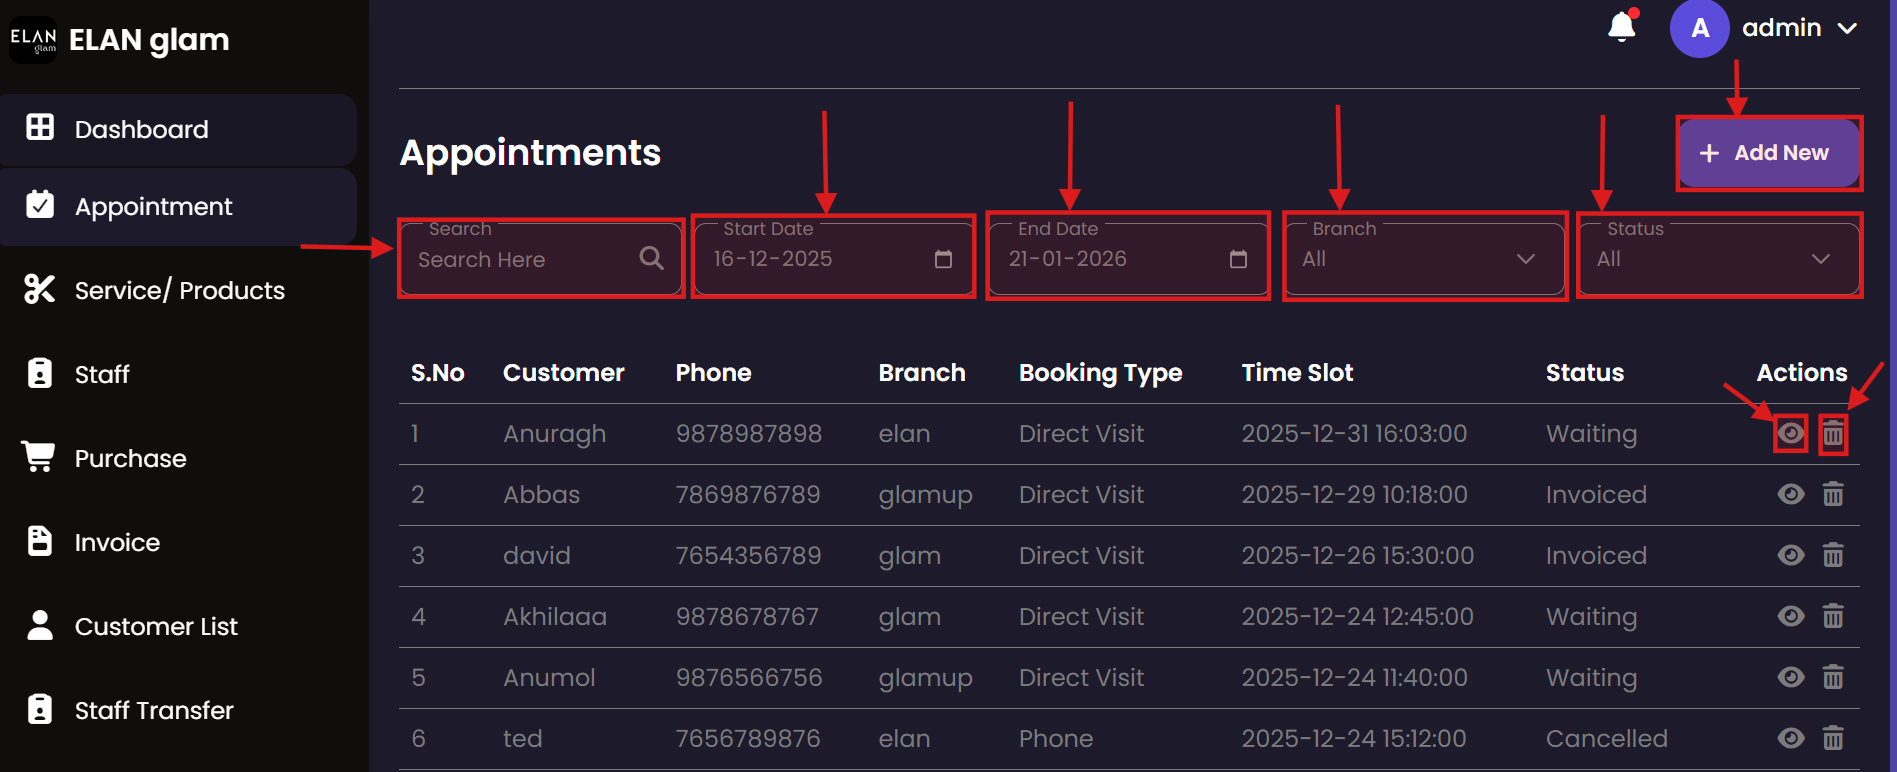
Appointment
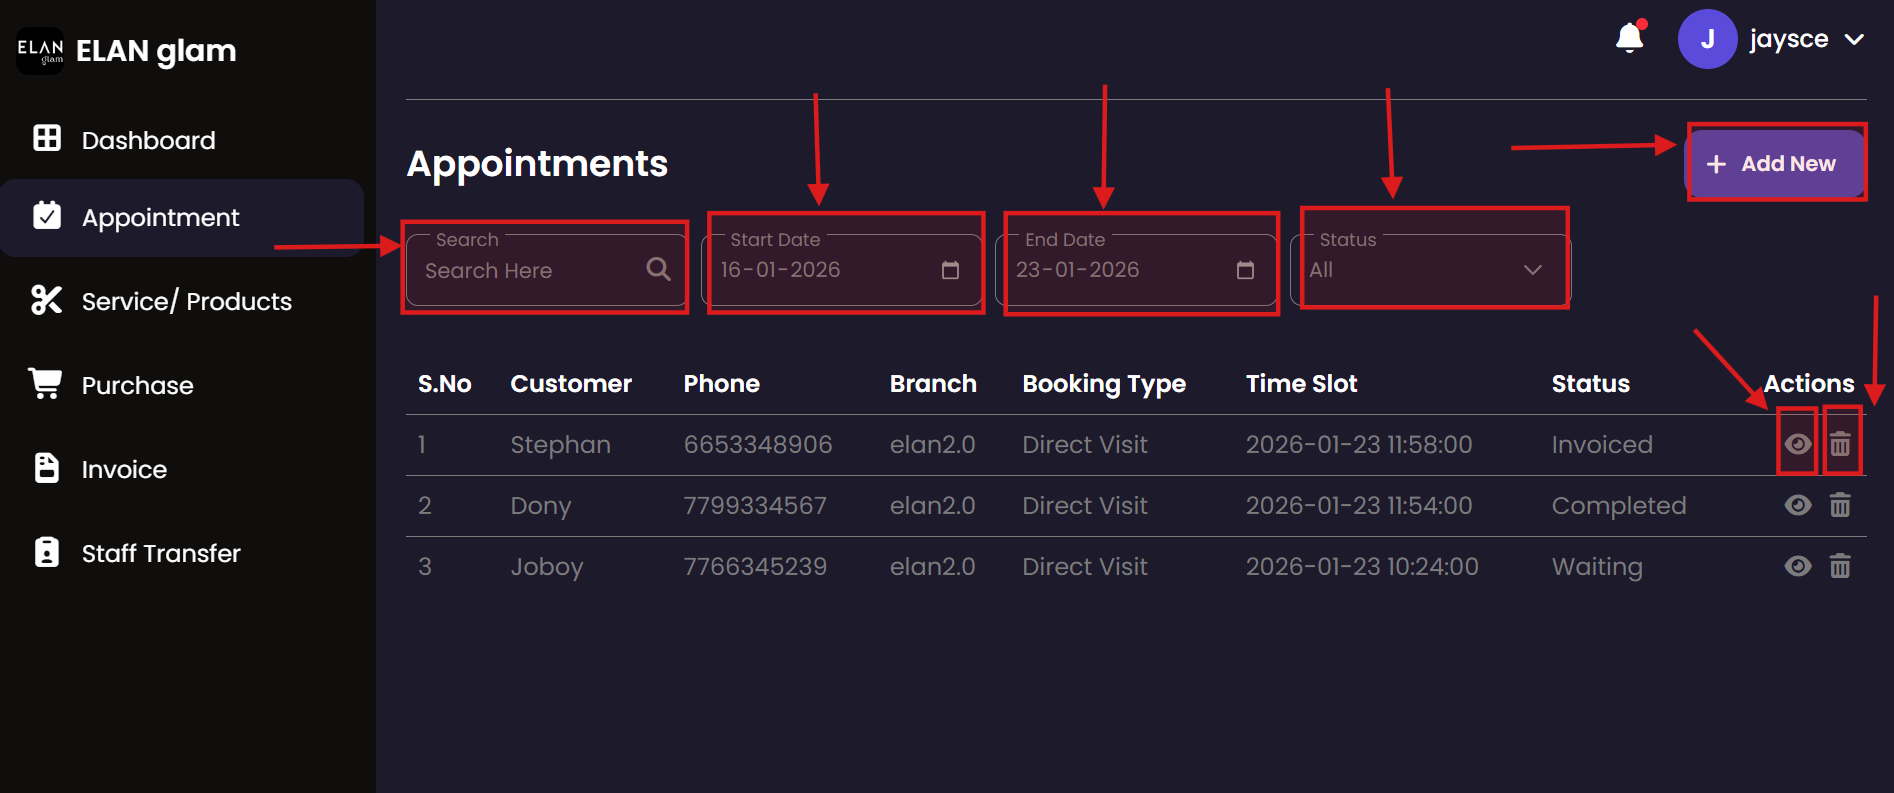
The Appointment system allows administrators to schedule, track, and manage customer bookings. It provides a centralized view of all service engagements, ensuring that staff and resources are effectively allocated across different branches.
Appointments List
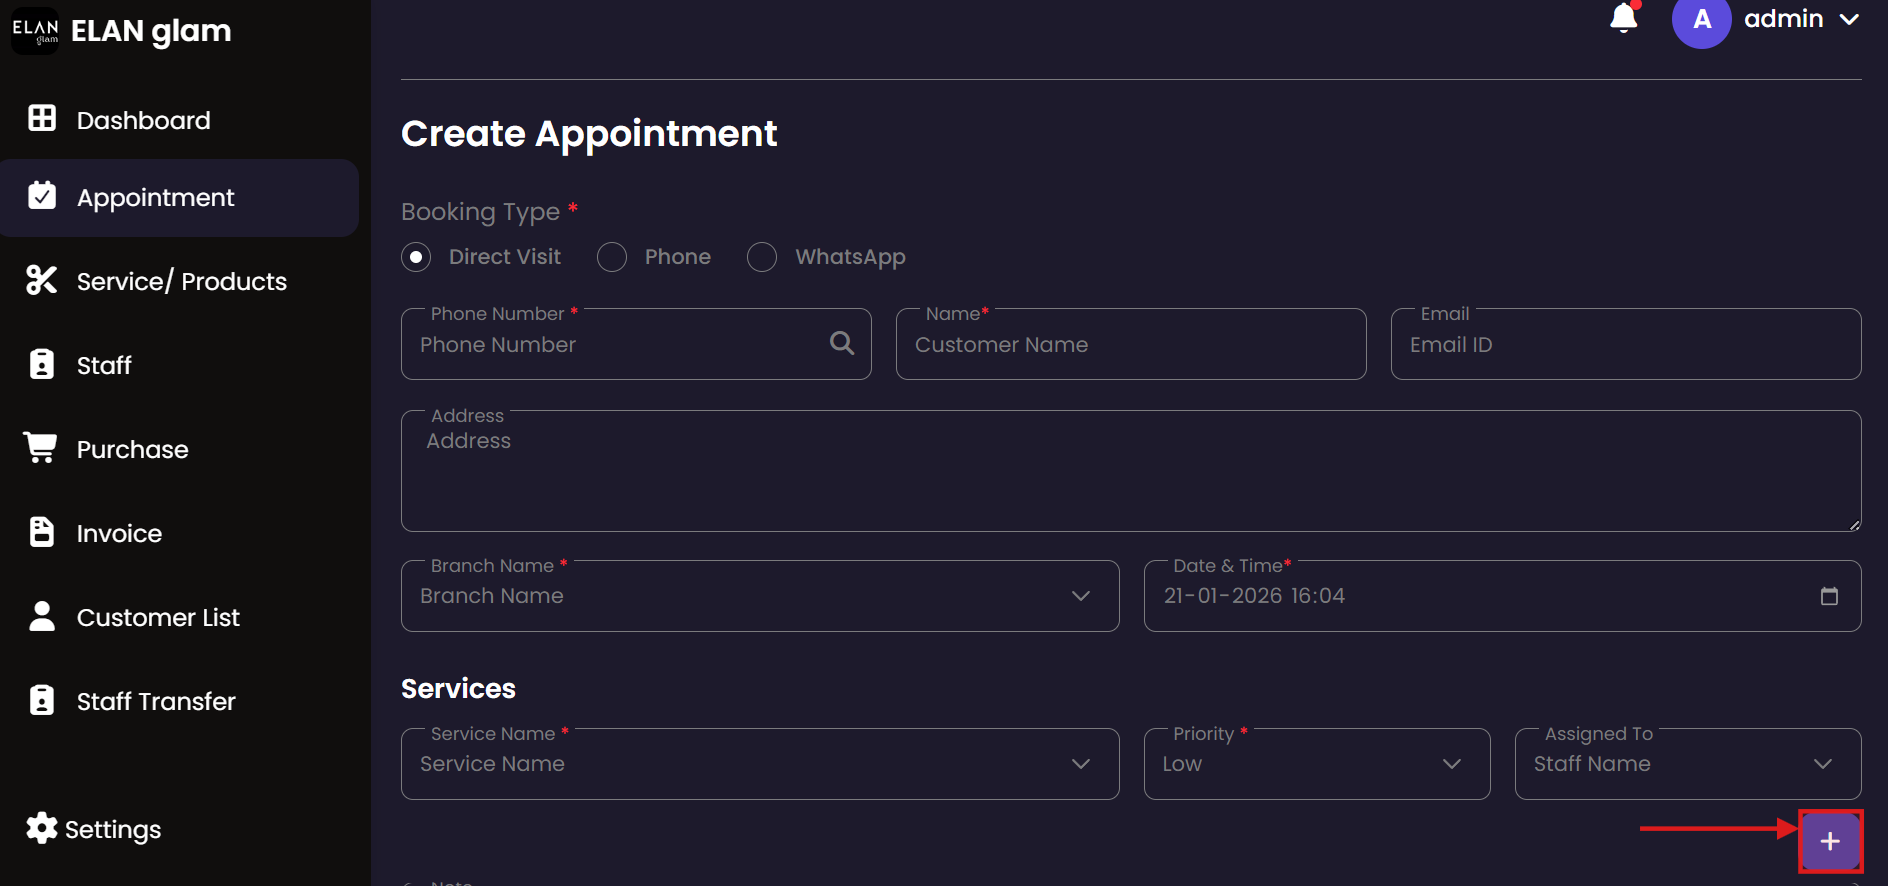
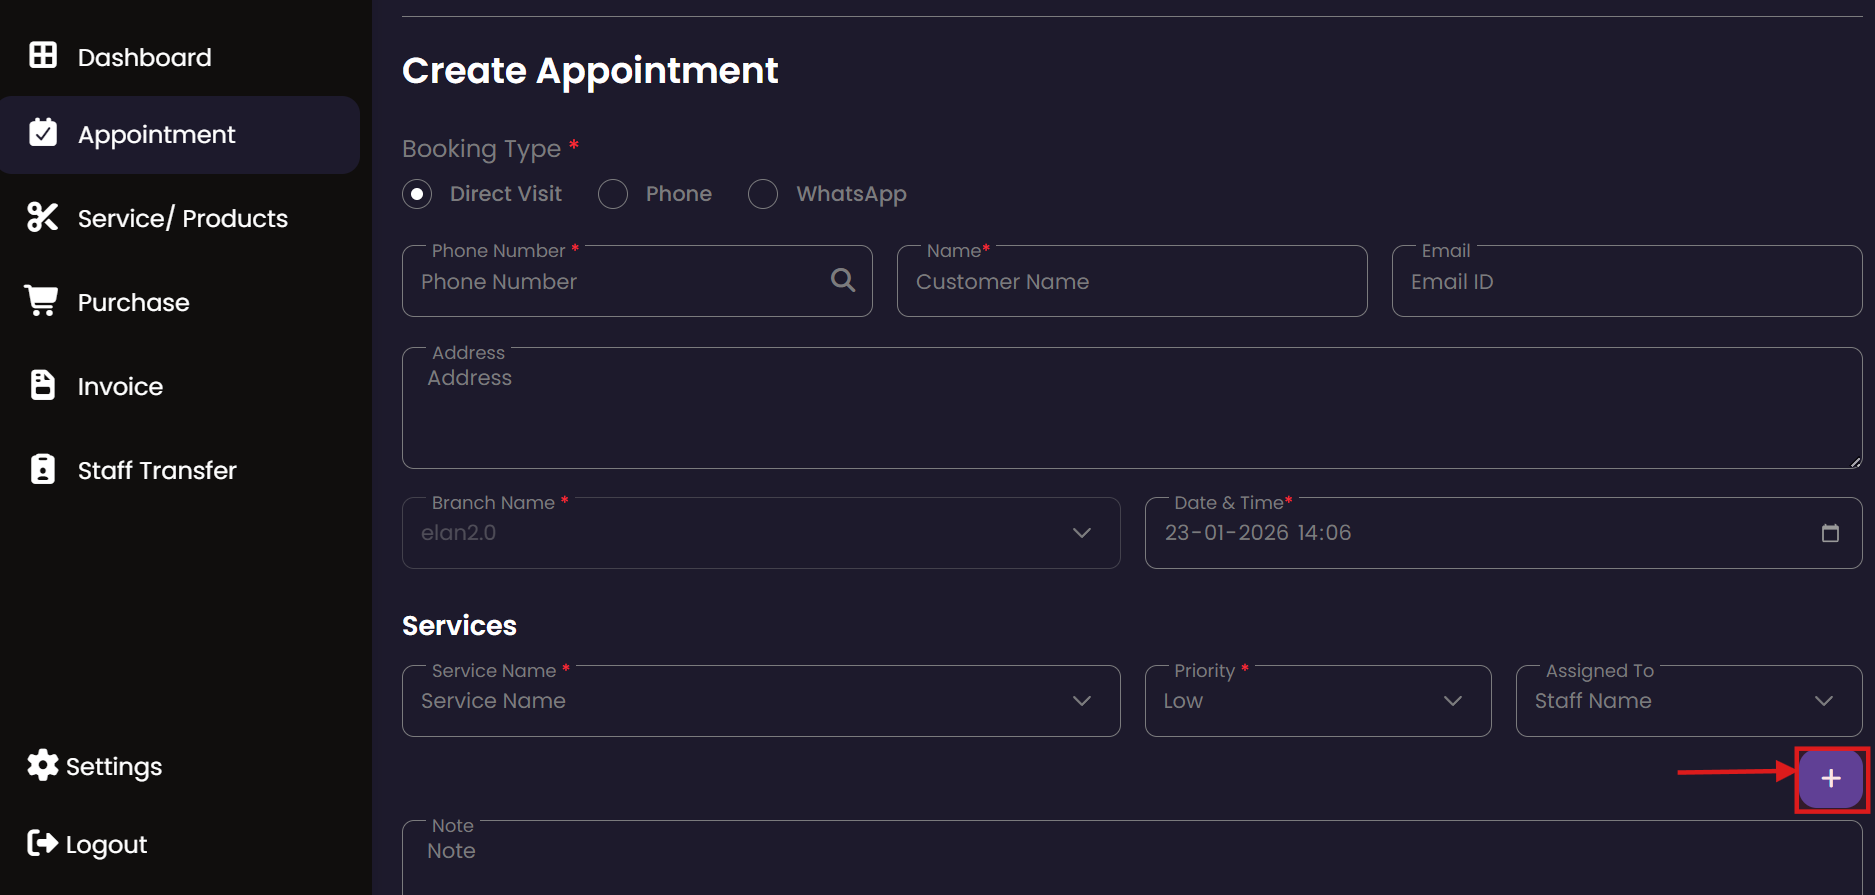
 Create Appointment
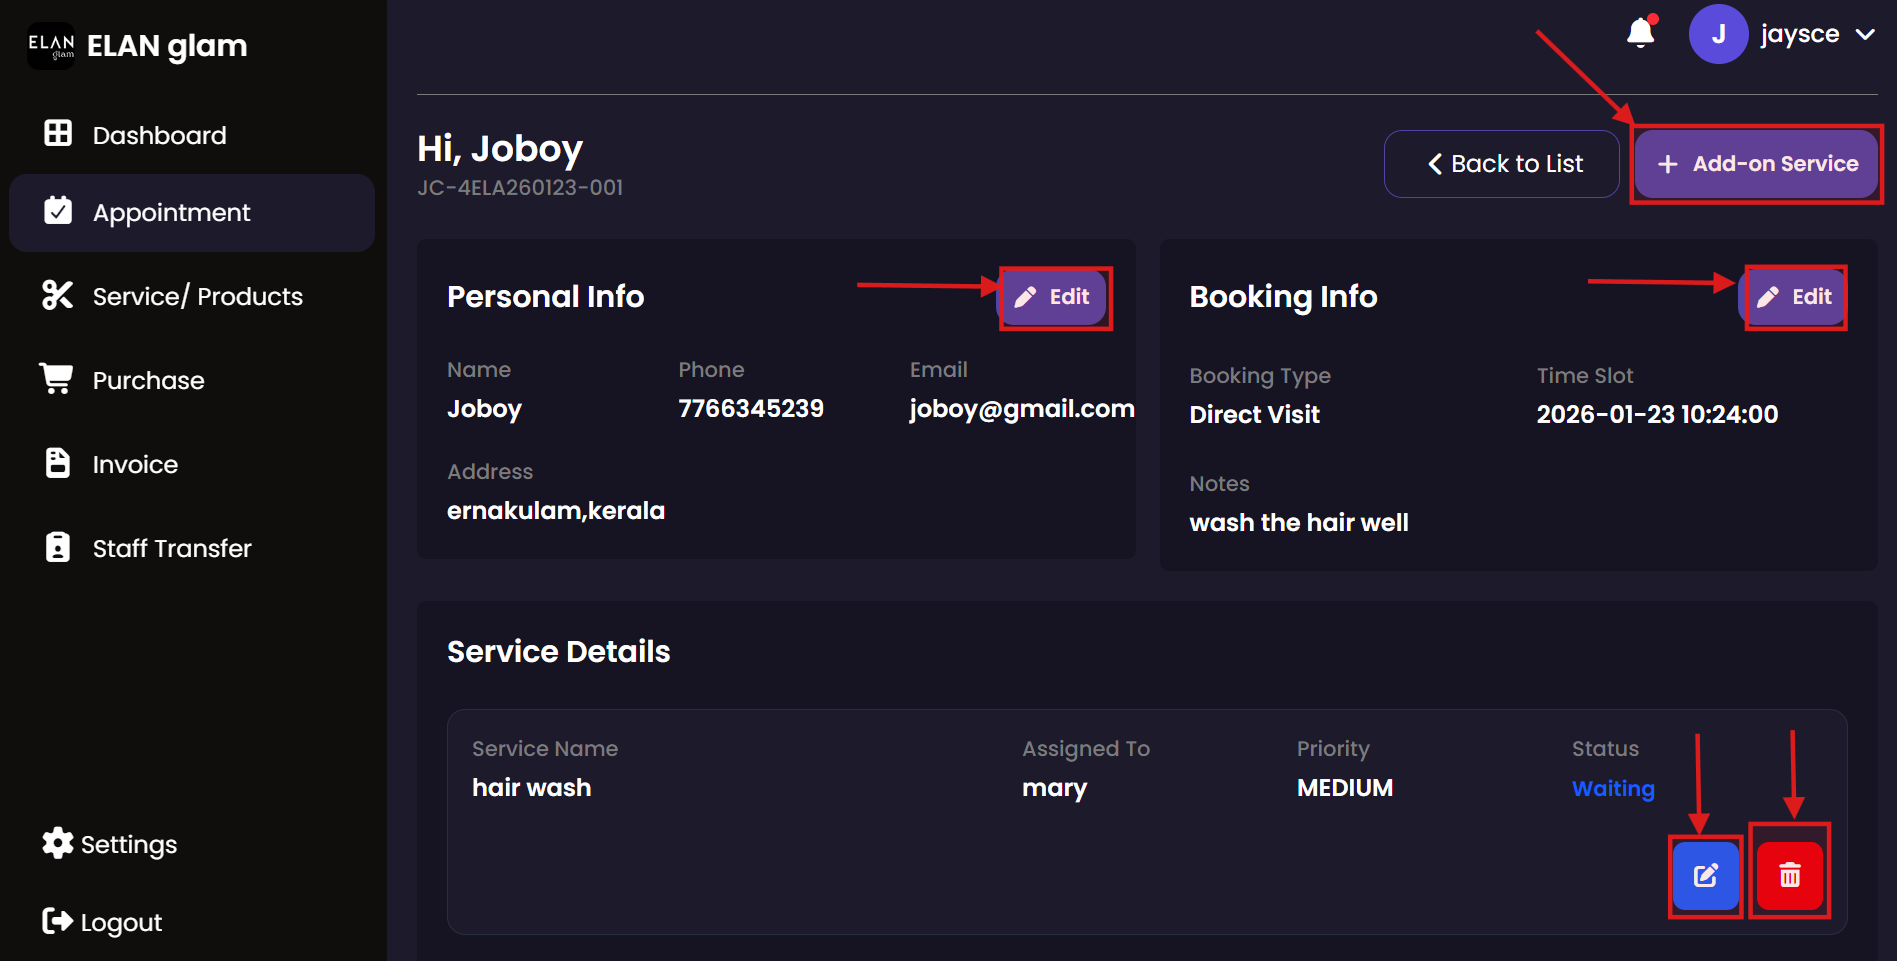
 Update Appointment
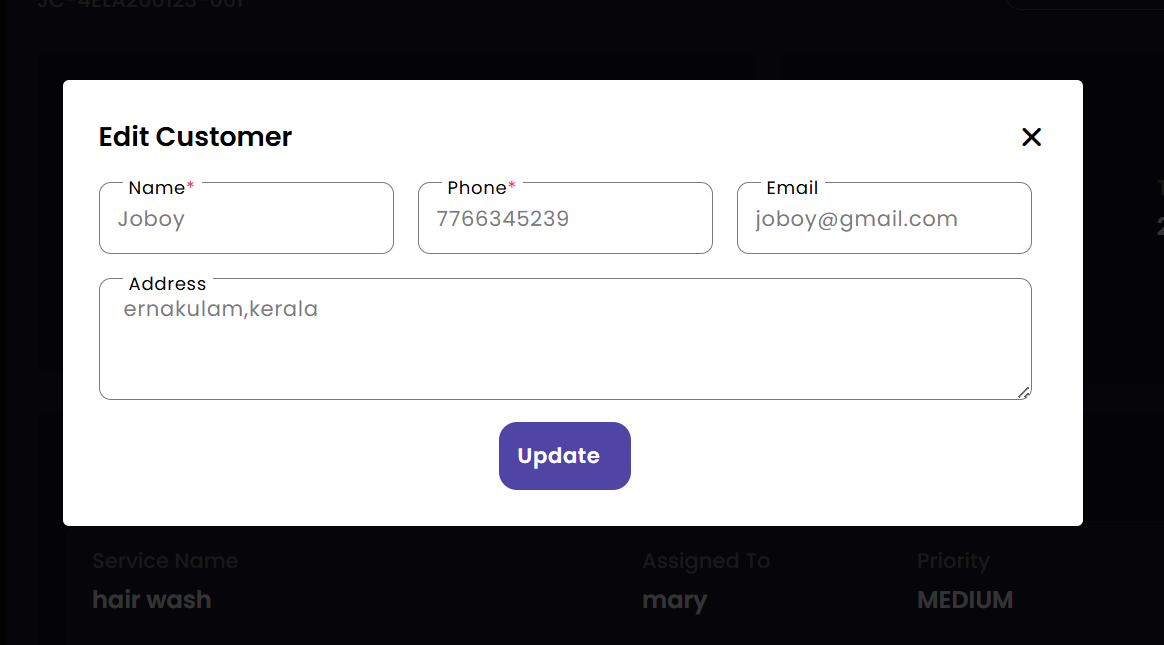
 Edit Customer Info
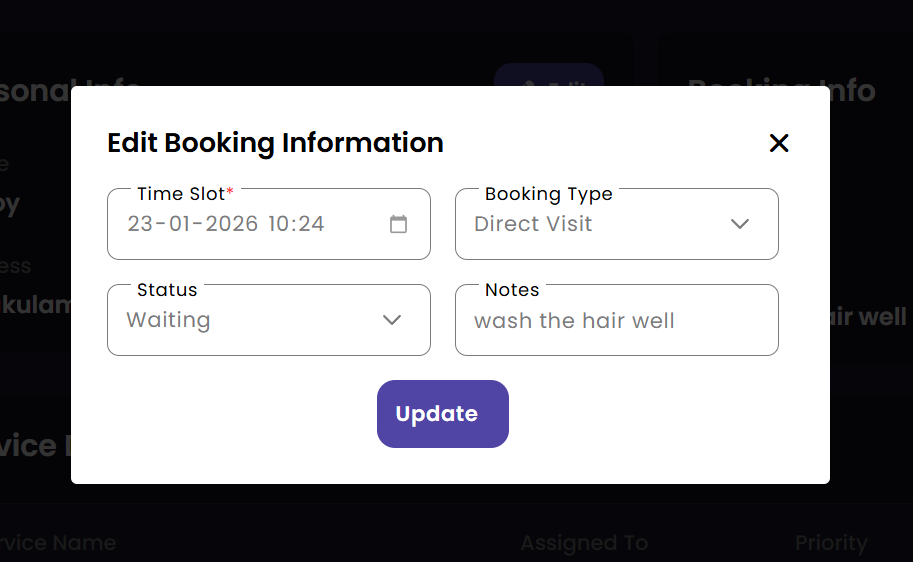
 Update Booking Info
 Service Details
|
Create Appointments
View/Update Appointments
Delete Appointment
Search Appointment
|
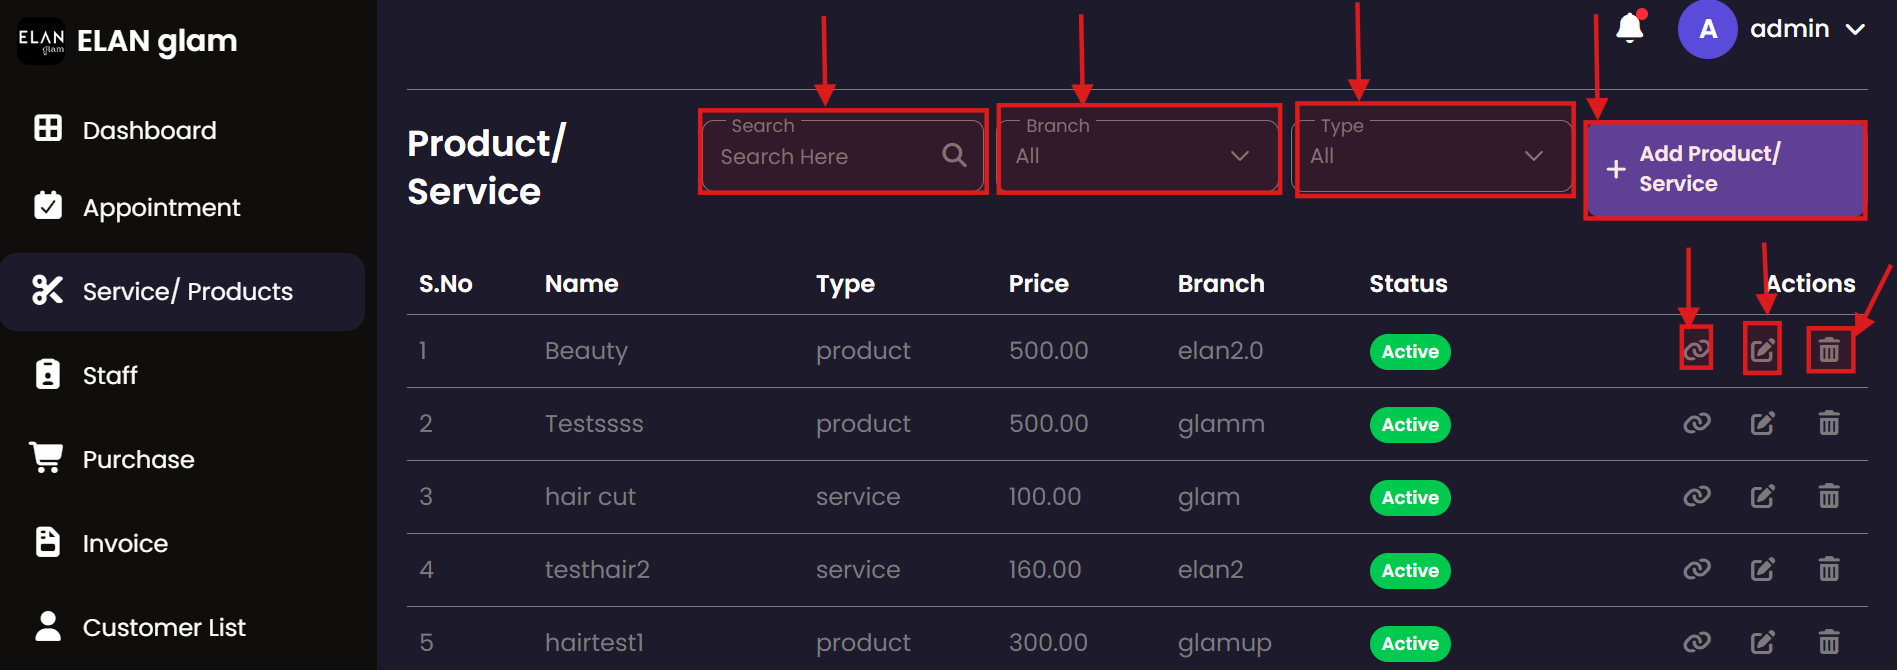
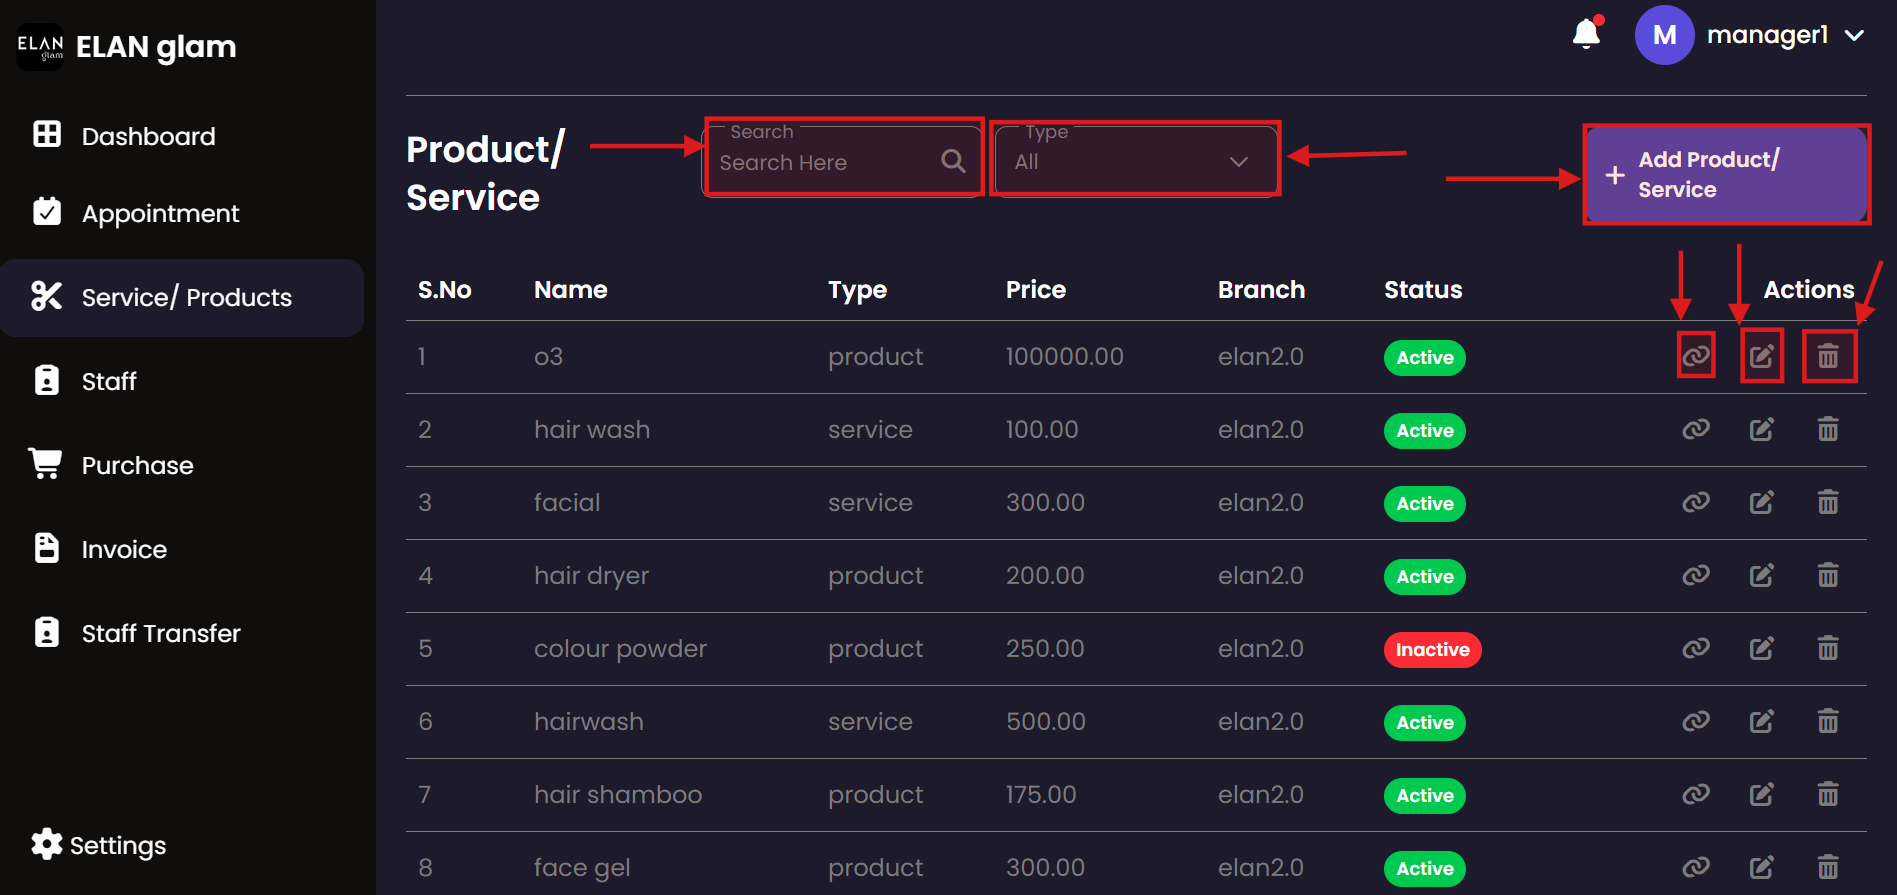
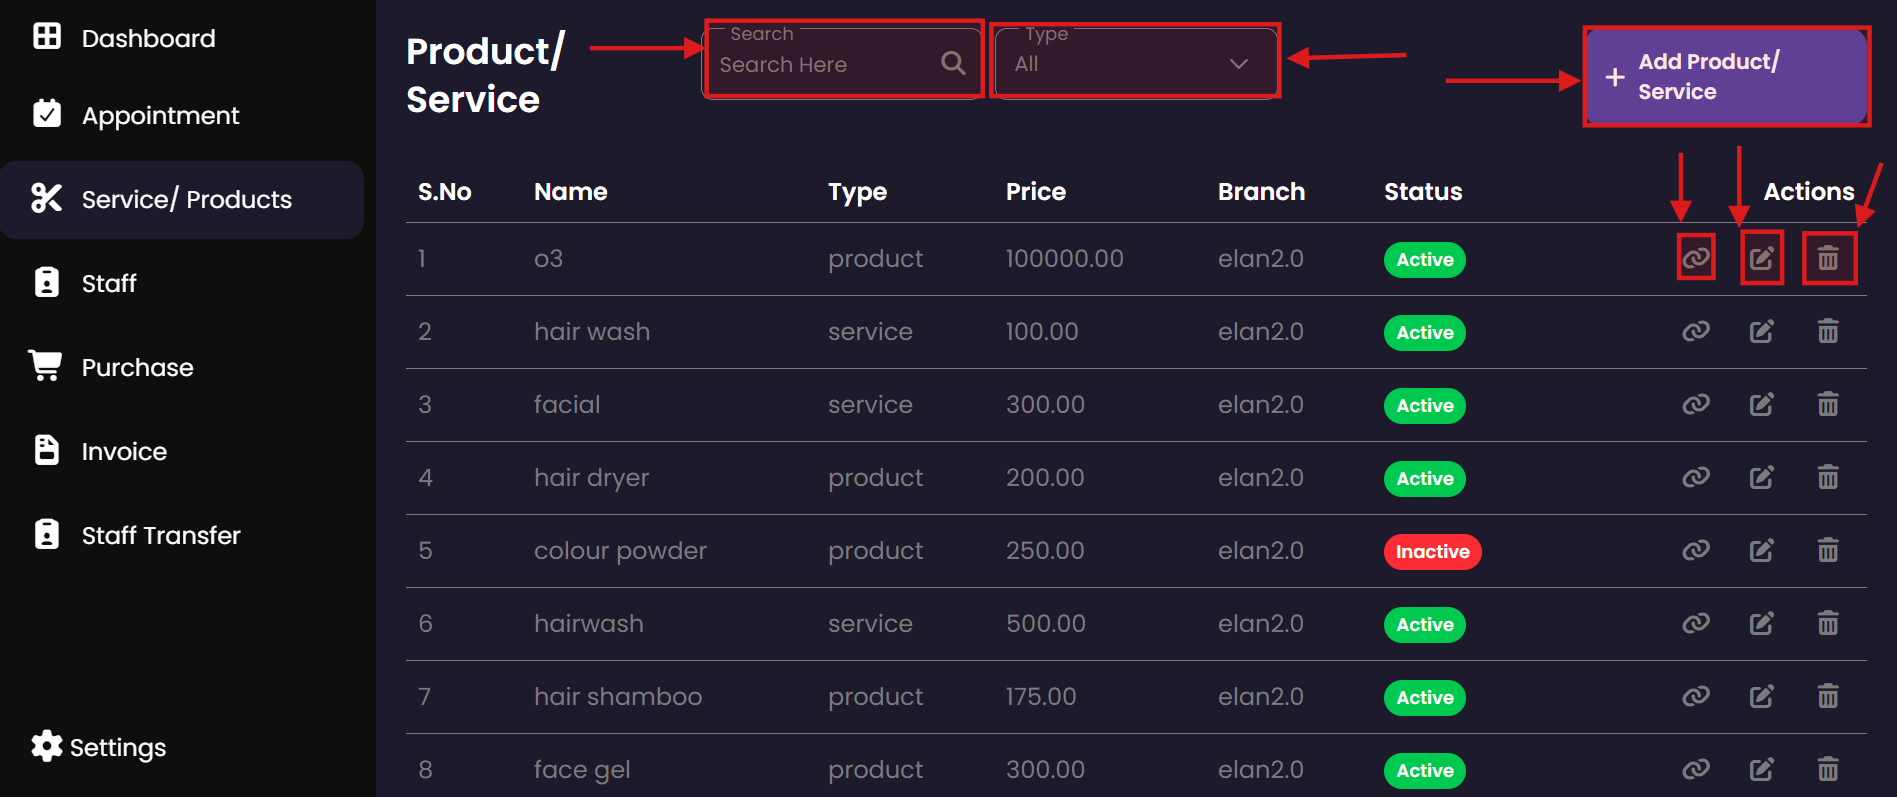
Products/Services
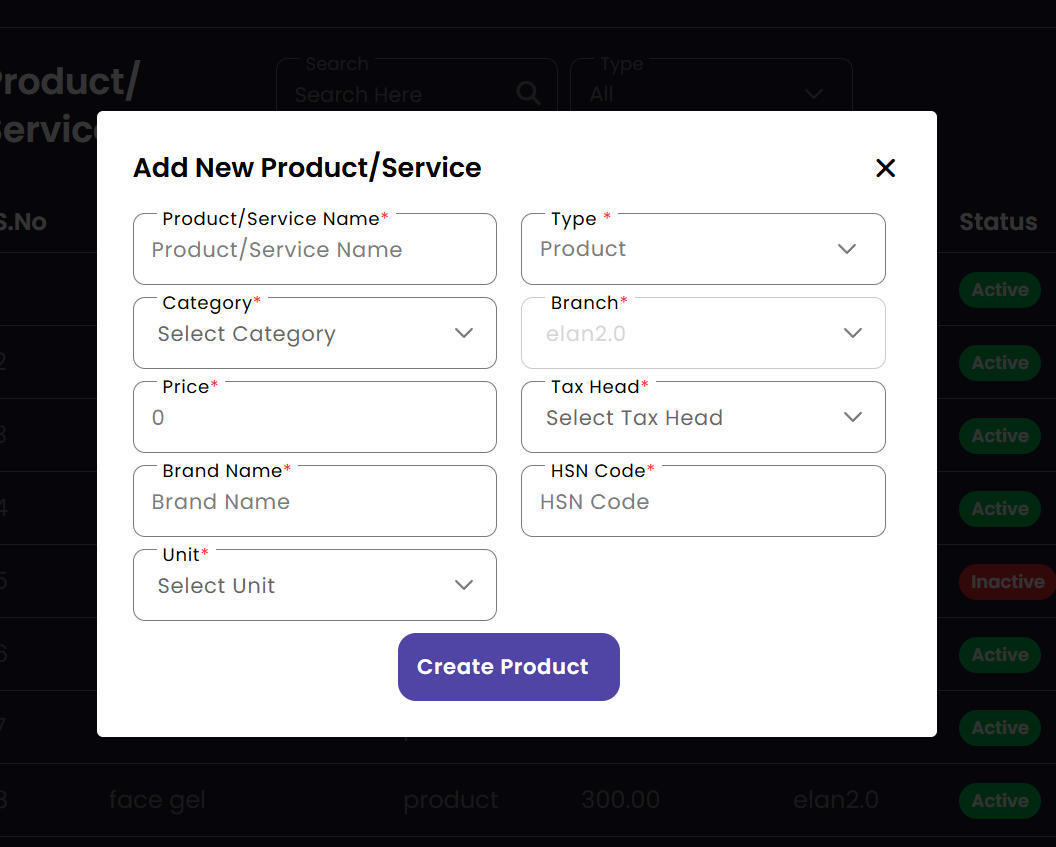
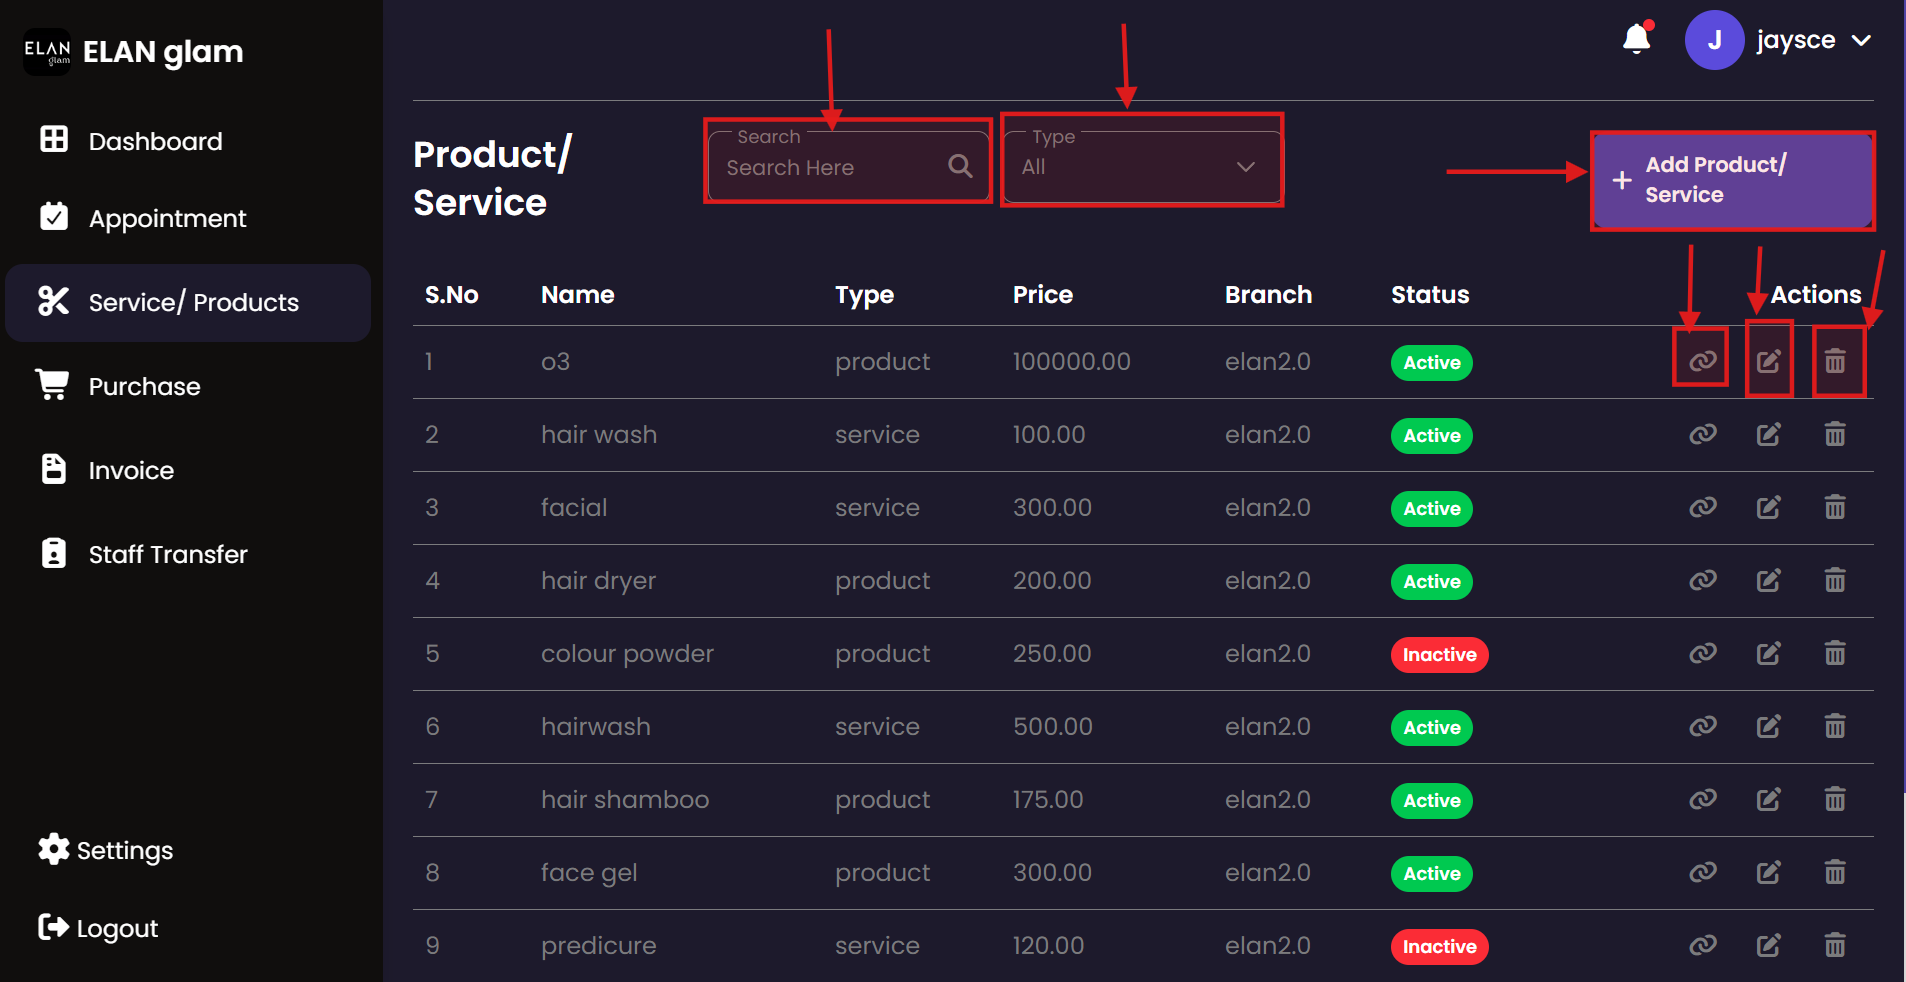
Manage the salon's inventory and service menu here. You can define what products are for sale and what services are offered to customers, including their pricing, tax implications, and associated units of measurement.
Products & Services List
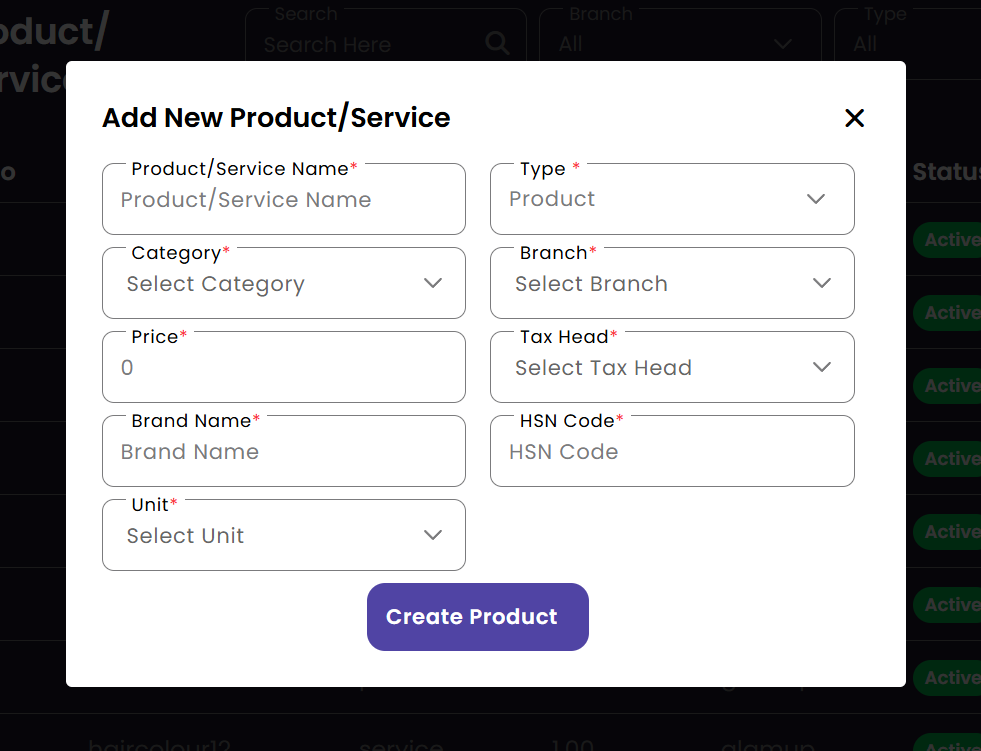
 Create Entry
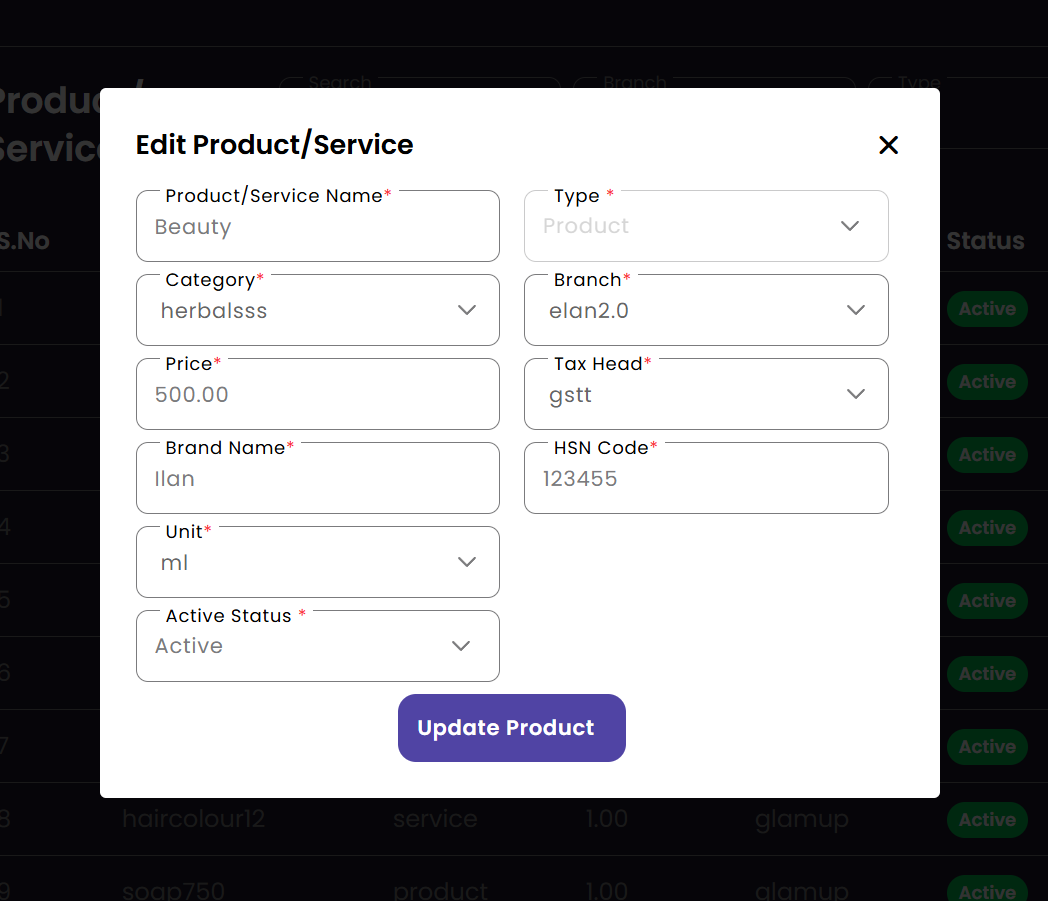
 Update Entry
|
Create Product/Services
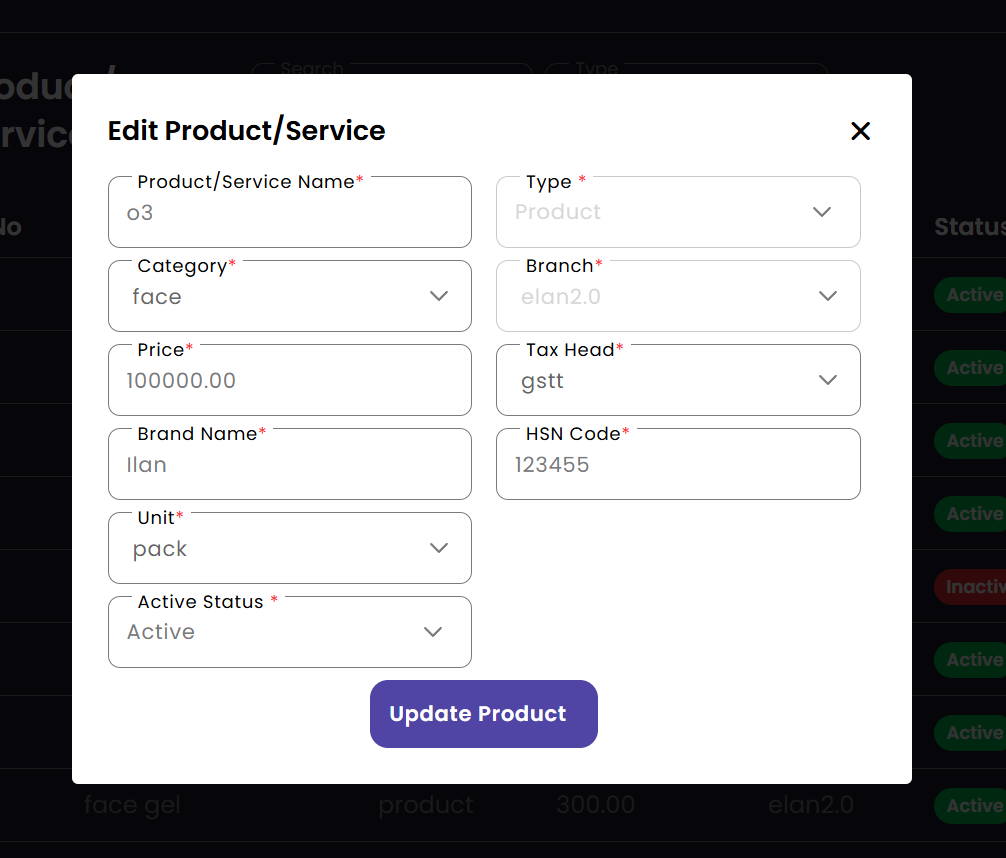
Update Product/Services
Delete Product/Service
Search Product/Service
Service Item Mapping Product/Service
|
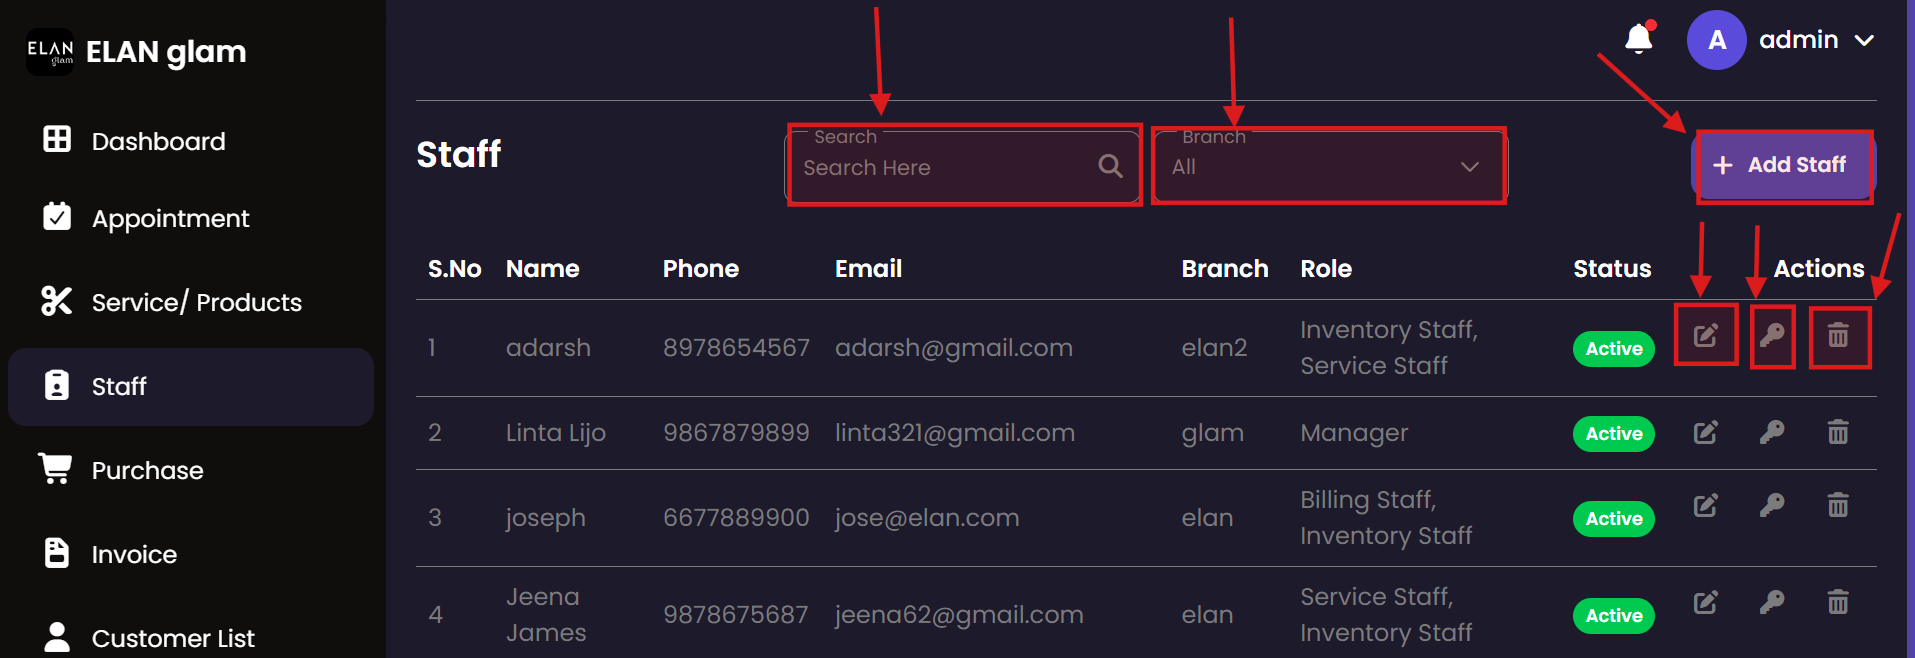
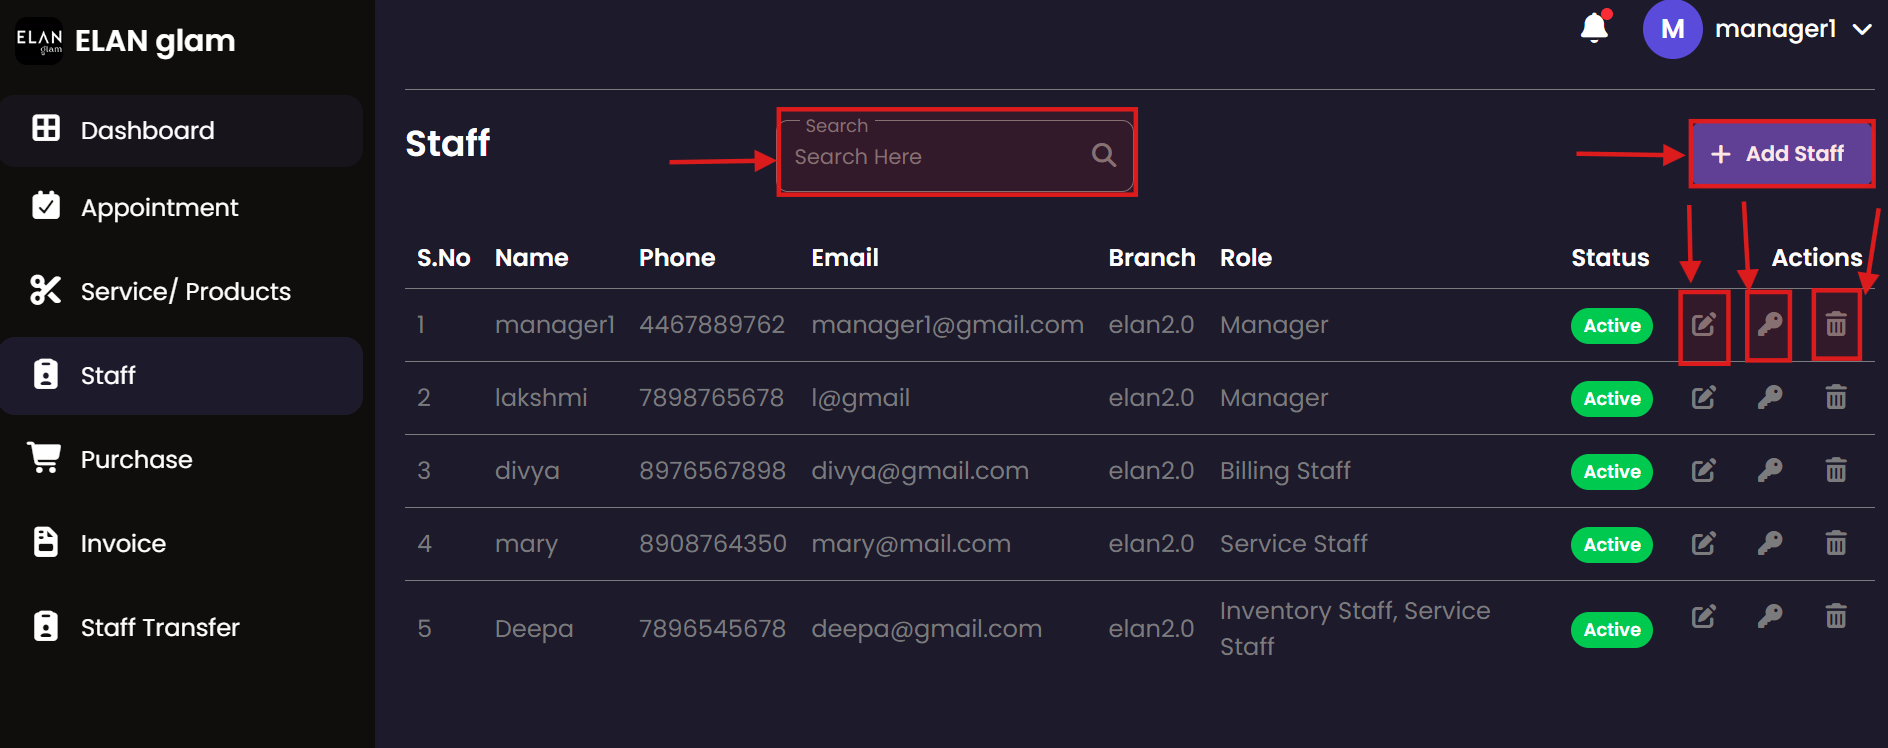
Staff
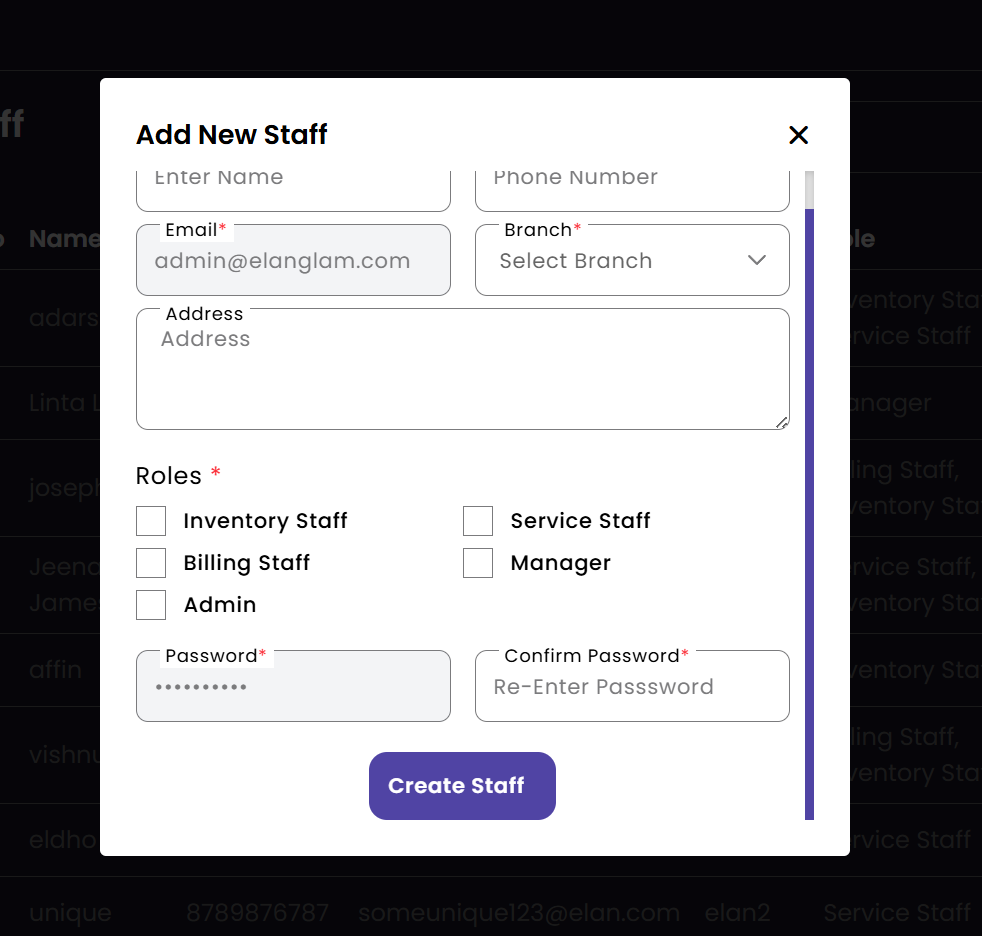
The Staff management portal allows you to maintain records for all employees. You can assign roles, manage login credentials, and ensure staff members are correctly placed within their respective branches.
Staff List
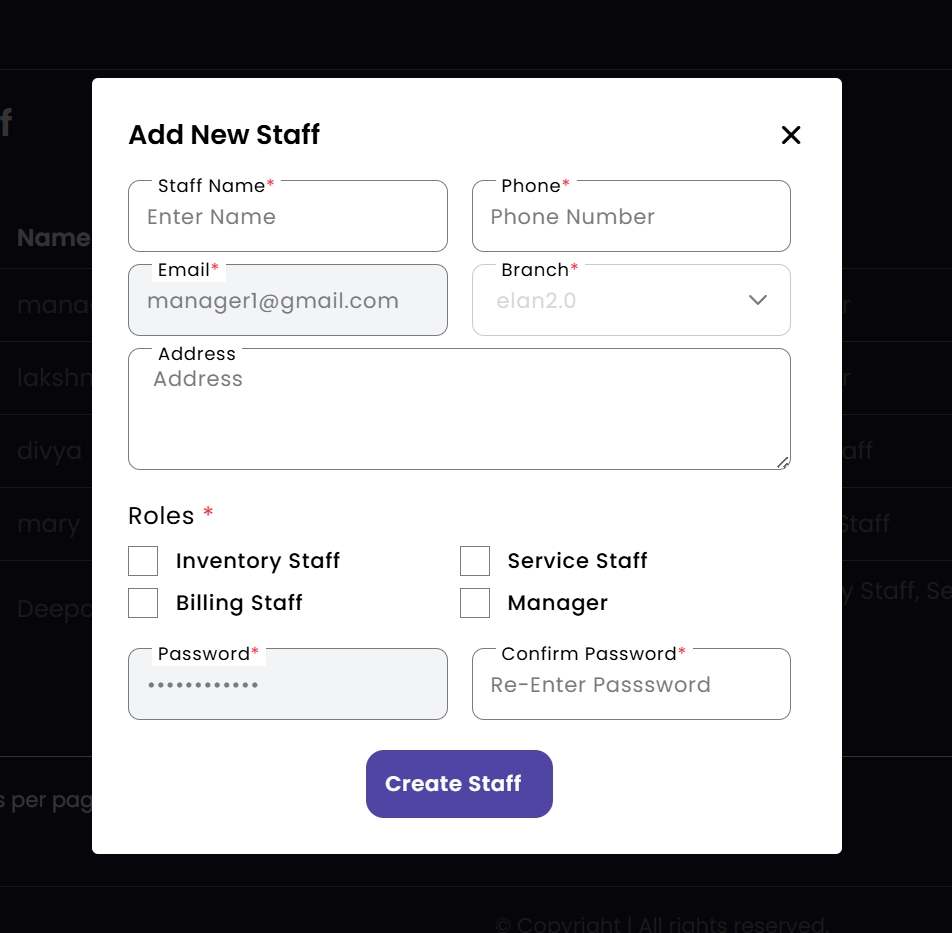
 Add New Staff
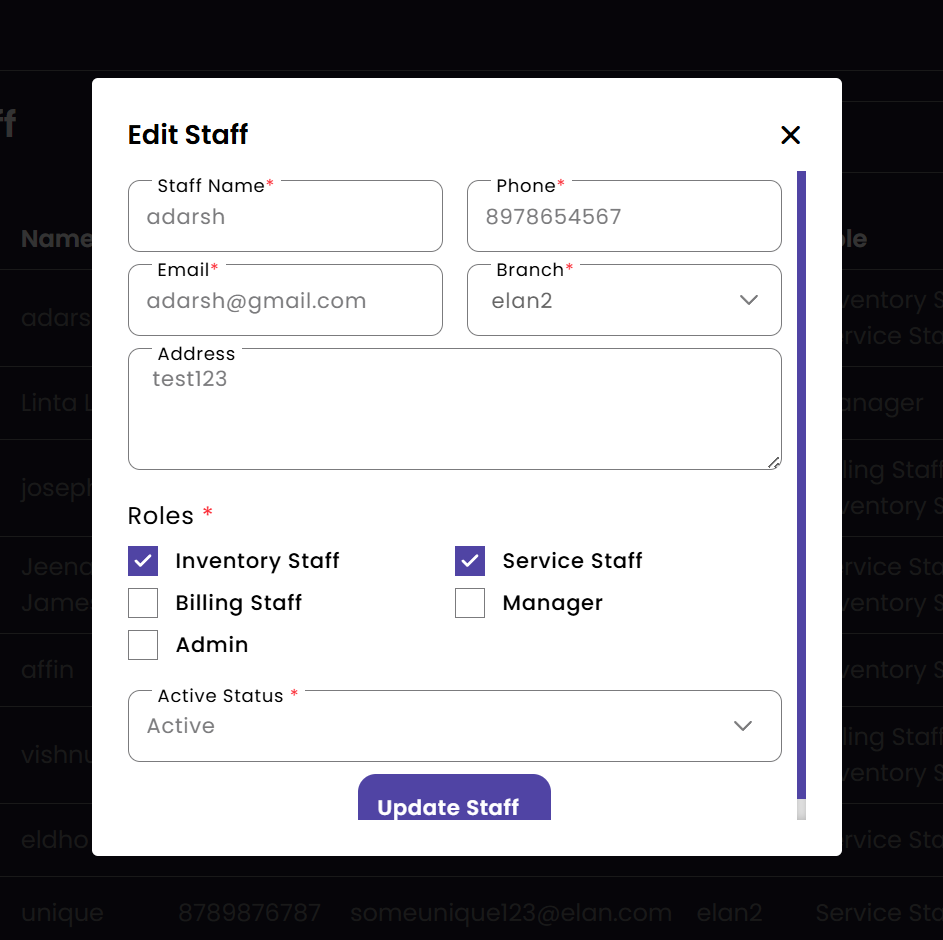
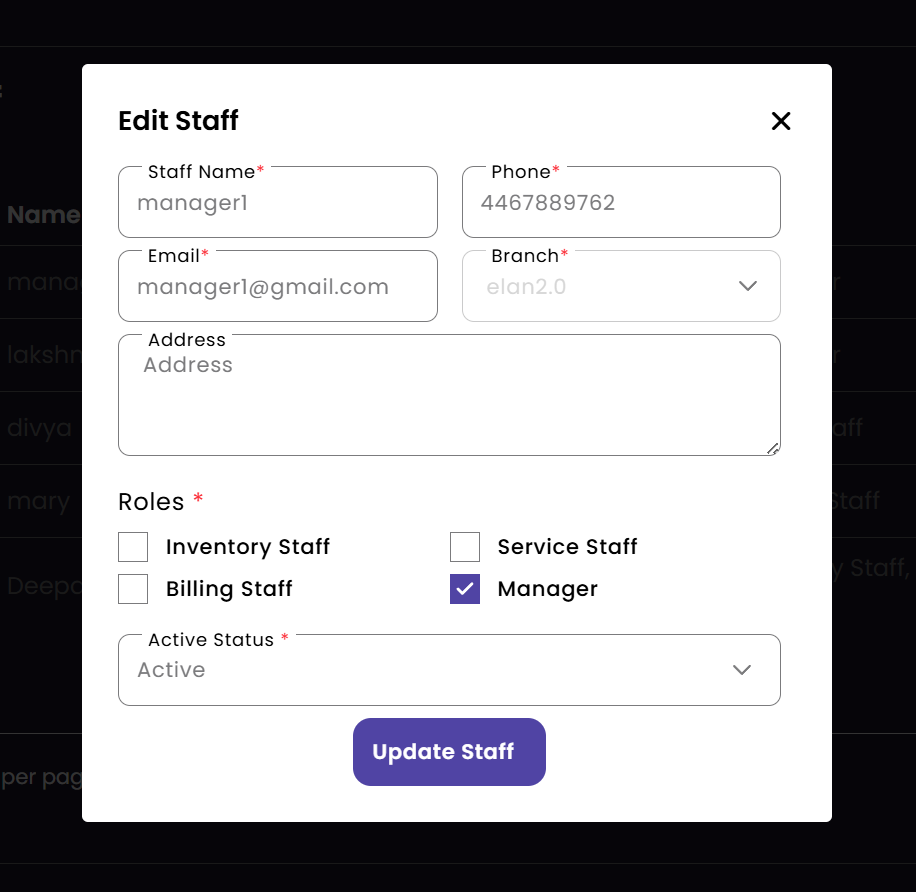
 Edit Staff Details
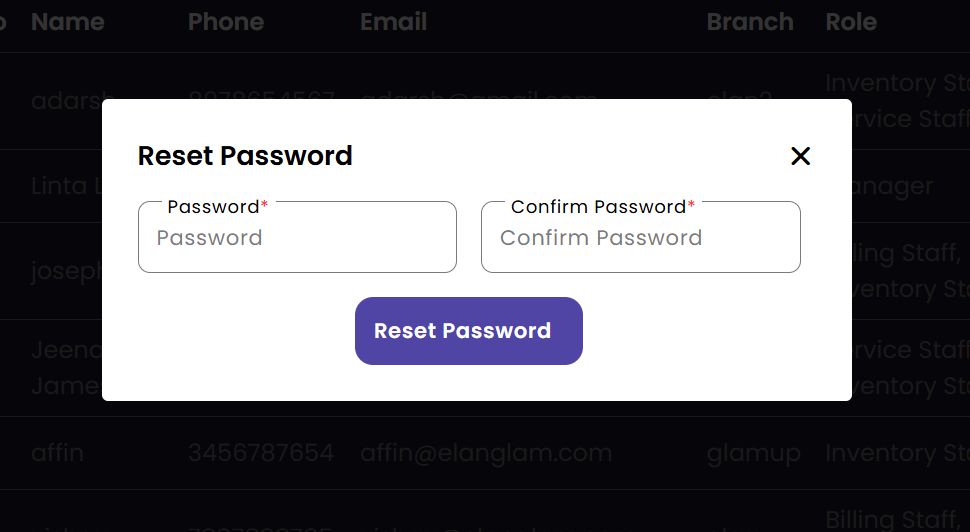
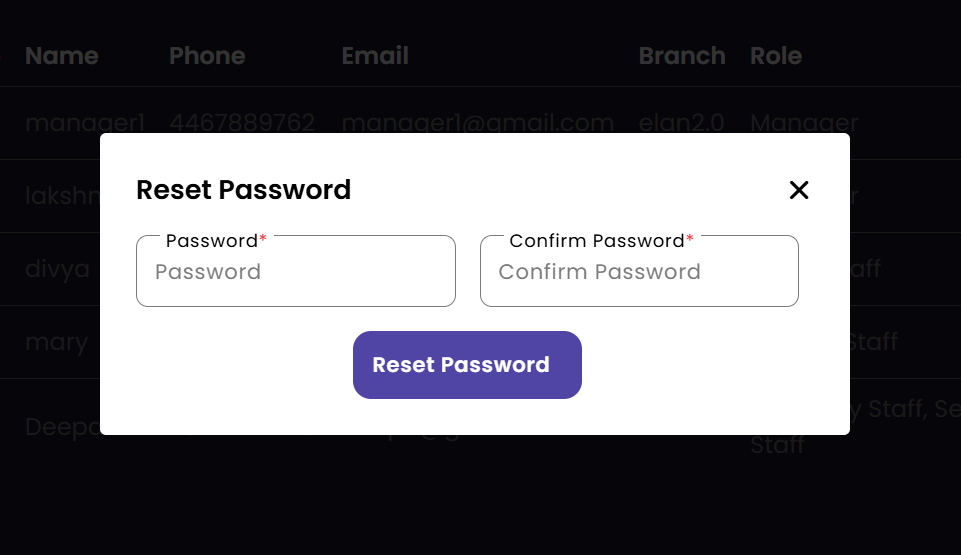
 Reset Password
|
Create Staff
Update Staff
Delete Staff
Search Staff
Staff Password
|
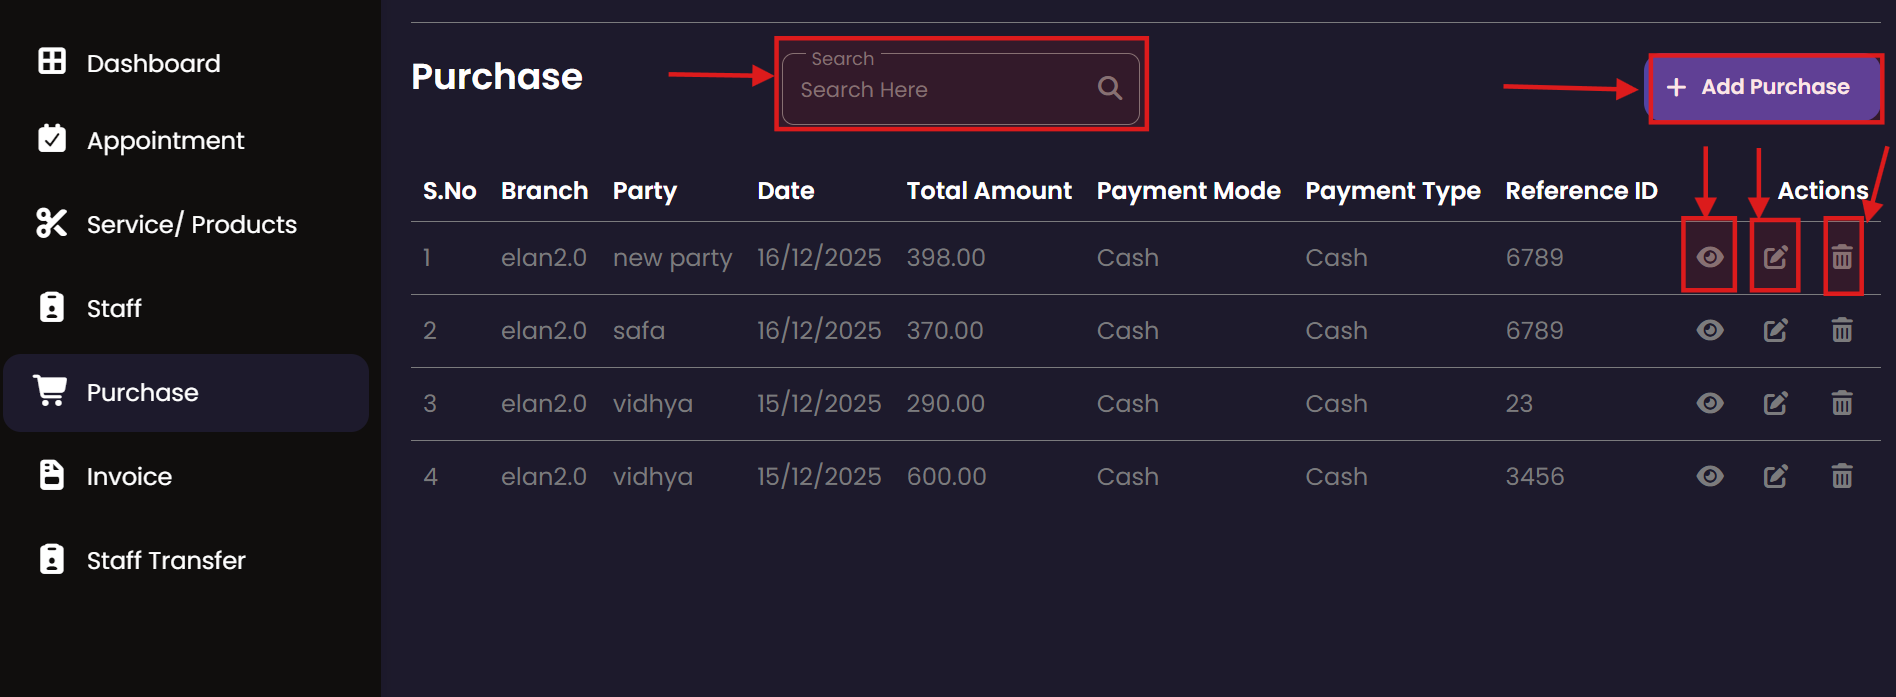
Purchase
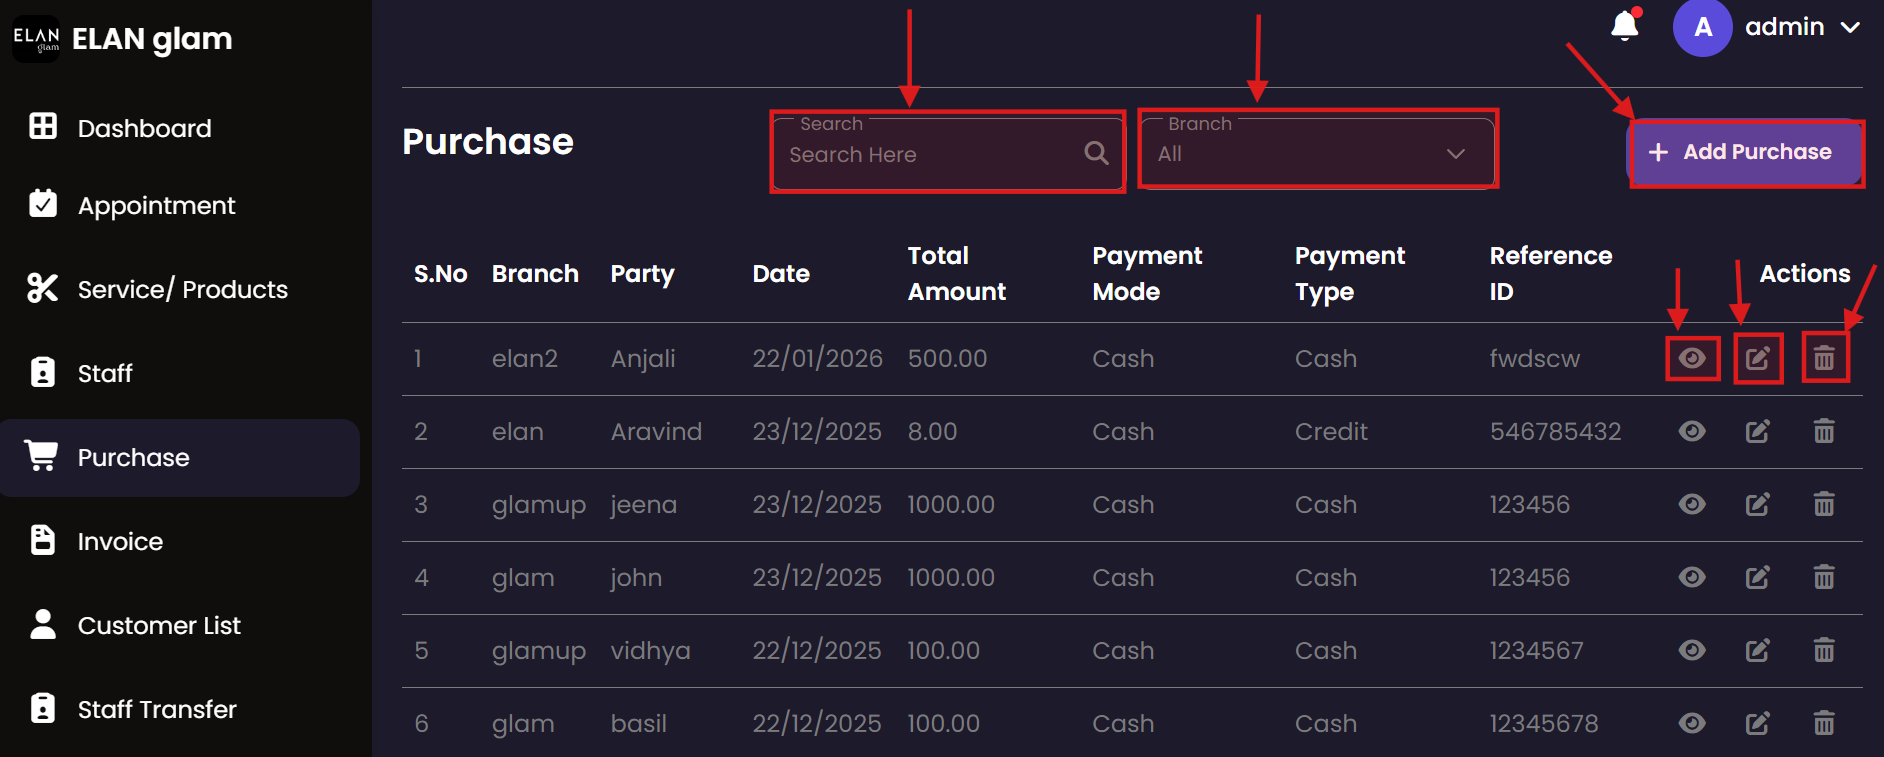
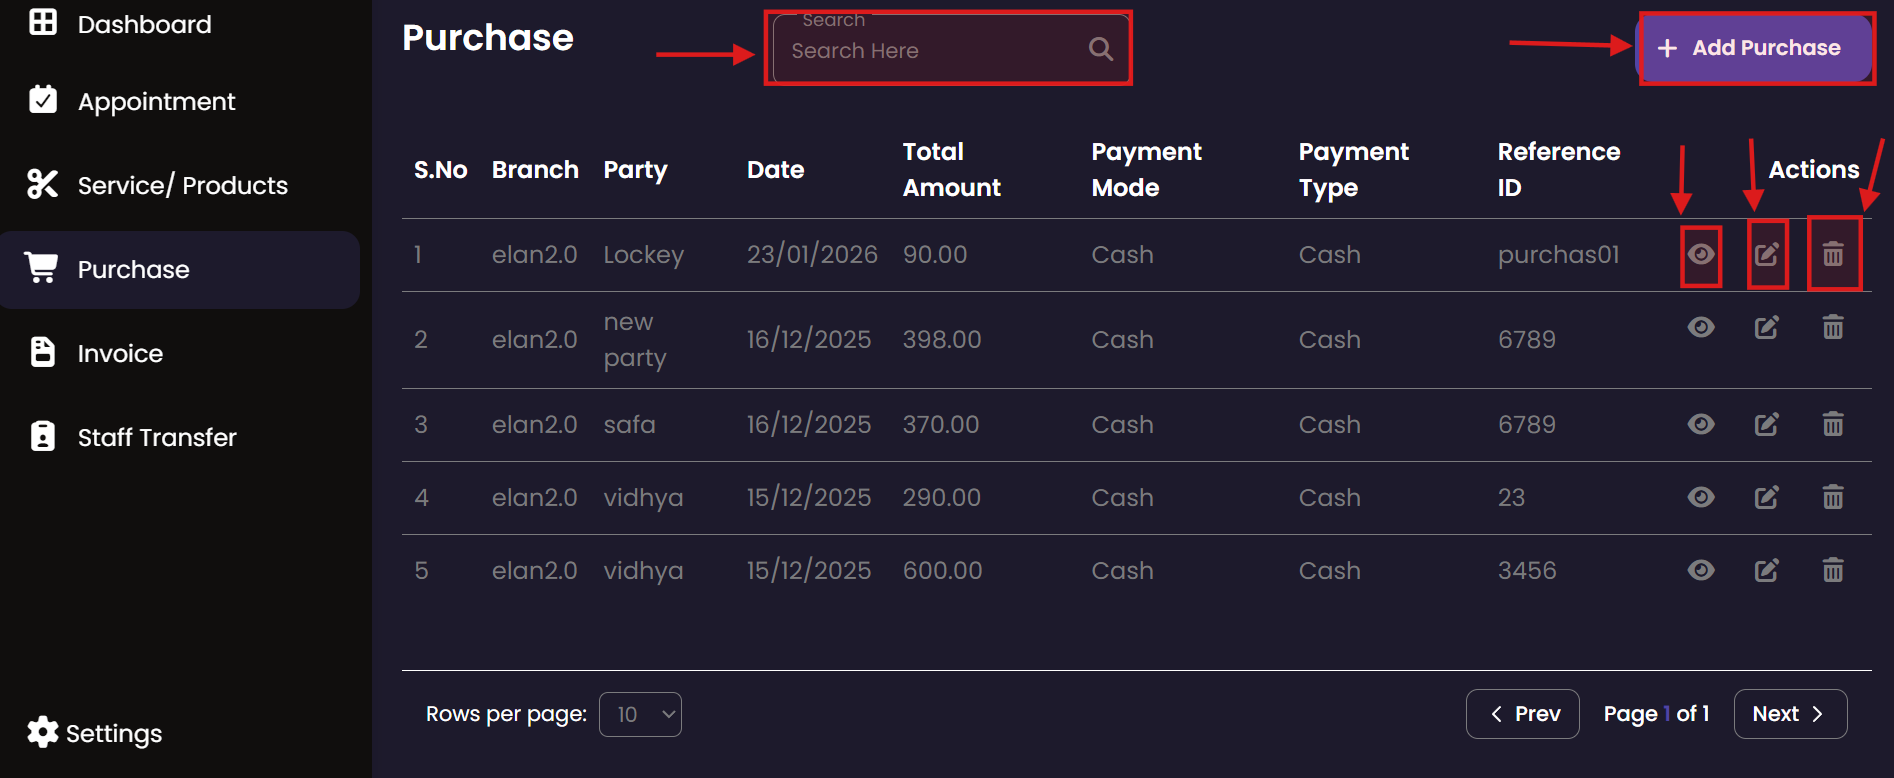
The Purchase module tracks all incoming inventory and supplies. It allows administrators to record stock acquisitions from various vendors, ensuring that the salon's inventory is always up-to-date and costs are properly logged.
Purchase Records
 New Purchase Entry
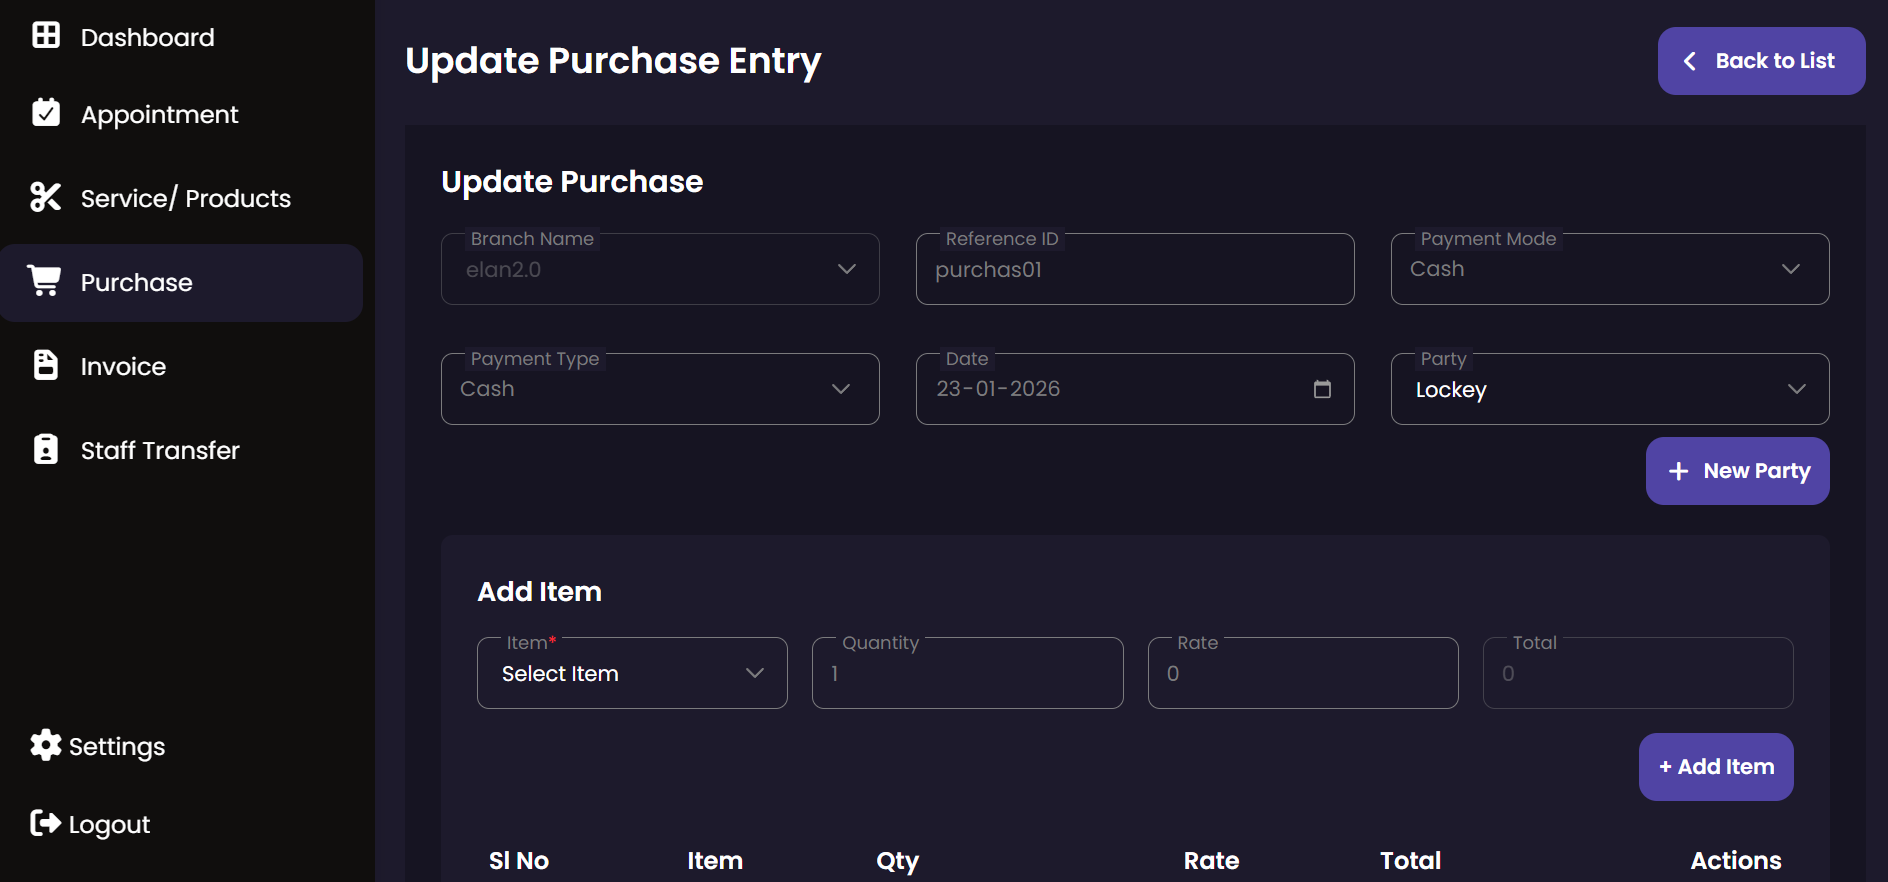
 Update Entry
 Purchase Details

|
Create Purchase
Update Purchase
Delete Purchase
View Purchase
Search Purchase
|
Invoice
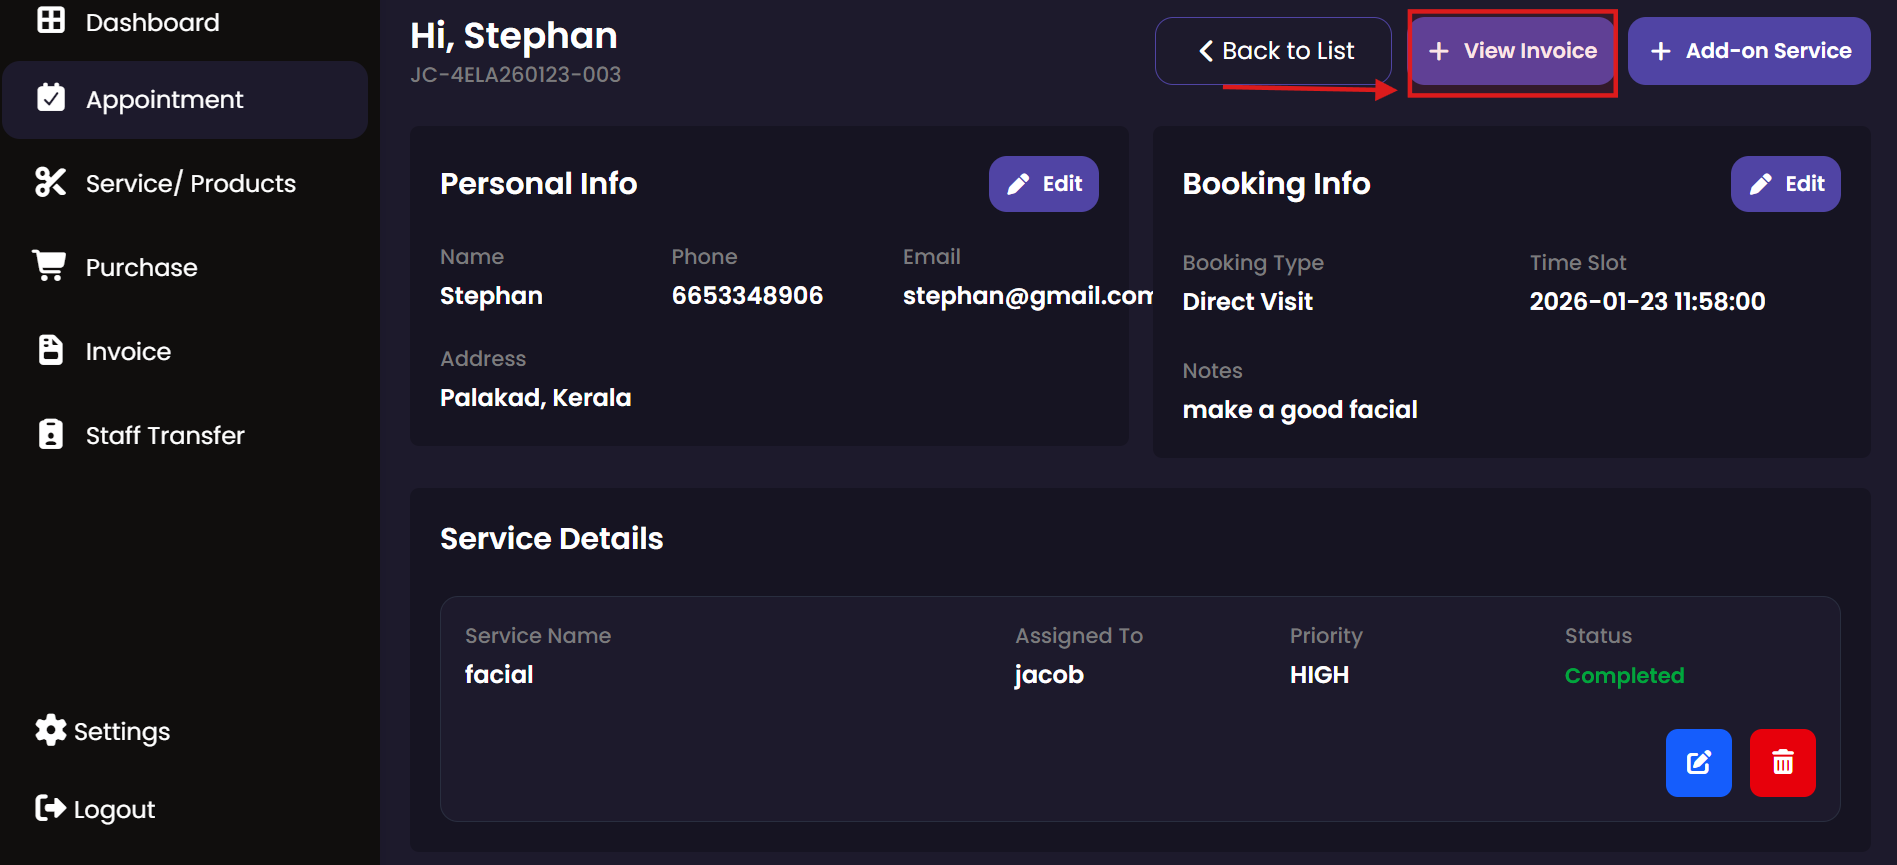
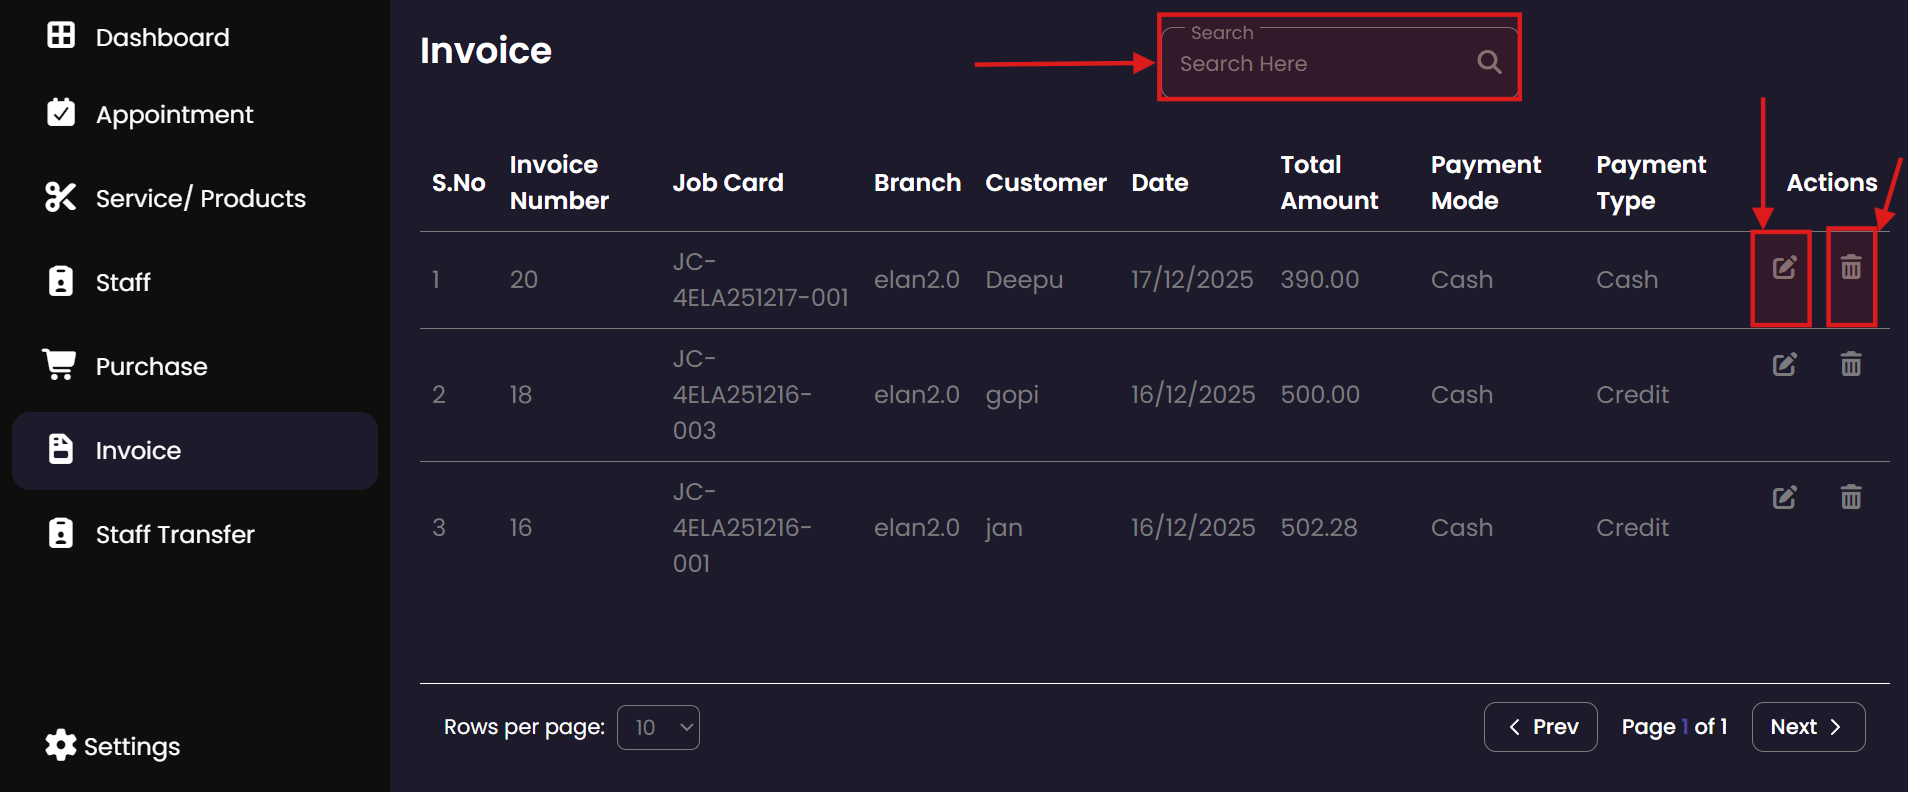
The Invoice section handles all billing activities. Administrators can generate professional invoices for completed services, manage discounts, and print physical receipts for customers. This ensures financial accuracy and transparency.
Invoice Generation
 Invoice Details
 Summary View
 Invoice List
|
Invoice
Generate invoice of the appointment
Print Invoice
Update Invoice
Delete Invoice
Search Invoice
|
Customer
Maintain a complete database of your clientele. The Customer module allows you to track visit history, manage contact information, and review past service engagements to provide personalized care.
Customer Directory
 Appointment History

|
Customer
View Customer Appointment
Delete Customer
Search Customer
|
Staff Transfer
Manage employee movement between different salon locations. The Staff Transfer module facilitates the temporary or permanent assignment of staff members to different branches based on operational needs.
|
Staff Transfer List
|
Create Staff Transfer
Accept/ Reject Staff Transfer
Search Staff Transfer
|
Units
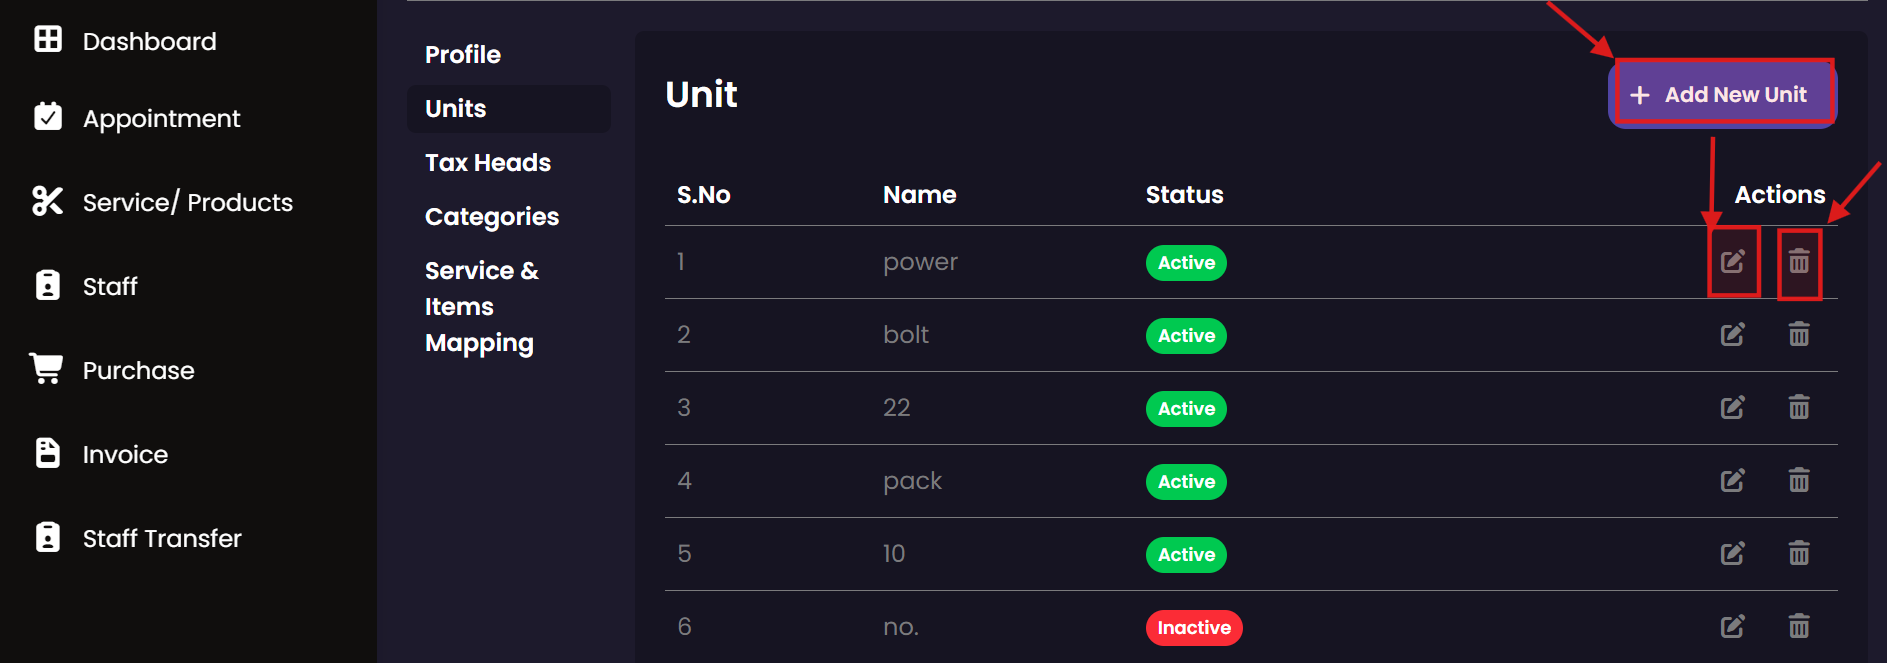
Define the units of measurement used for products and services. Set up standard units like 'ml', 'pcs', or 'sessions' to ensure consistent stock tracking and service billing across all branches.
Units List
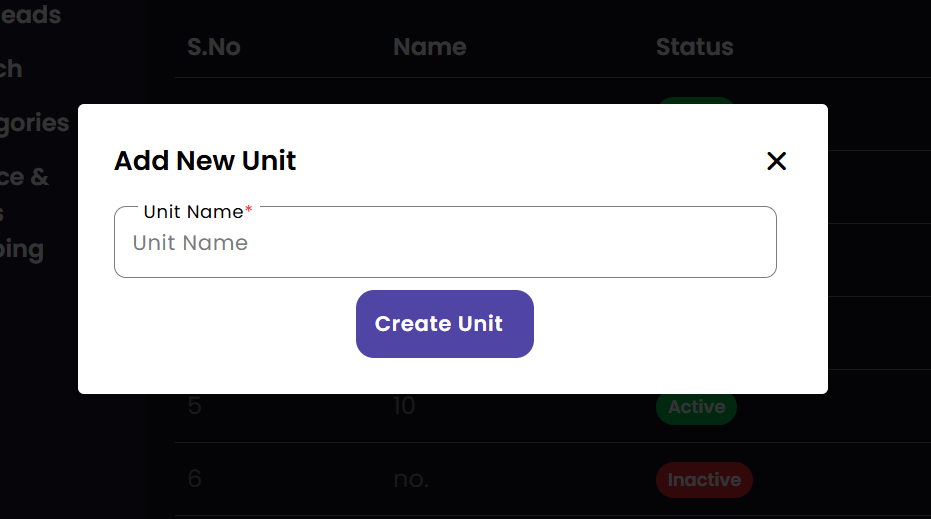
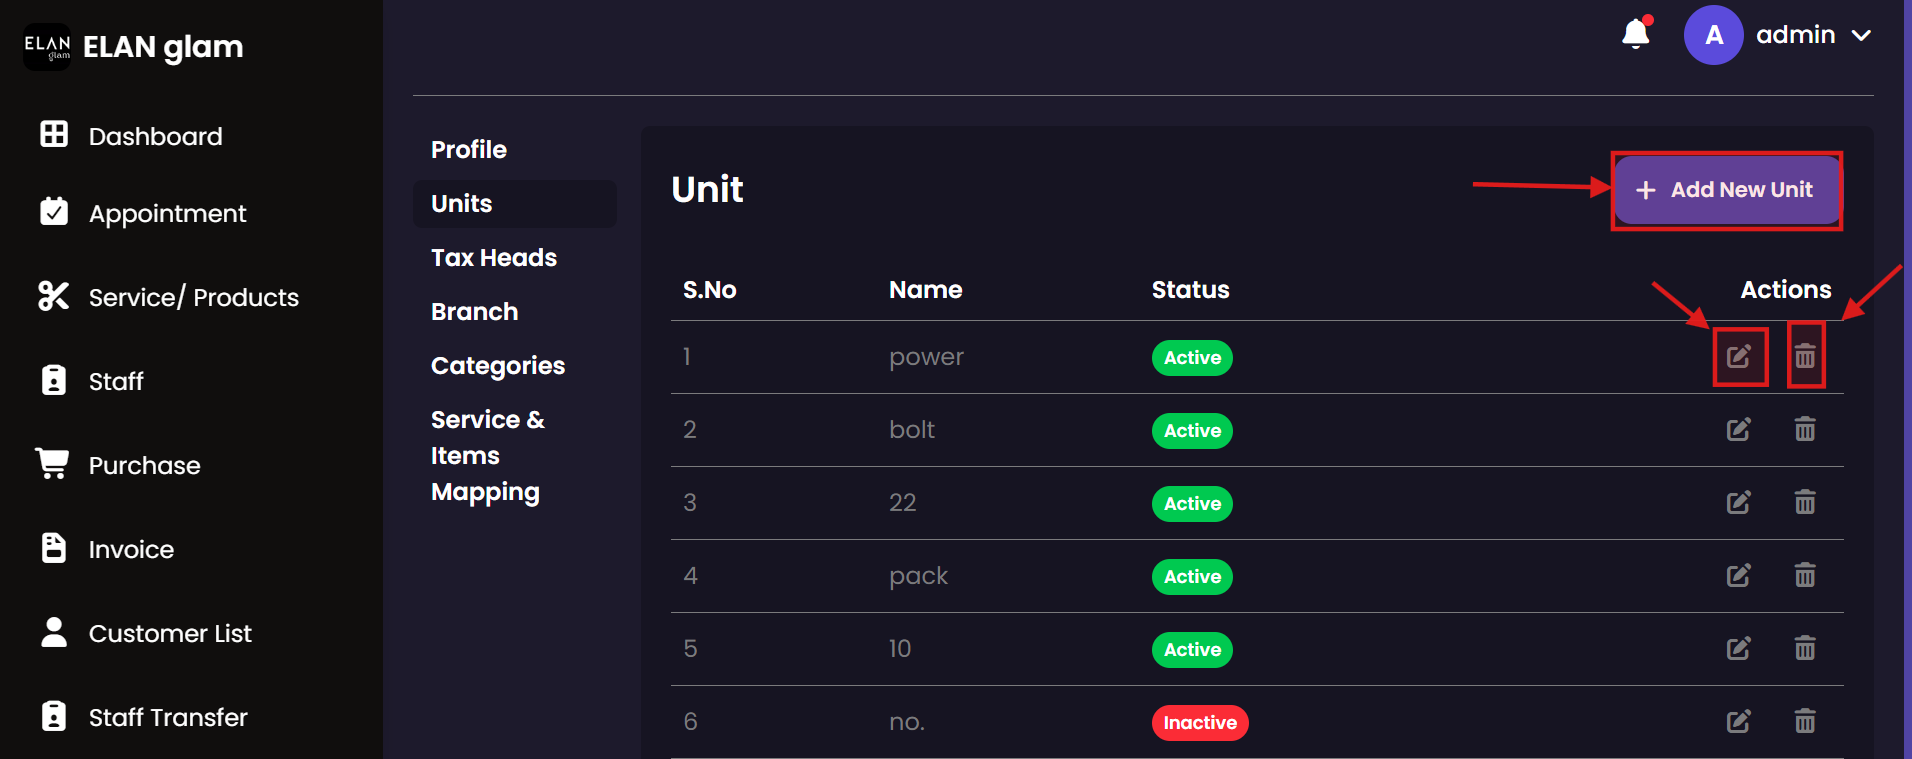 New Unit
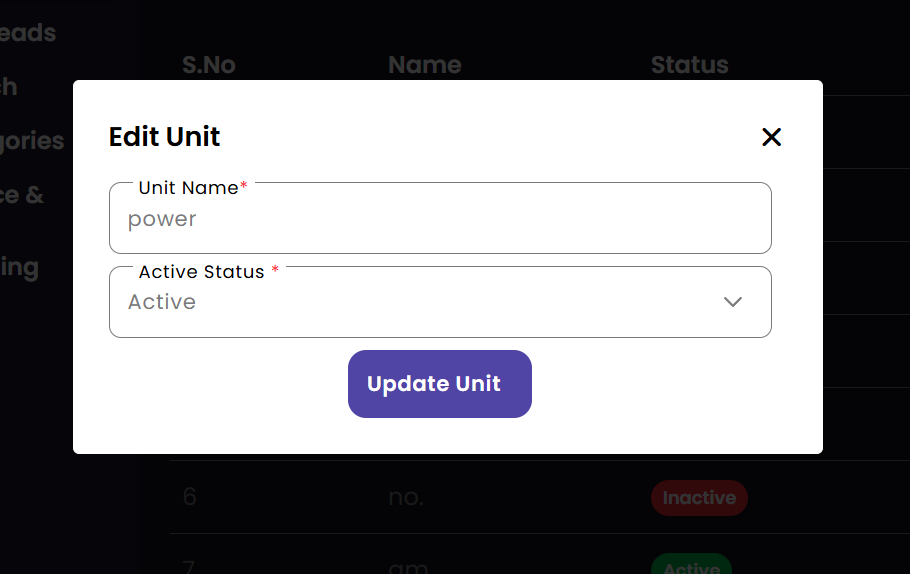
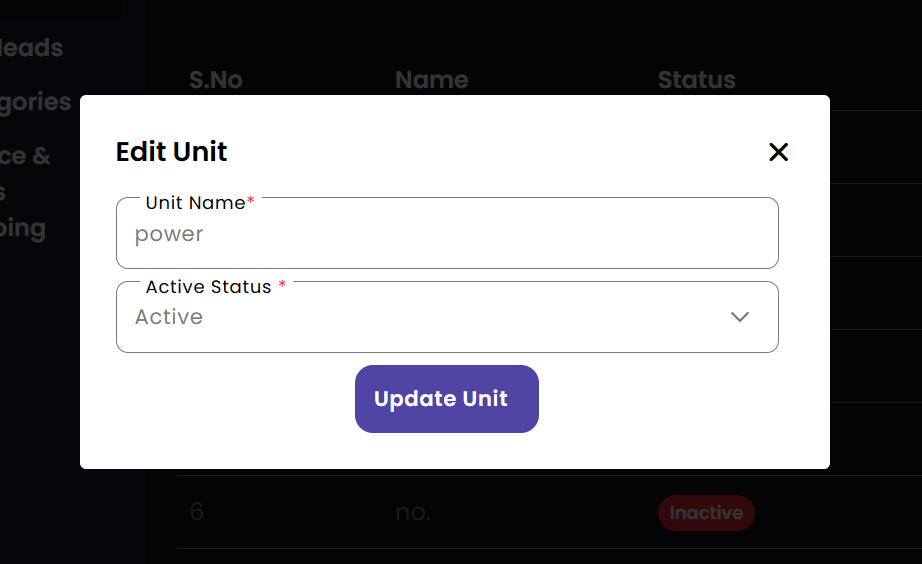
 Update Unit
|
Create Unit
Update Unit
Delete Unit
|
Tax Head
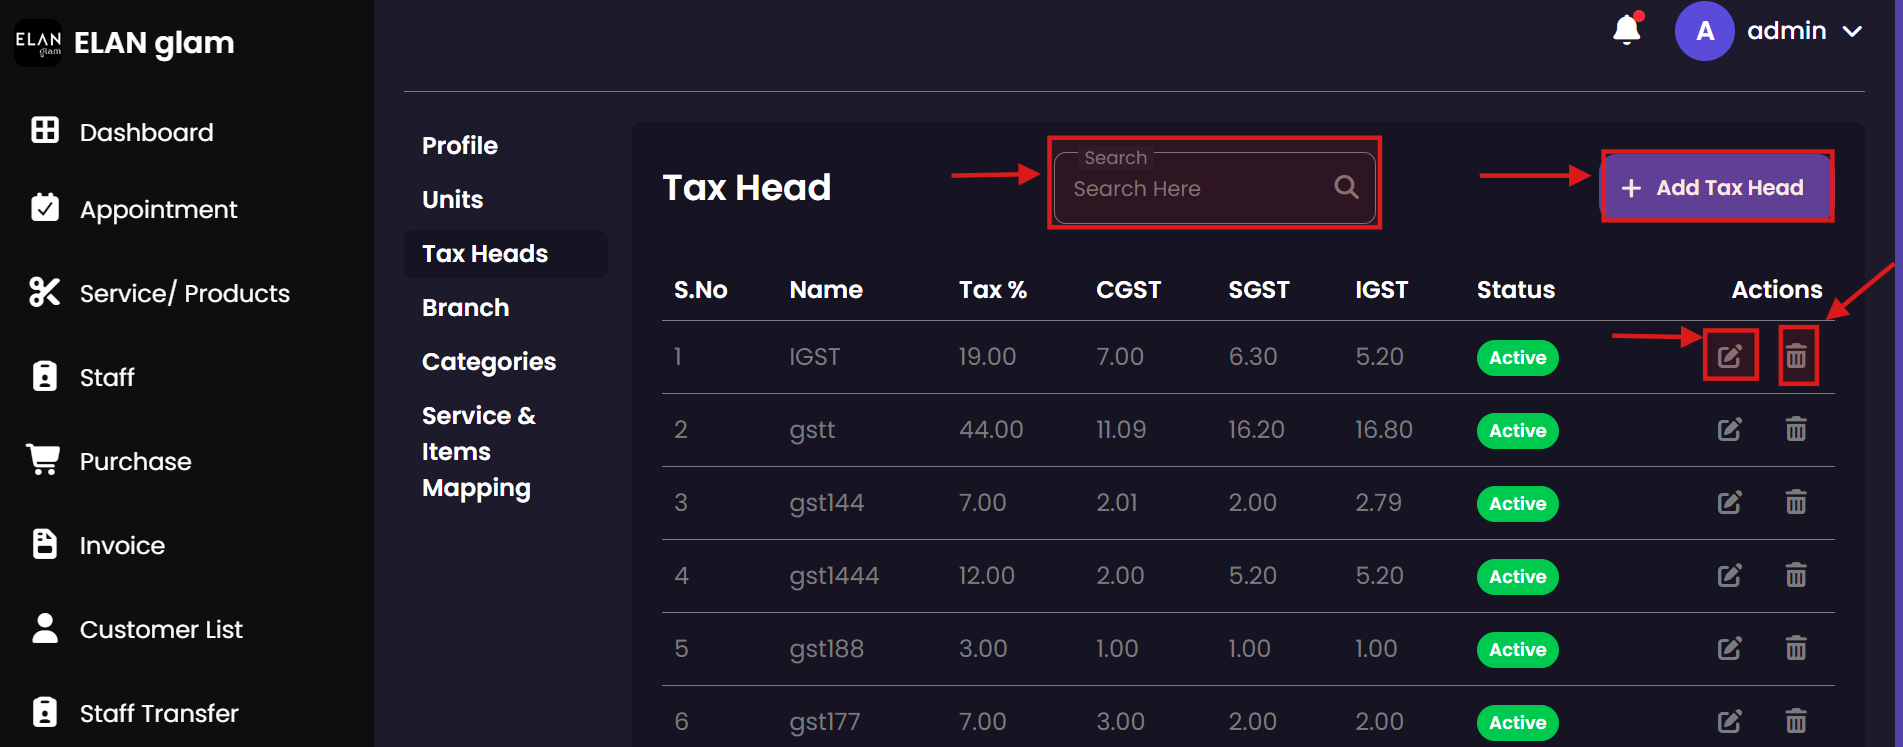
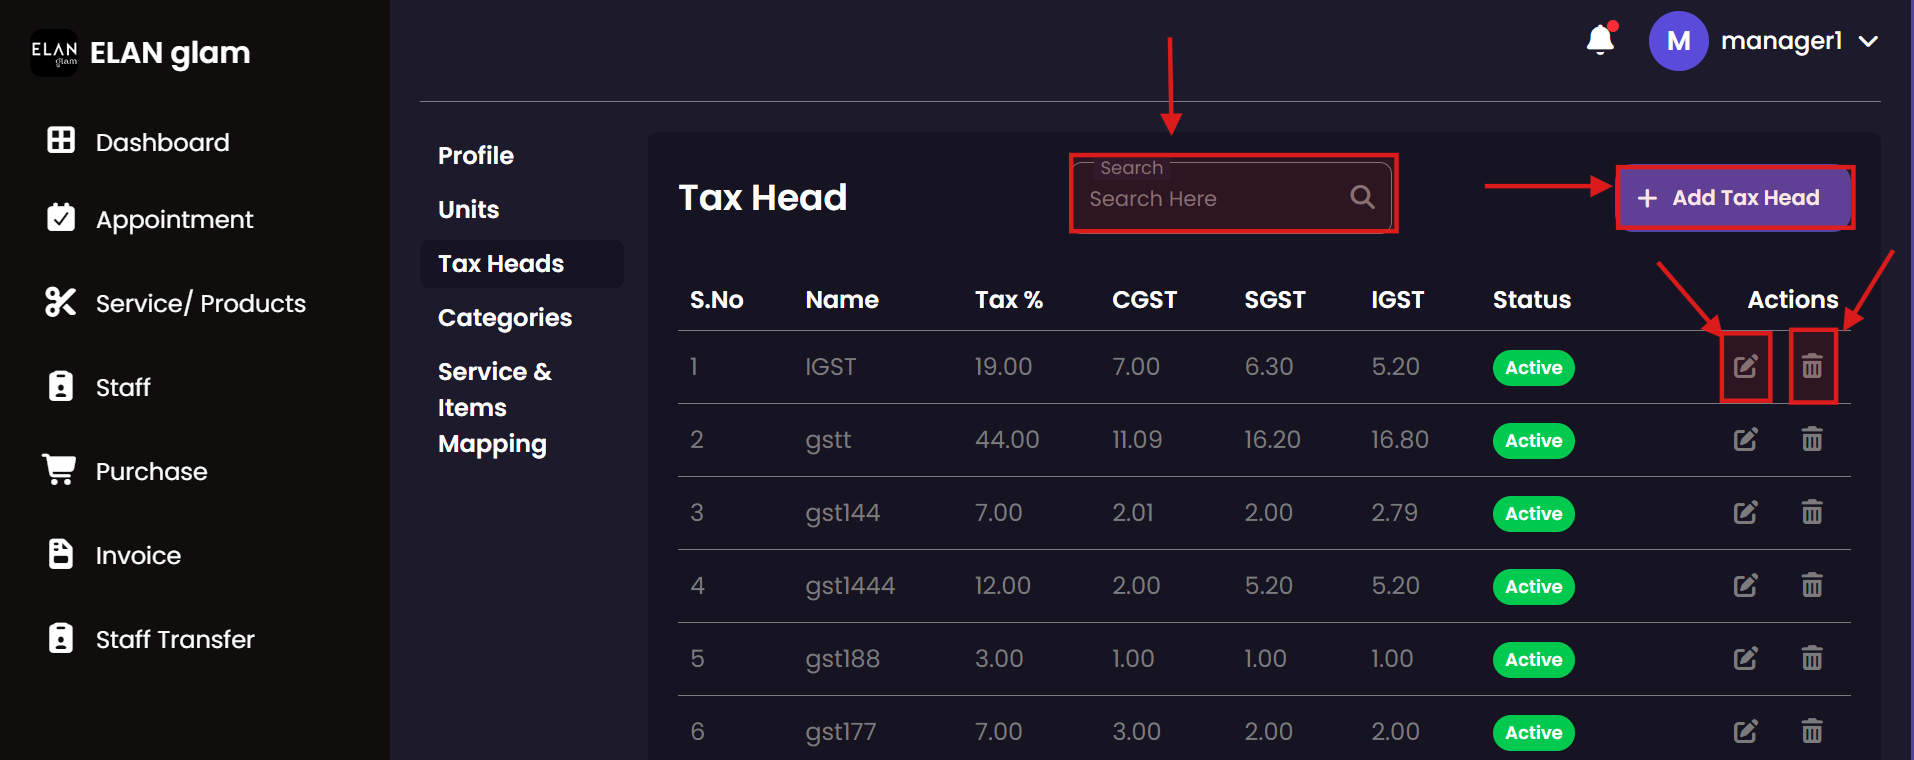
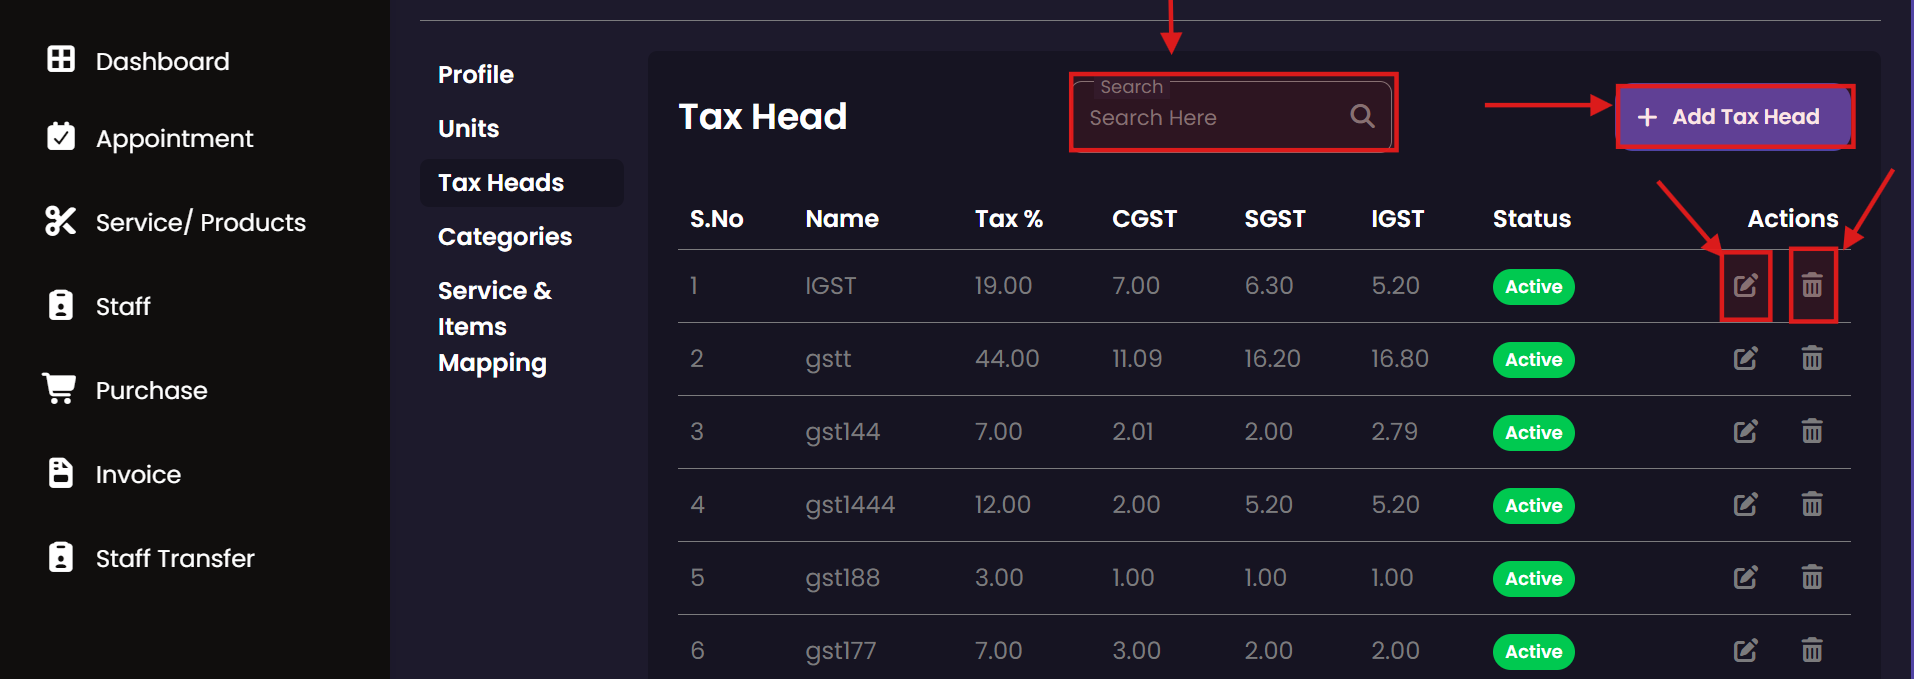
Configure tax structures for different categories of products and services. Administrators can define various tax heads (e.g., VAT, Service Tax) to comply with local financial regulations and ensure accurate invoicing.
Tax Heads
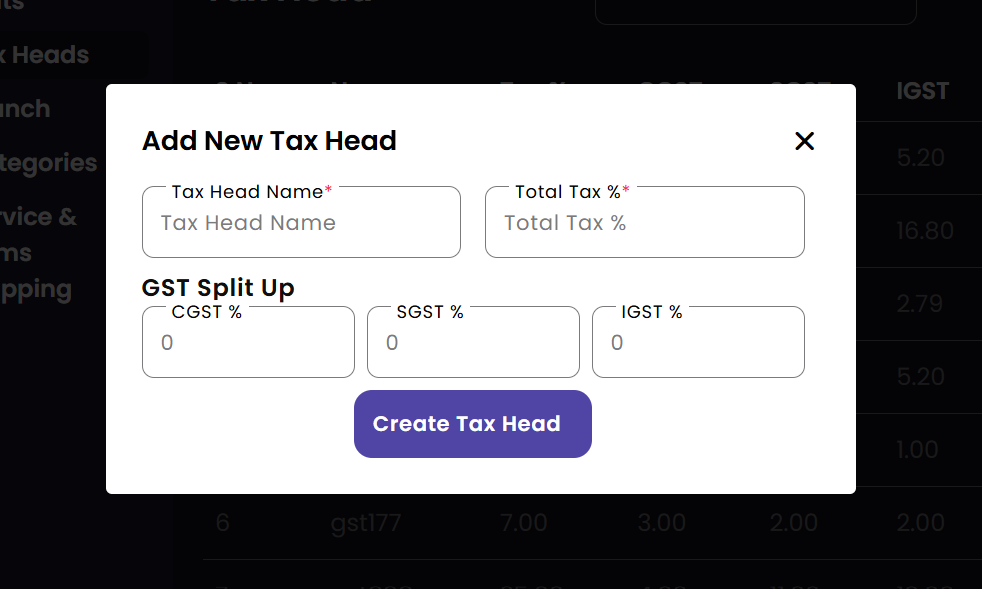
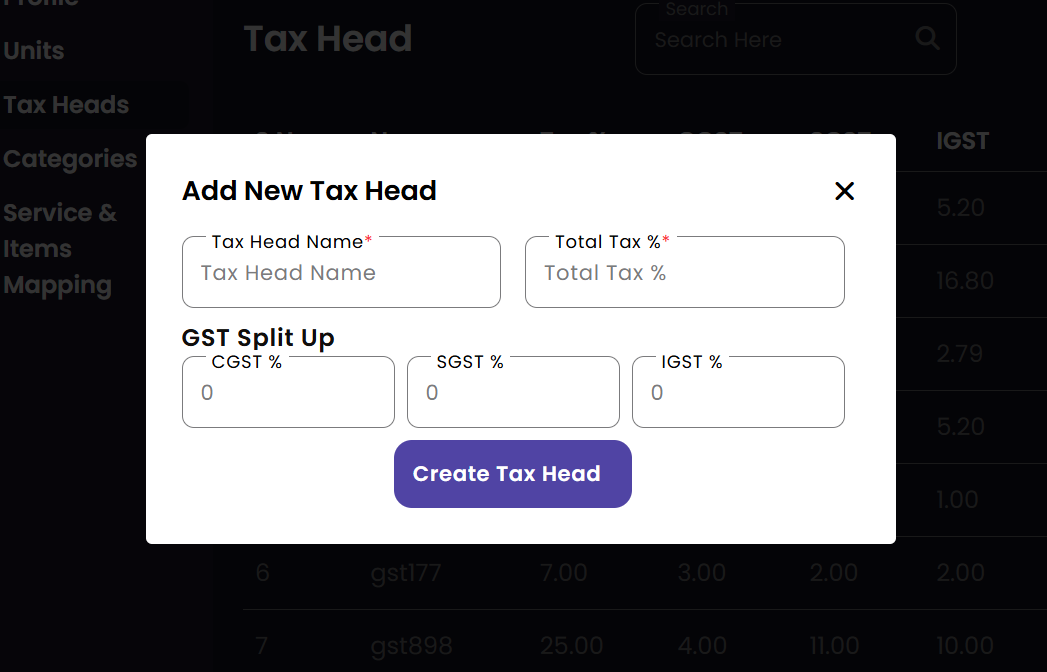
 Create Tax Head
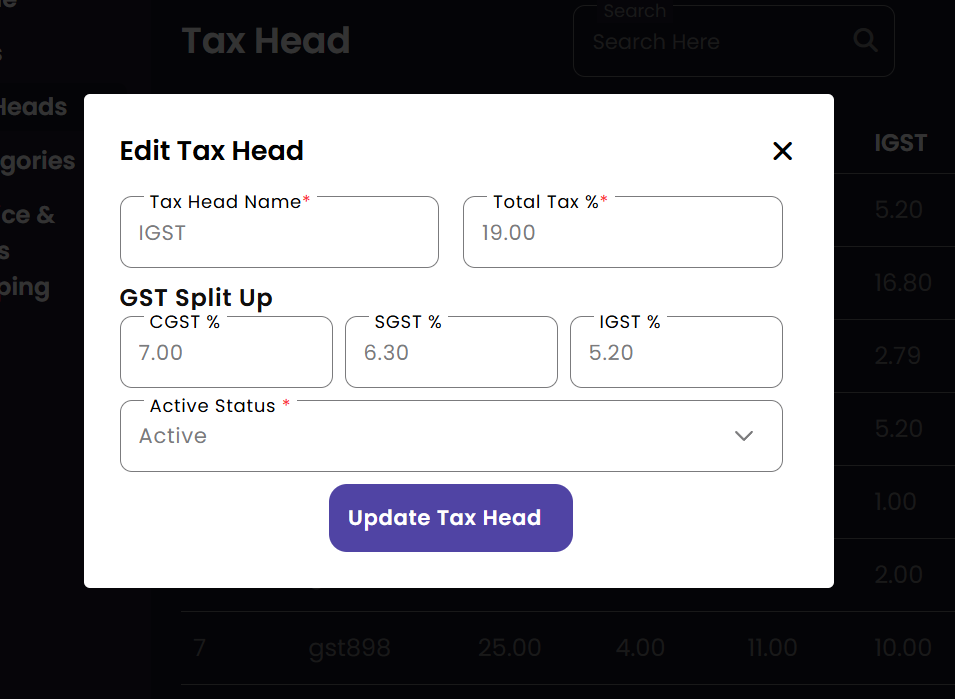
 Update Tax Head

|
Create Tax Head
Update Tax Head
Delete Tax Head
Search Tax Head
|
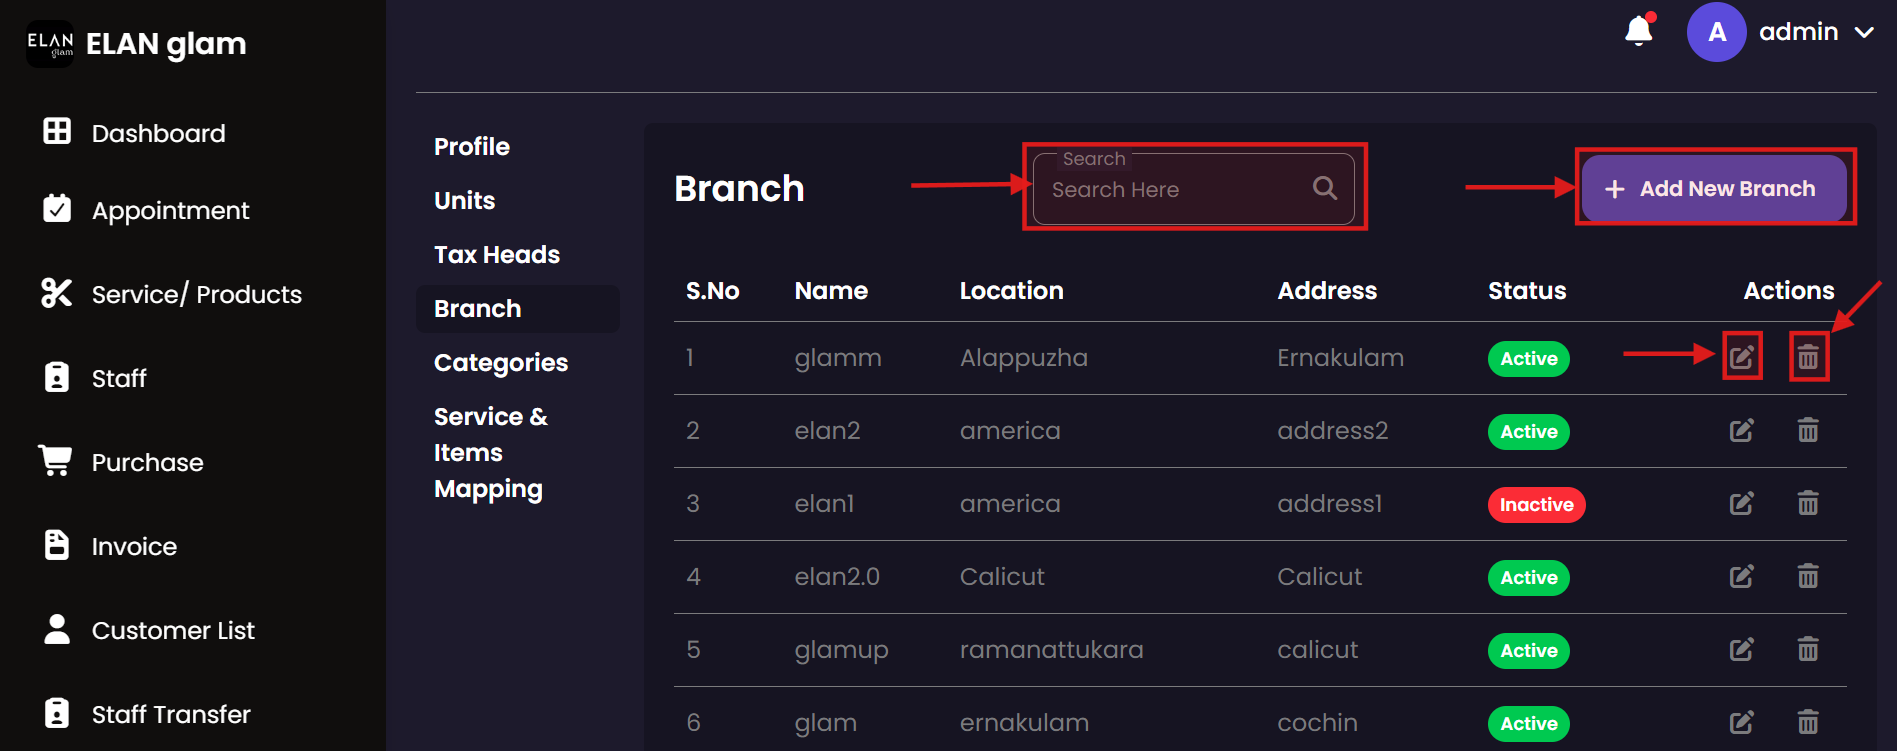
Branch
Manage and configure different salon locations. Add new branches, update contact details, and view the entire organizational structure from this centralized management interface.
Branch List
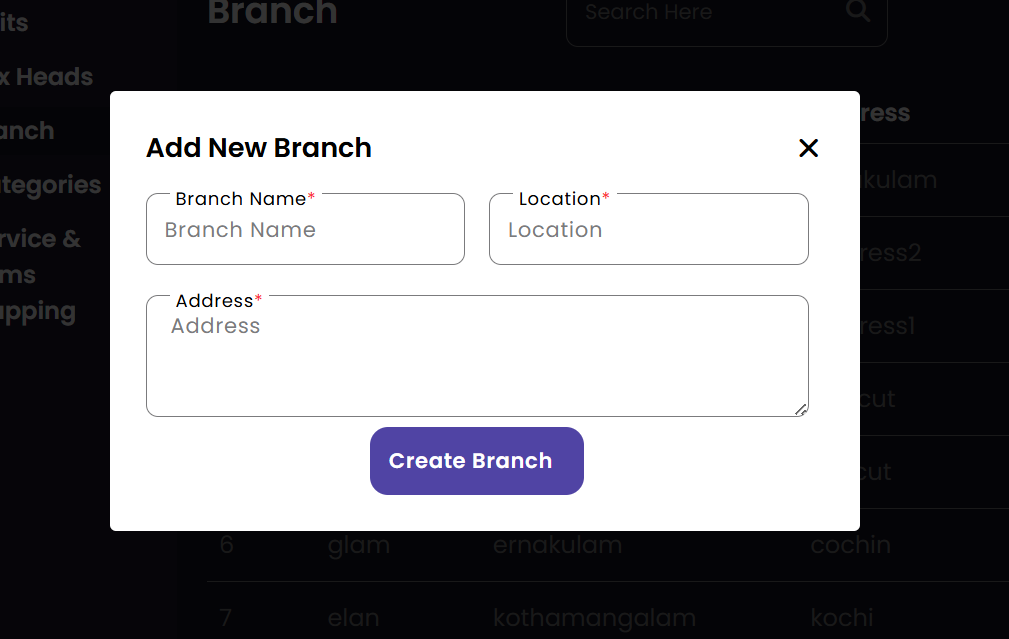
 Create Branch
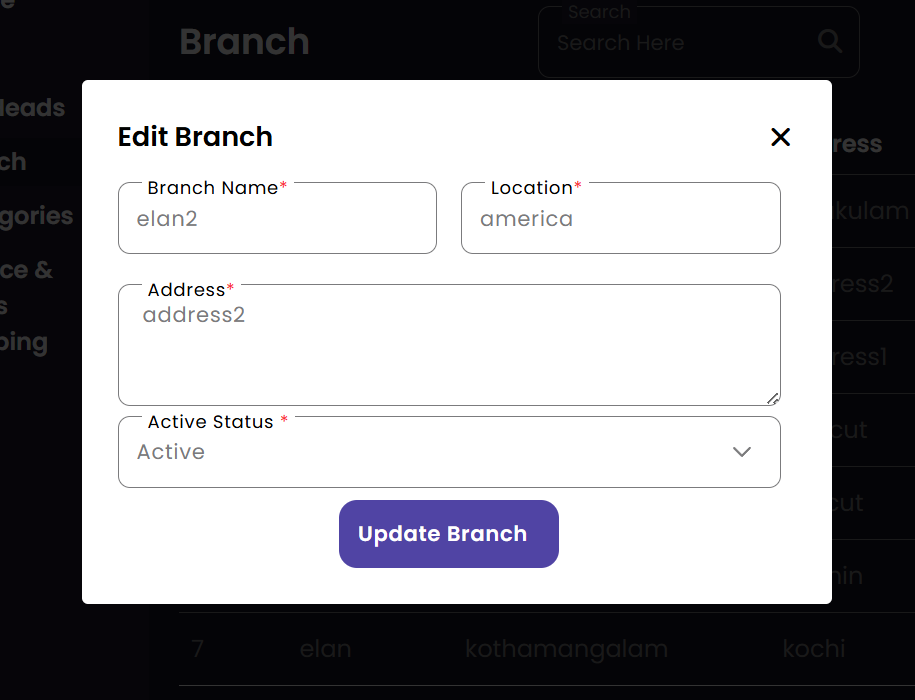
 Update Branch
|
Create Branch
Update Branch
Delete Branch
Search Branch
|
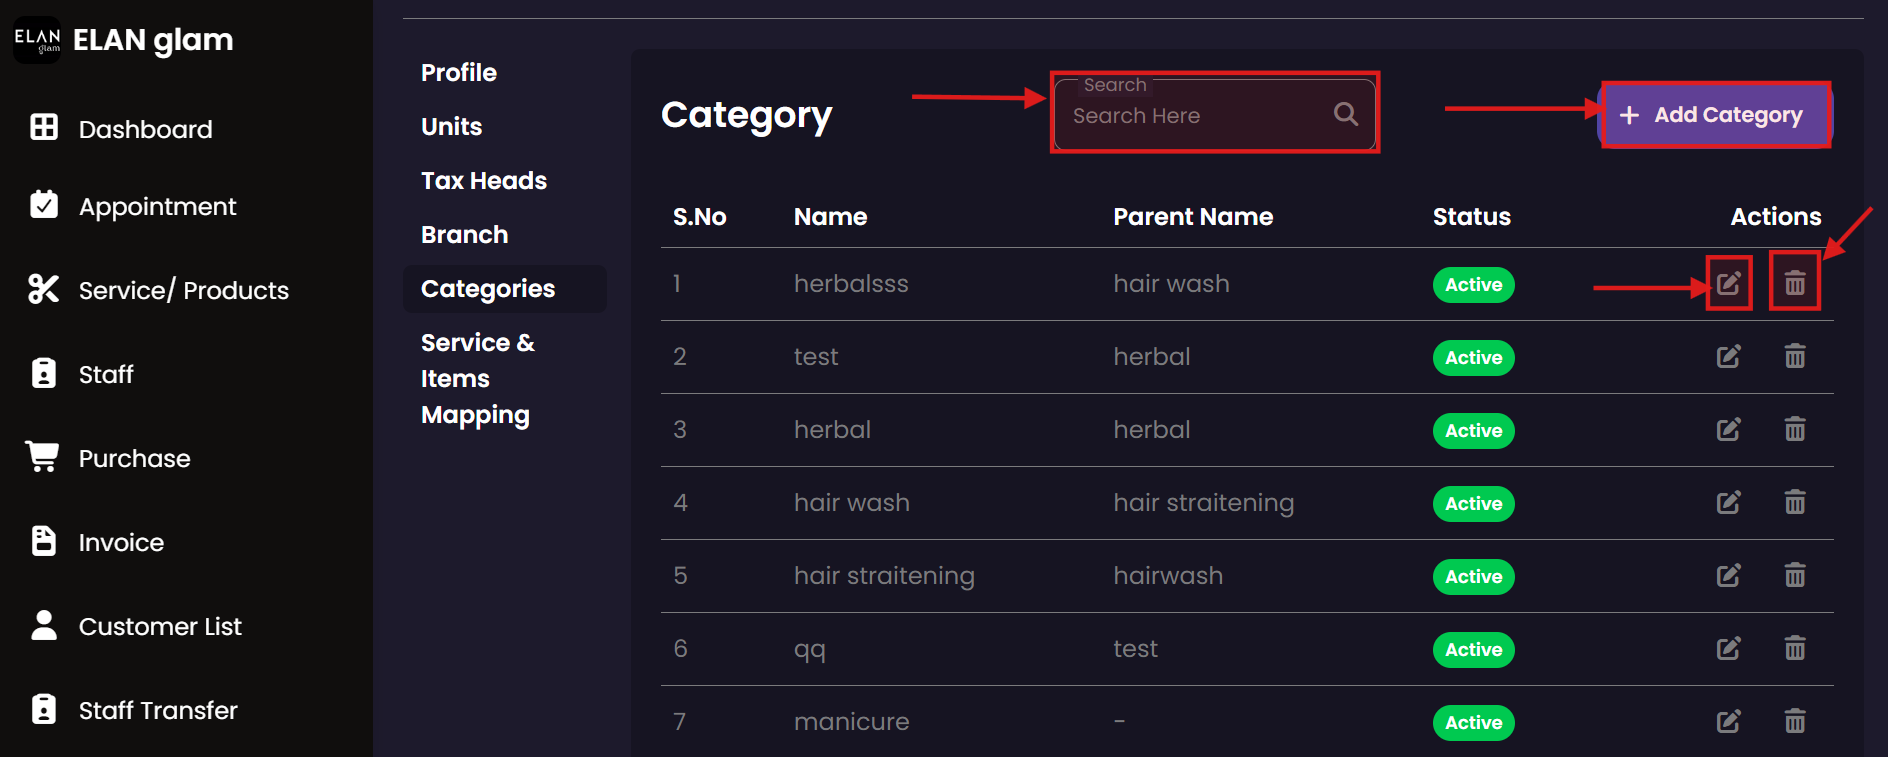
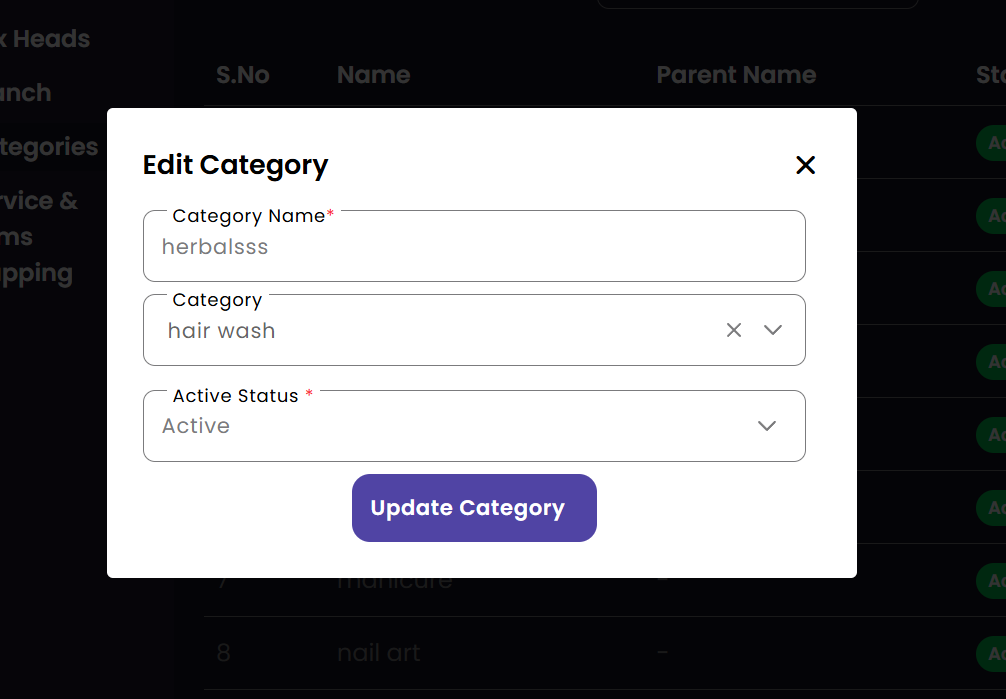
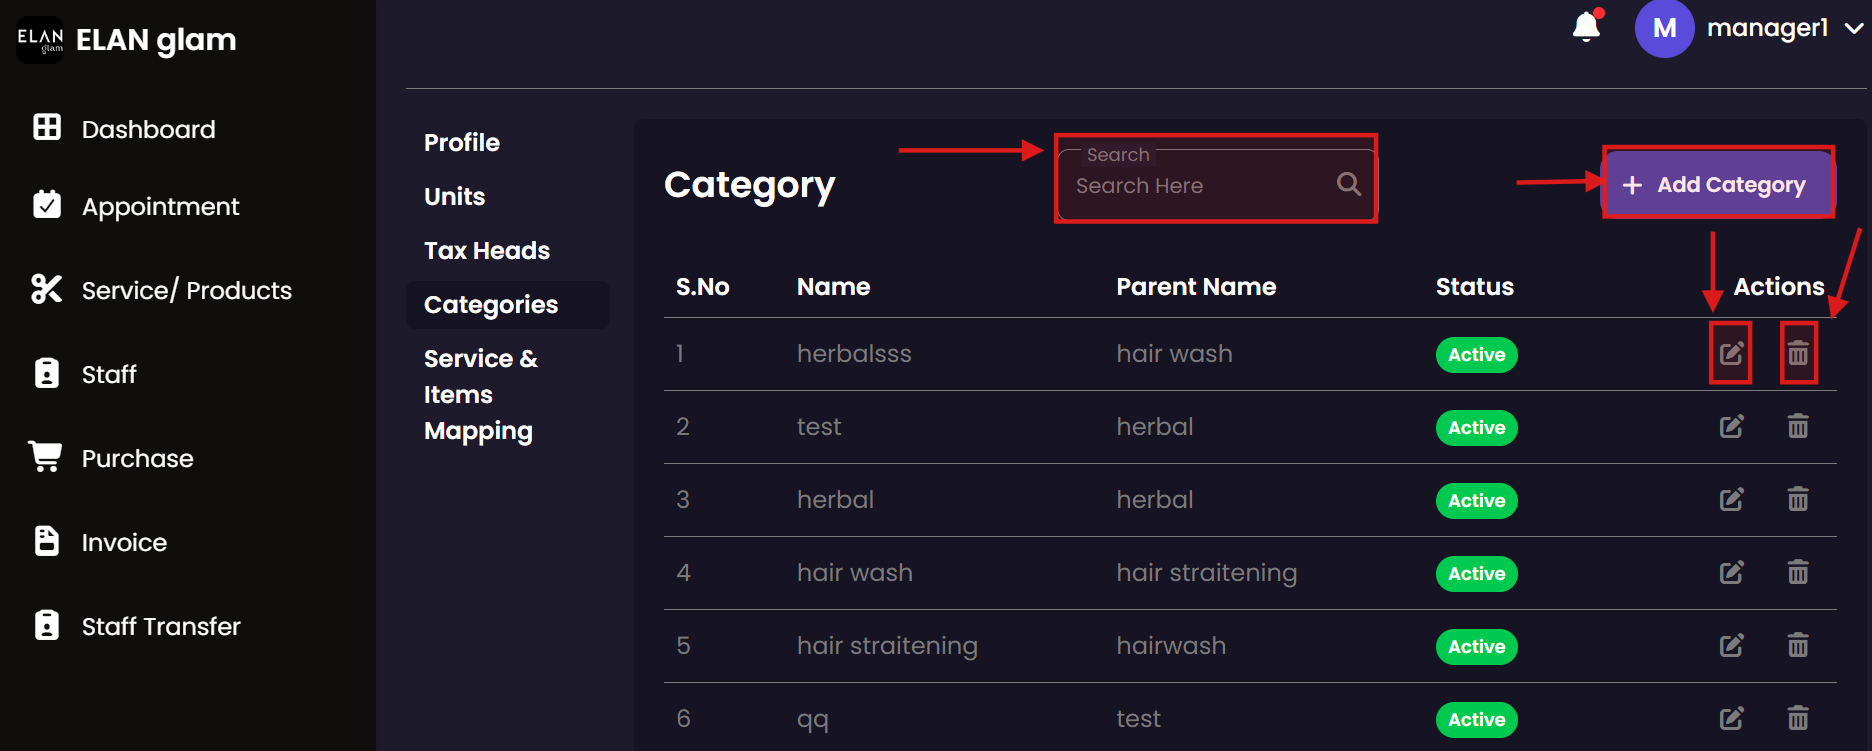
Category
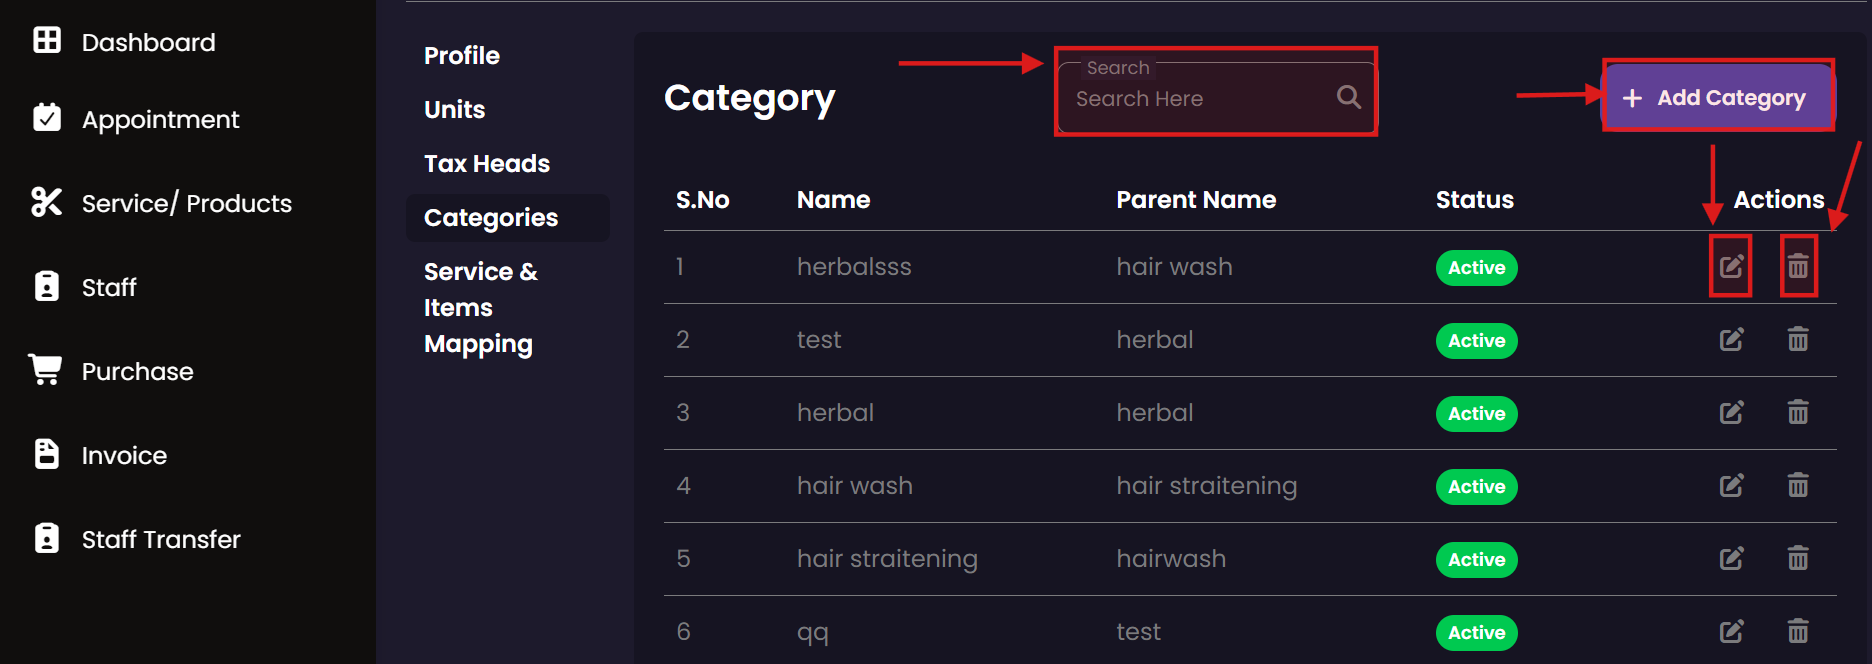
Organize products and services into meaningful groups. Proper categorization helps in better reporting, easier searchability, and structured management of the salon's extensive service menu.
Categories
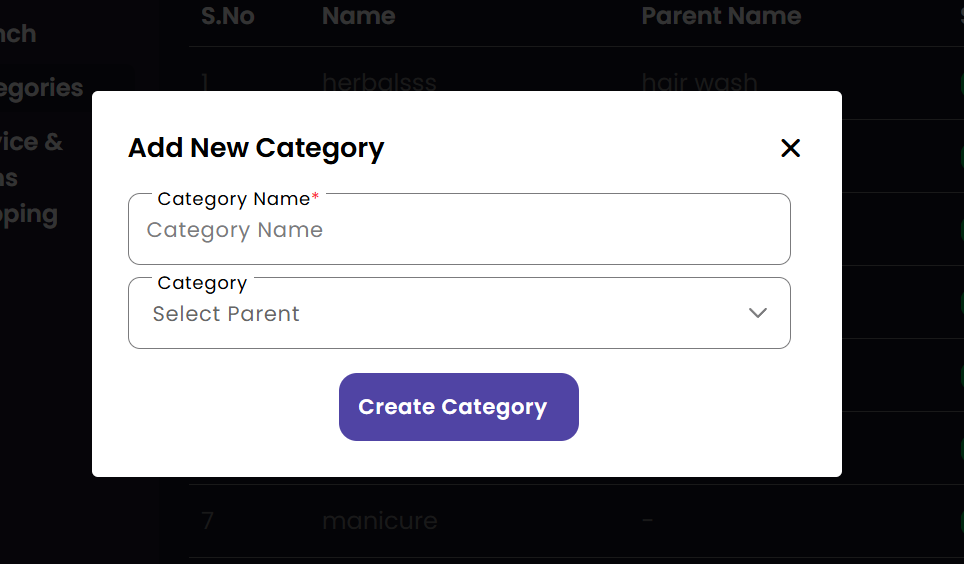
 Create Category
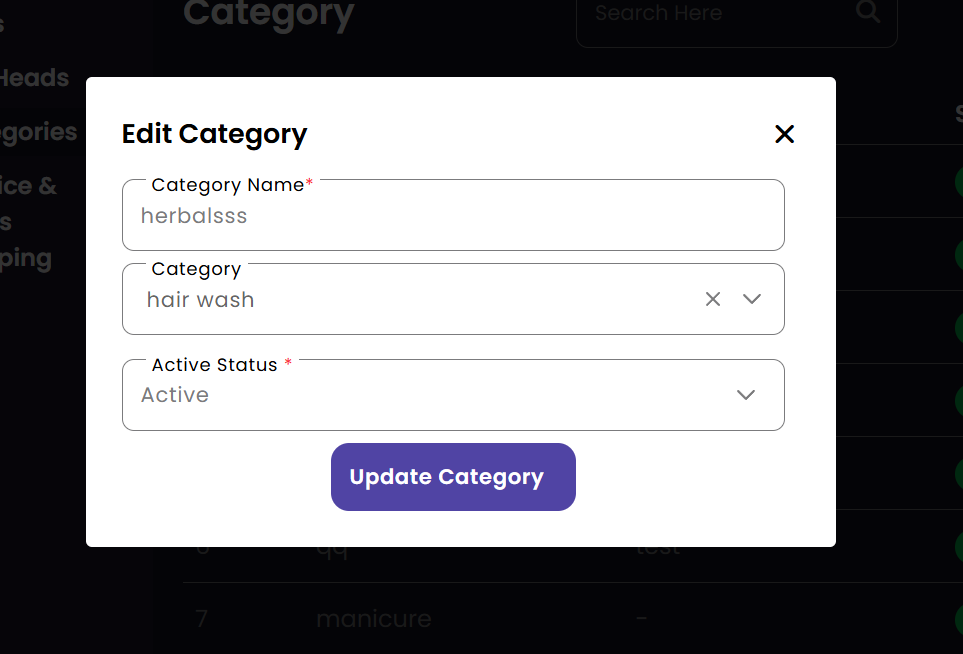
 Update Category
|
Create Category
Update Category
Delete Category
Search Category
|
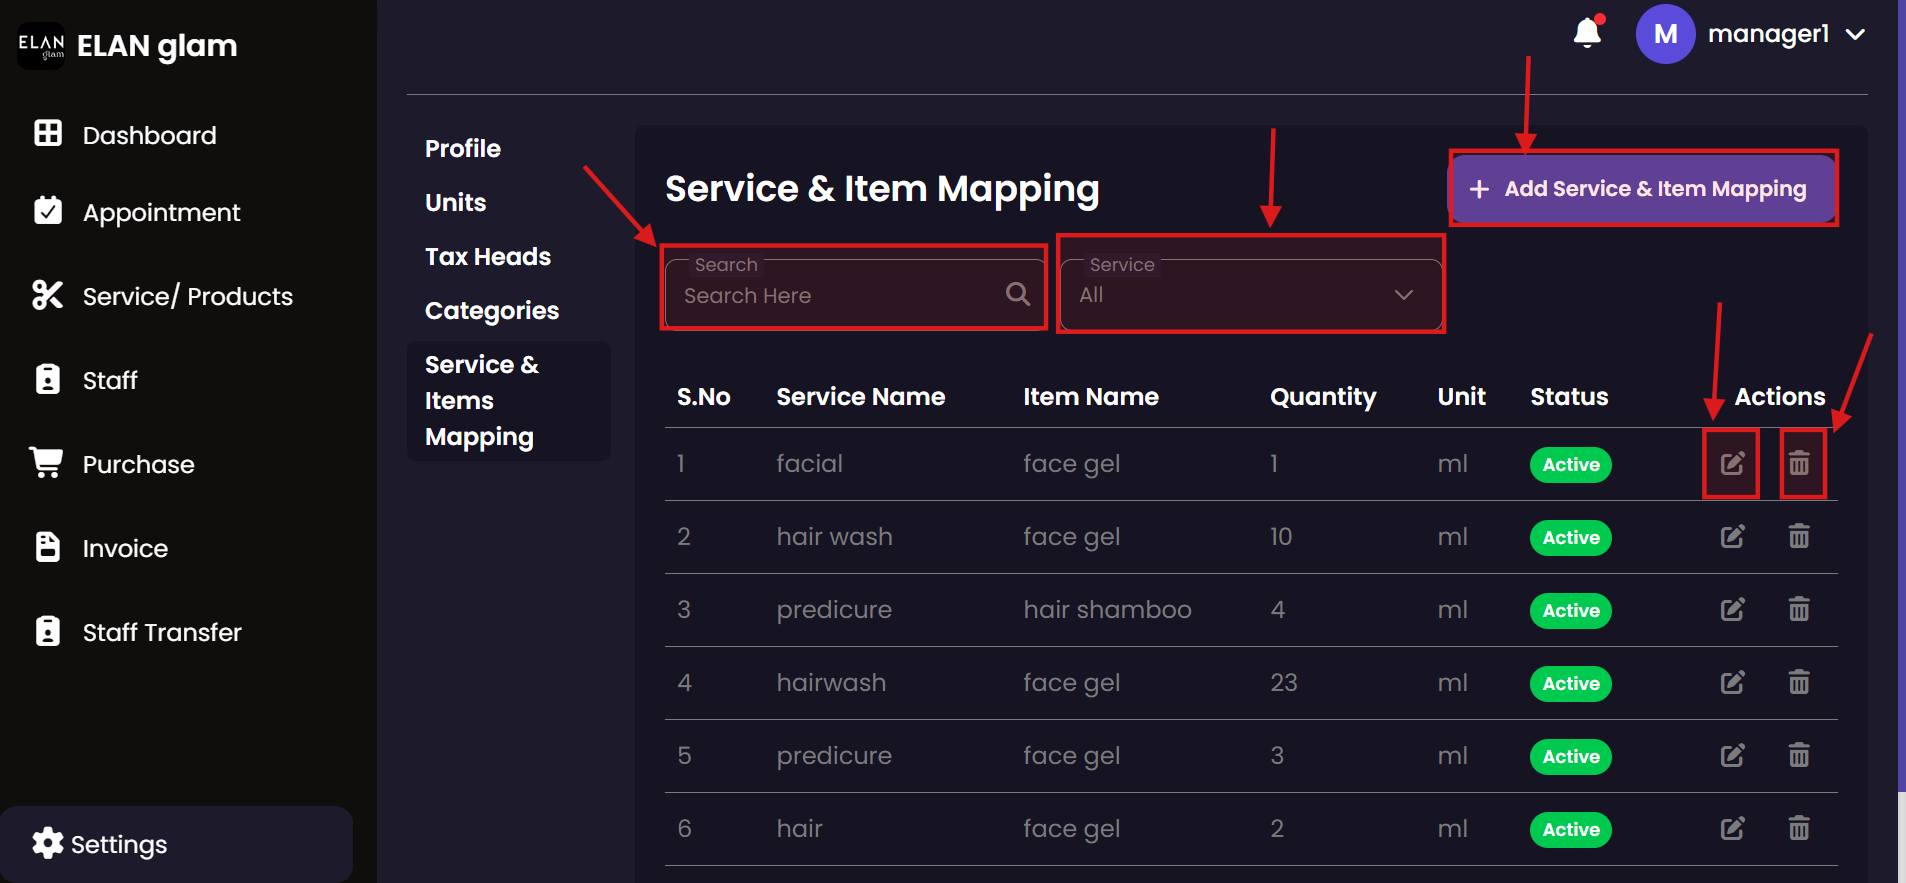
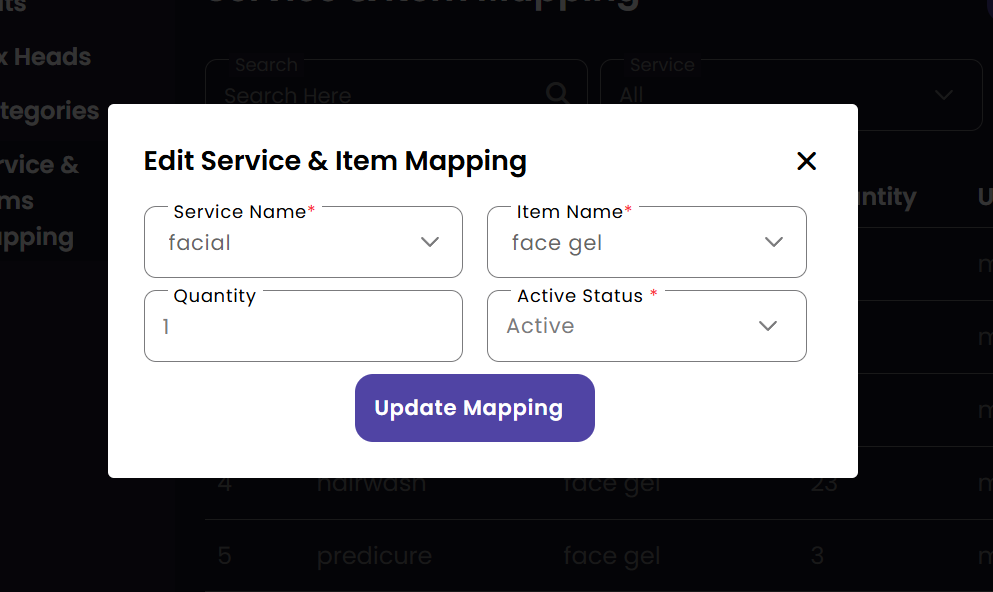
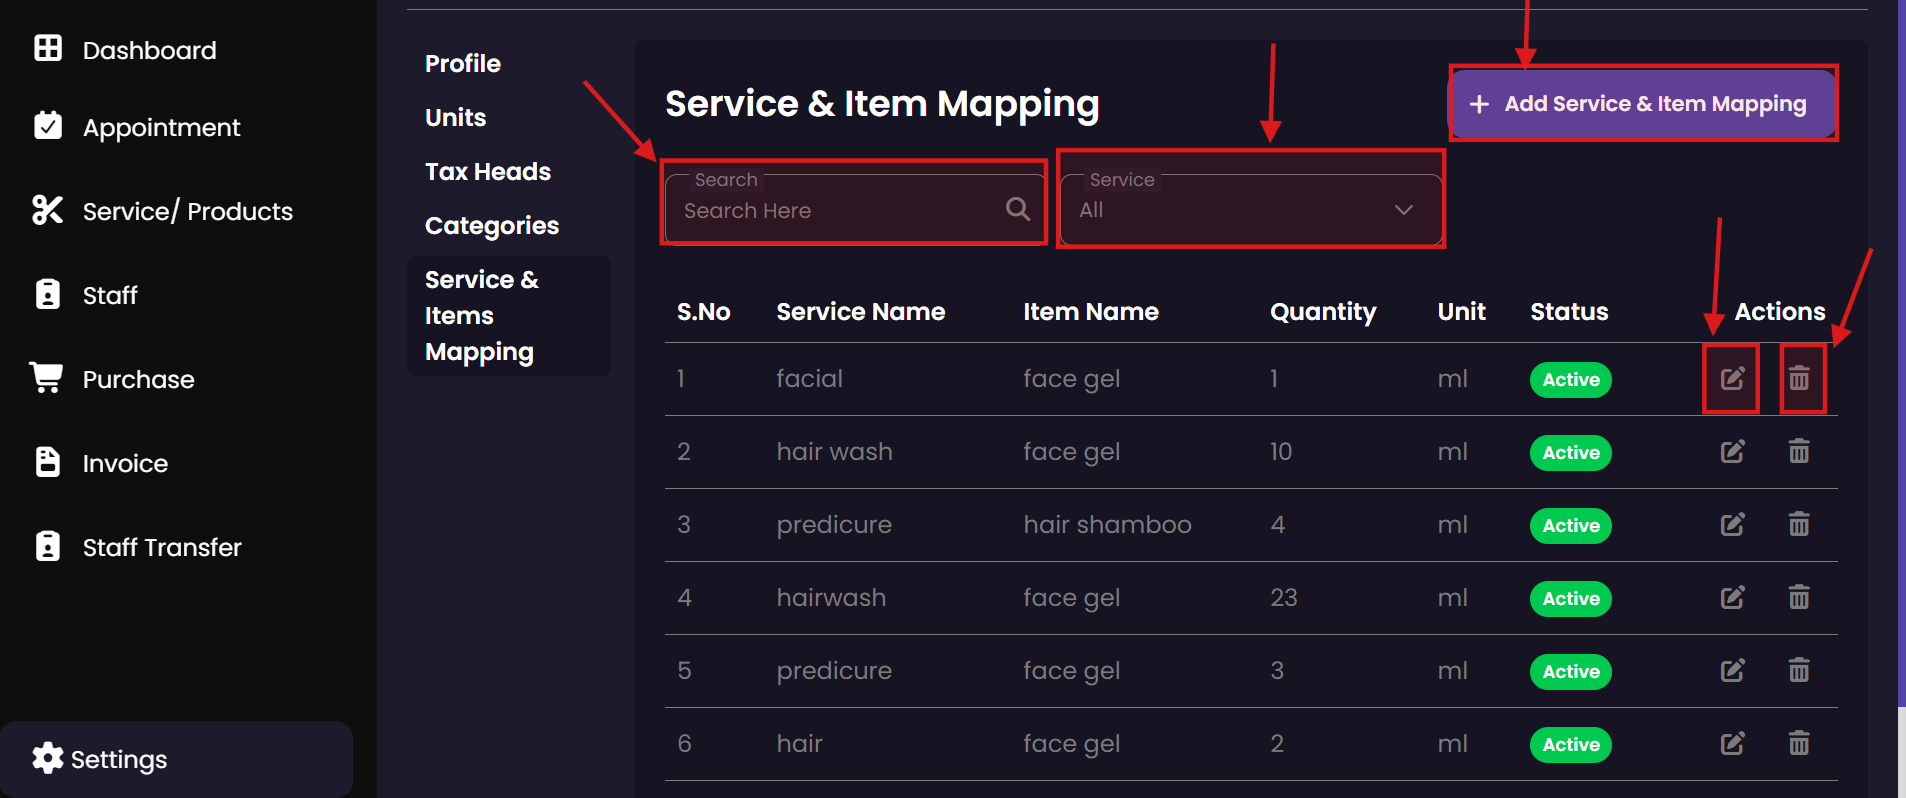
Service Item Mapping
fig:service_item_mapping1 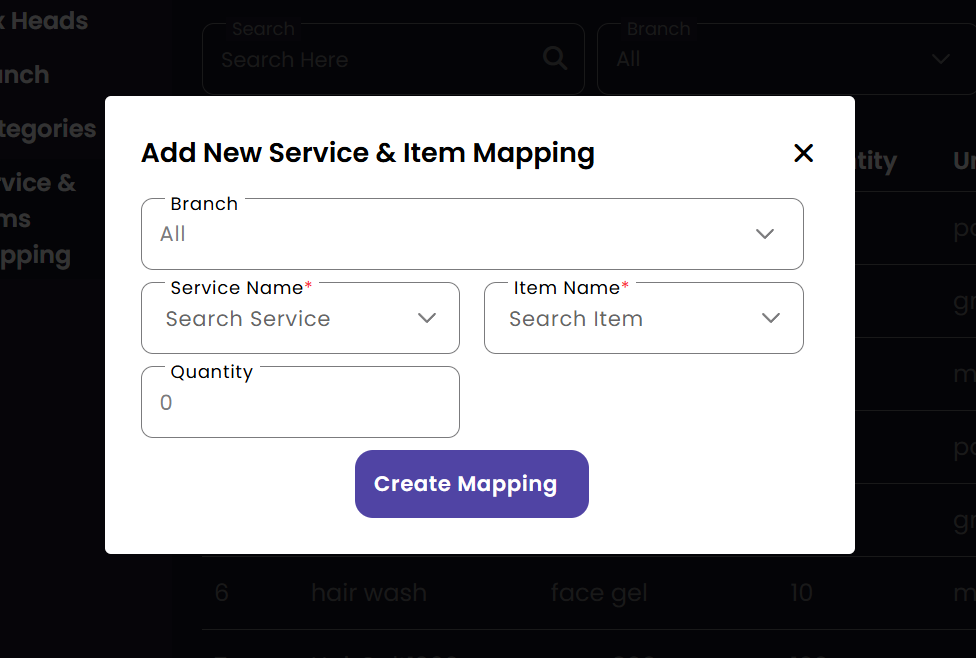 fig:service_item_mapping3
 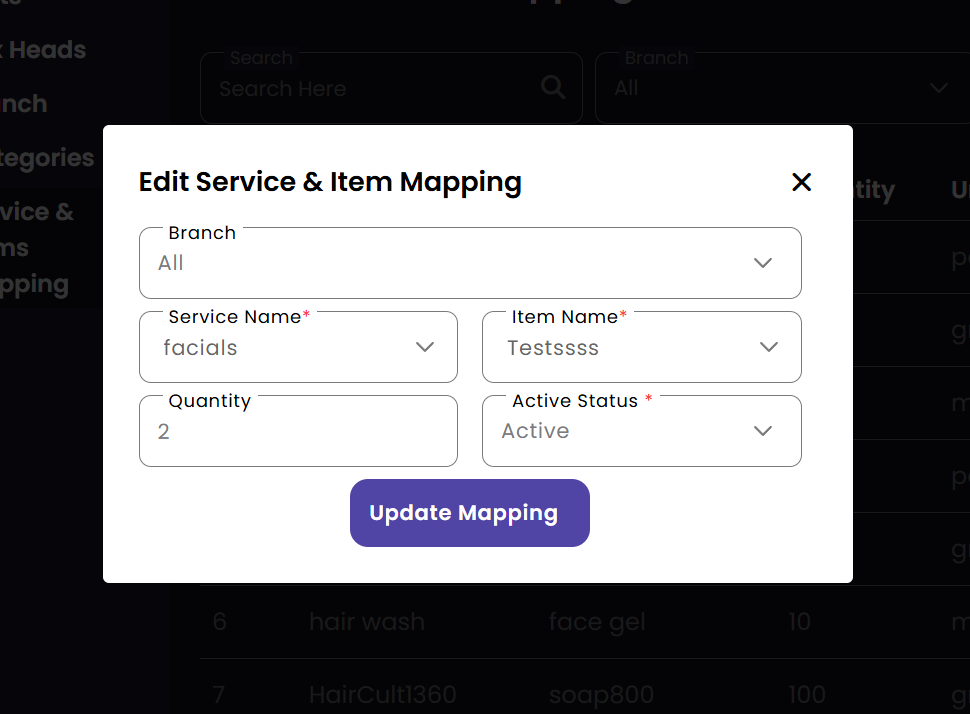 |
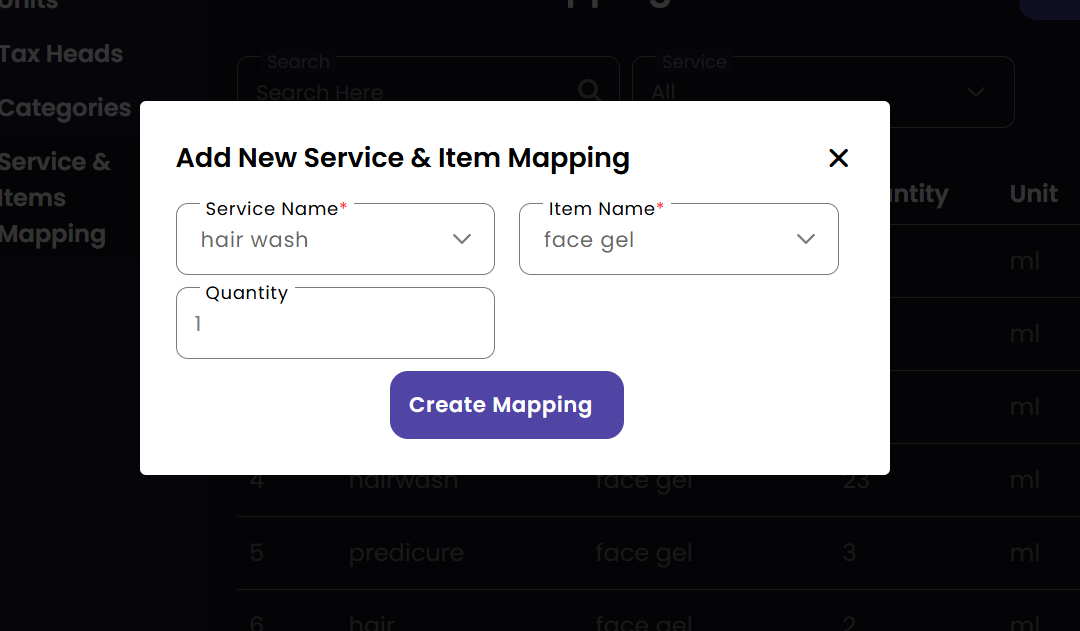
Create Service Item Mapping
Update Service Item Mapping
Delete Service Item Mapping
Search Service Item Mapping
|
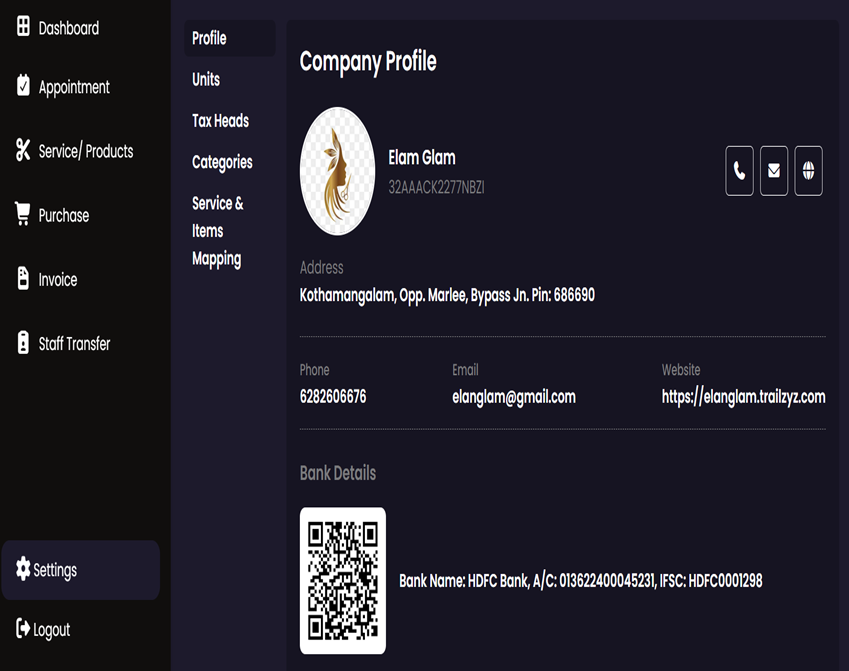
Profile
Manage your administrative user profile and security settings. Keeping your contact information up-to-date and maintaining account security is essential for administrative duties.
Personal Profile
|
View Profile
|
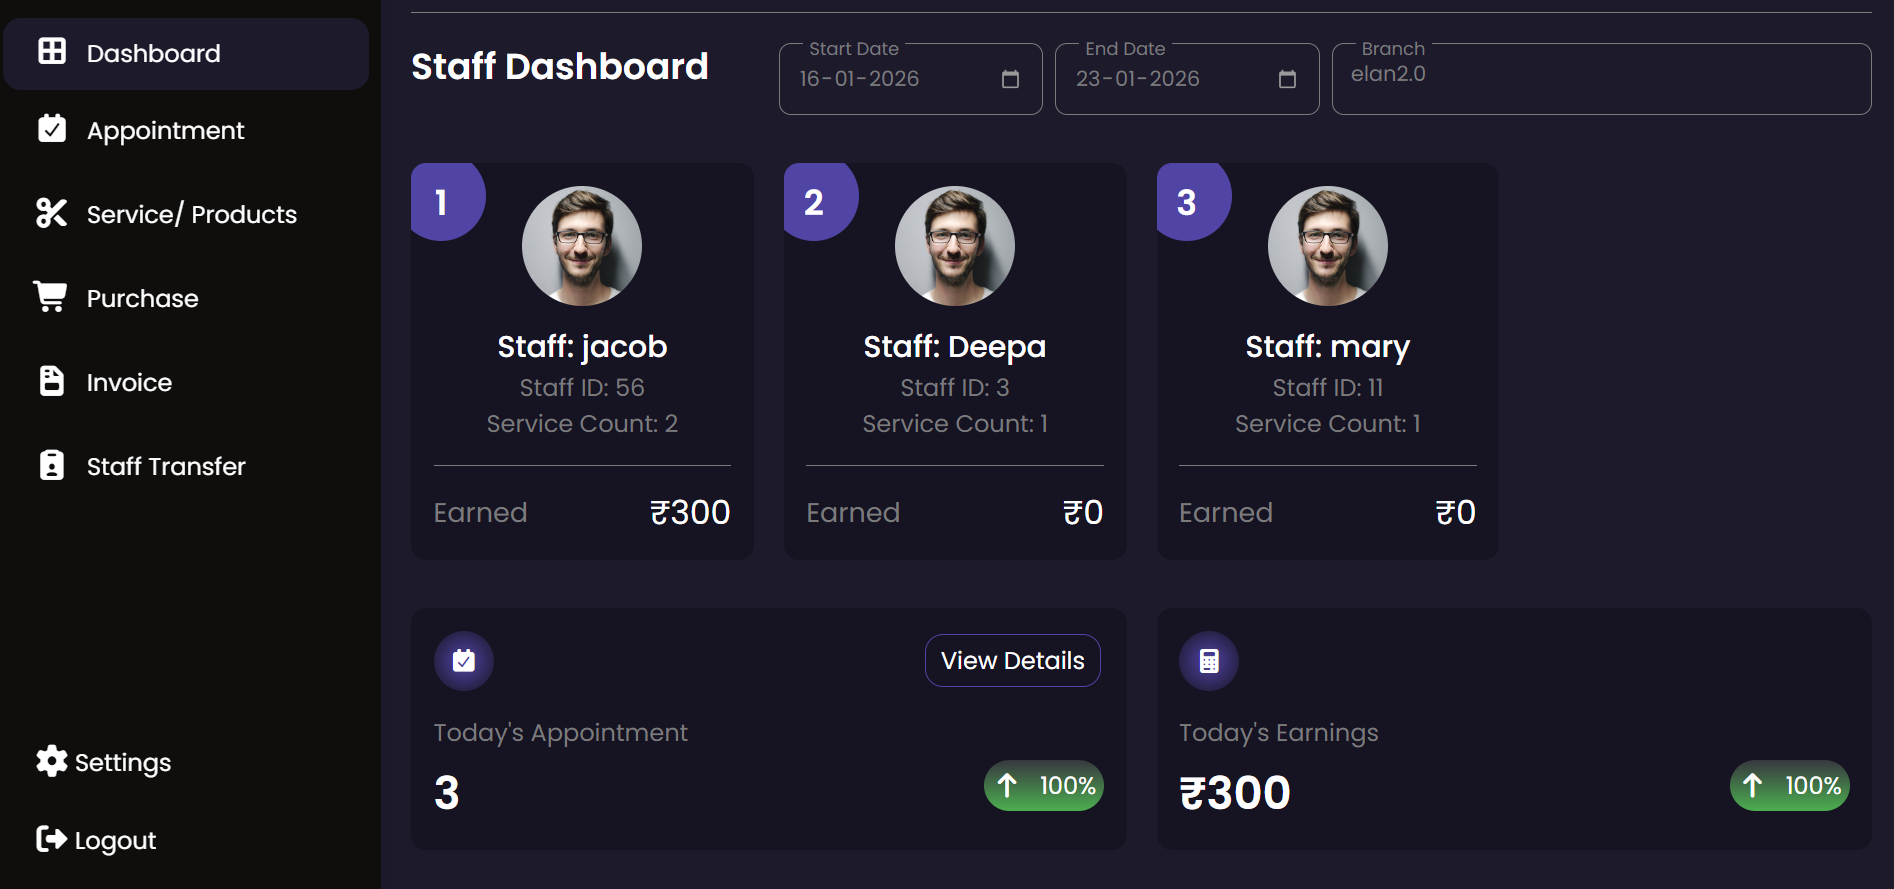
Dashboard
Get a high-level overview of the salon's performance through real-time metrics. The dashboard provides insights into earnings, appointment volume, staff productivity, and inventory status at a glance.
Analytics Overview
|
Dashboard
|
Manager Module
The Manager module is tailored for branch-level oversight. Managers can monitor daily appointments, manage branch inventory, oversee local staff, and track branch performance metrics while ensuring smooth day-to-day operations.
Appointment
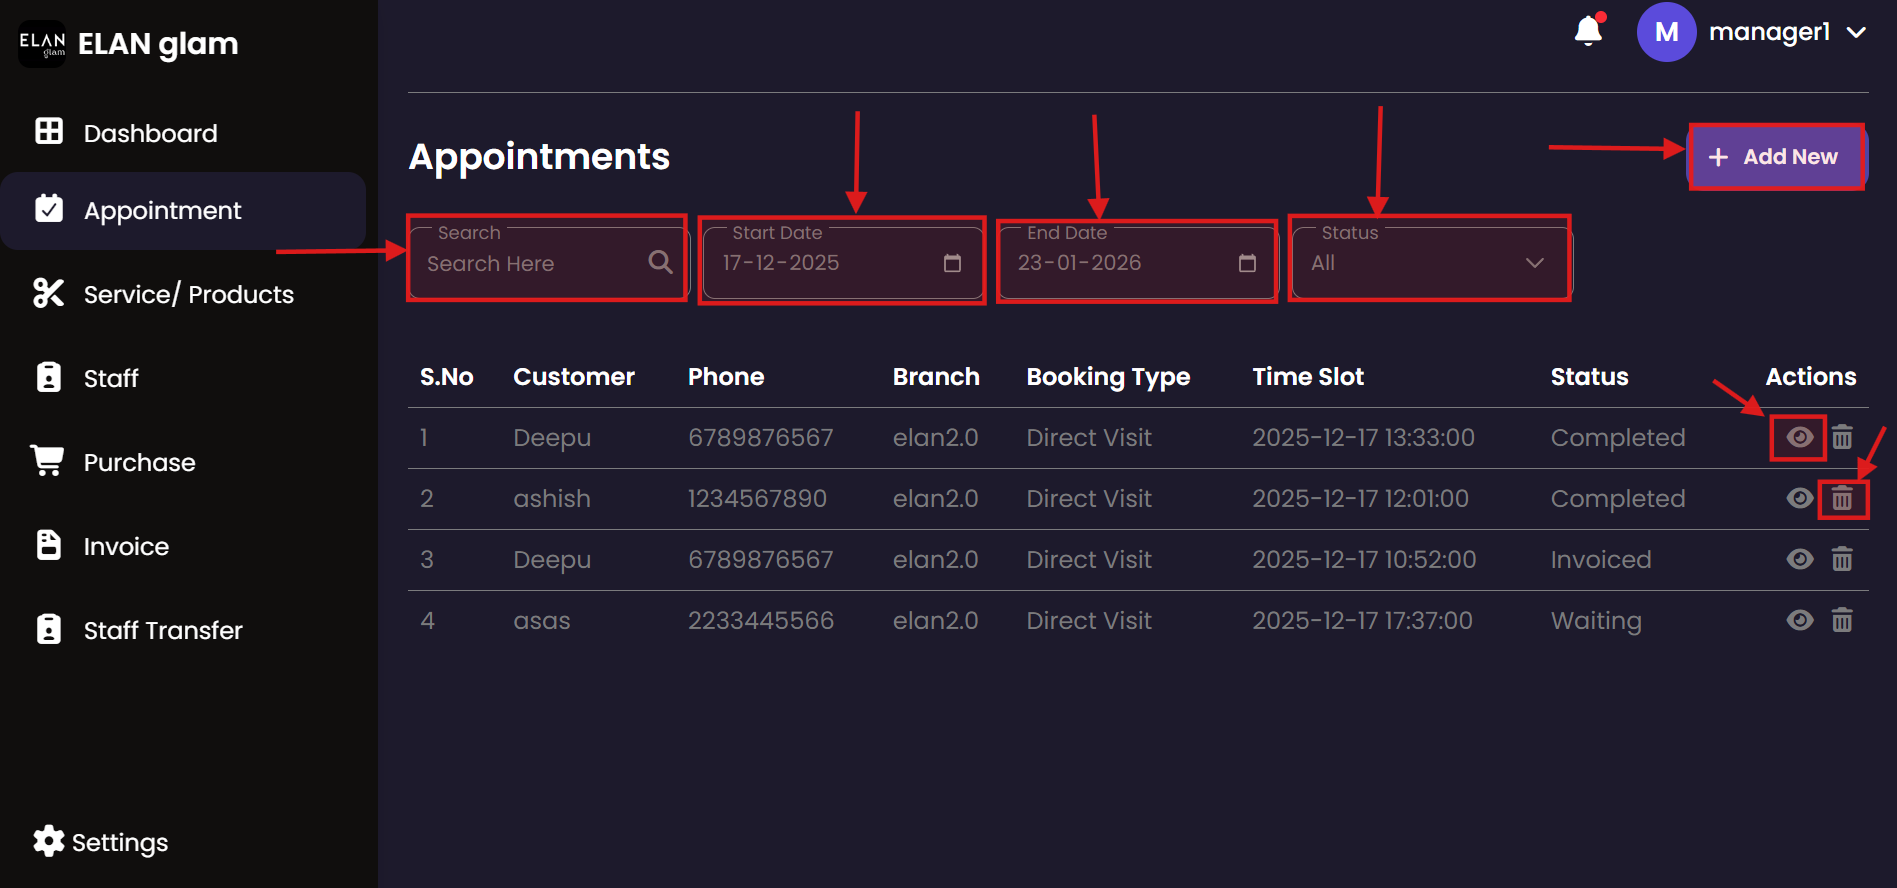
Oversee all appointments within your assigned branch. Managers can create new bookings, update existing customer information, and monitor the status of services in real-time to ensure patient satisfaction and staff efficiency.
Appointments List
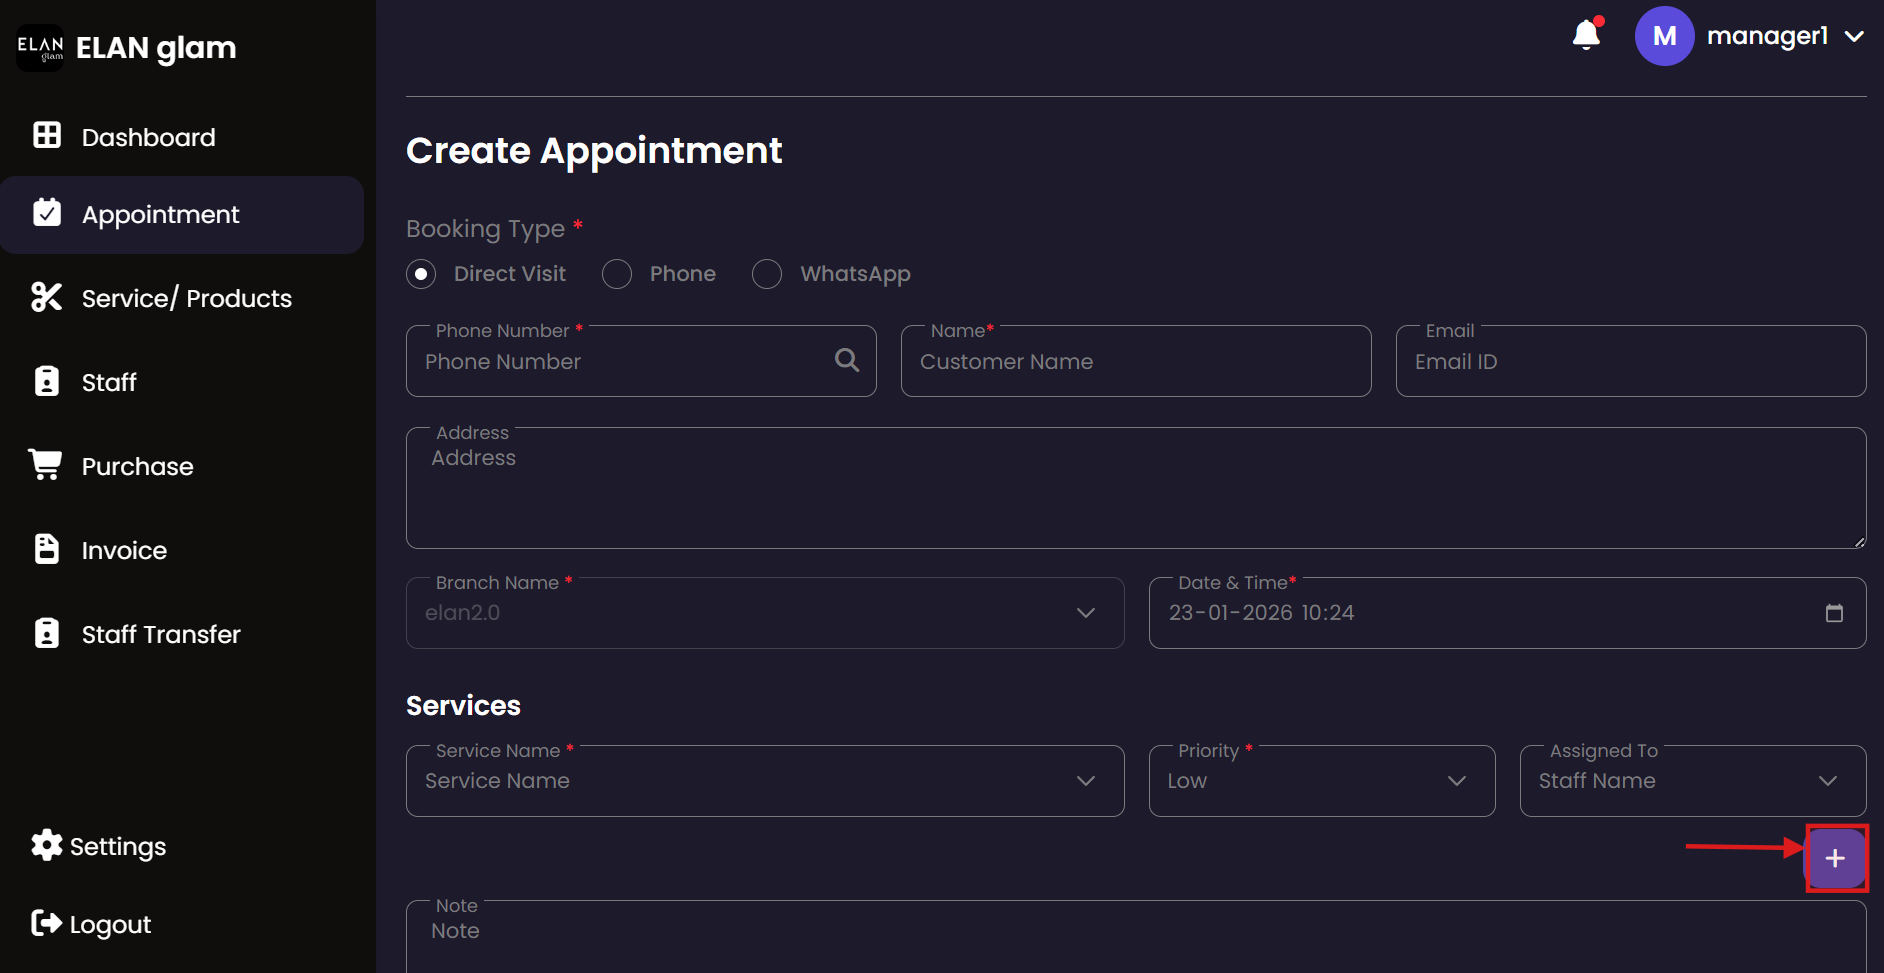
 Schedule Appointment
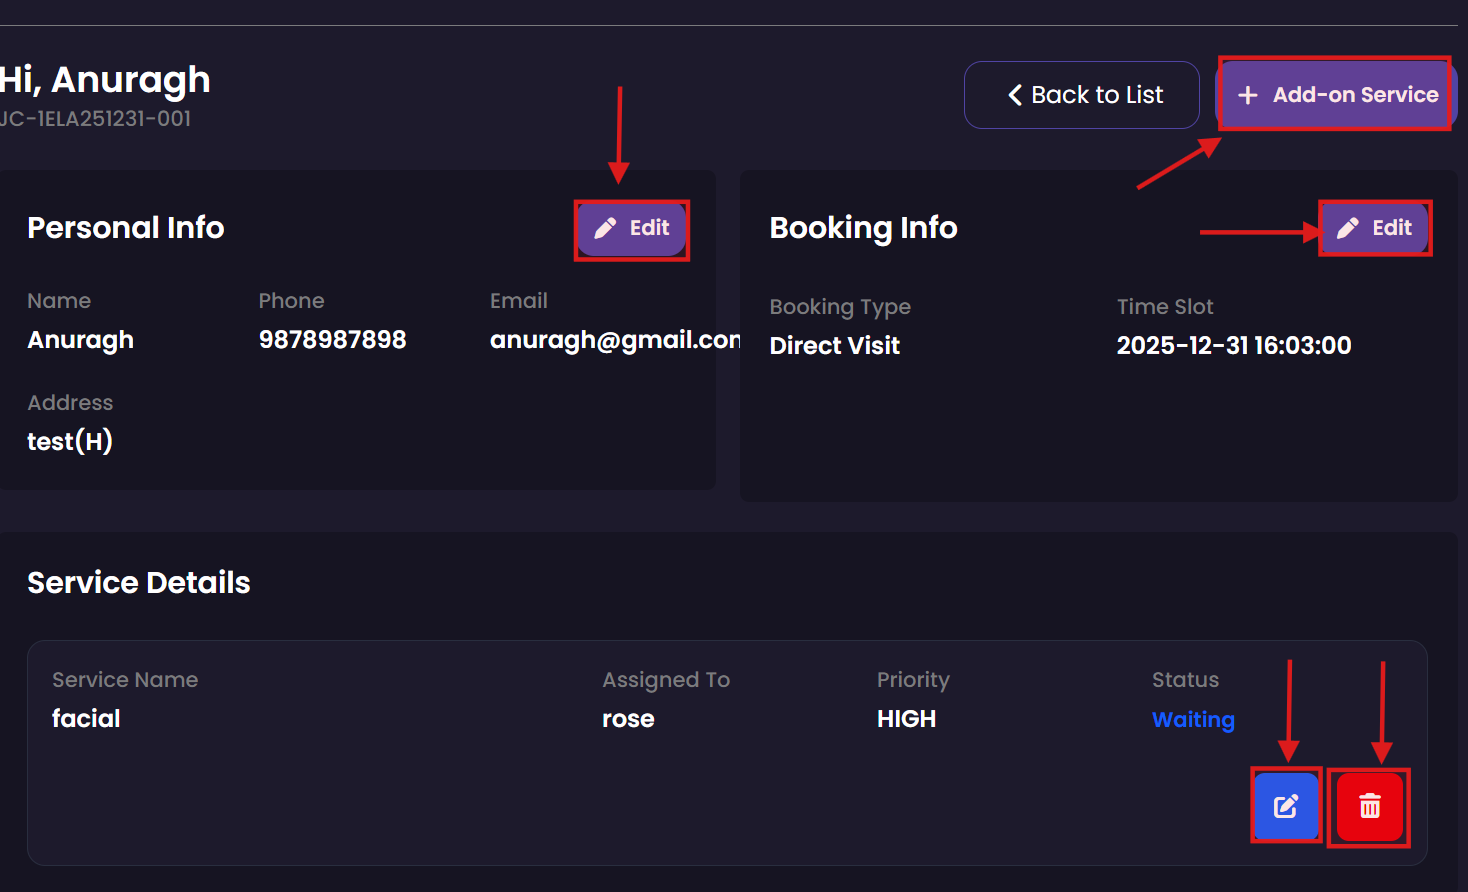
 View/Update Details
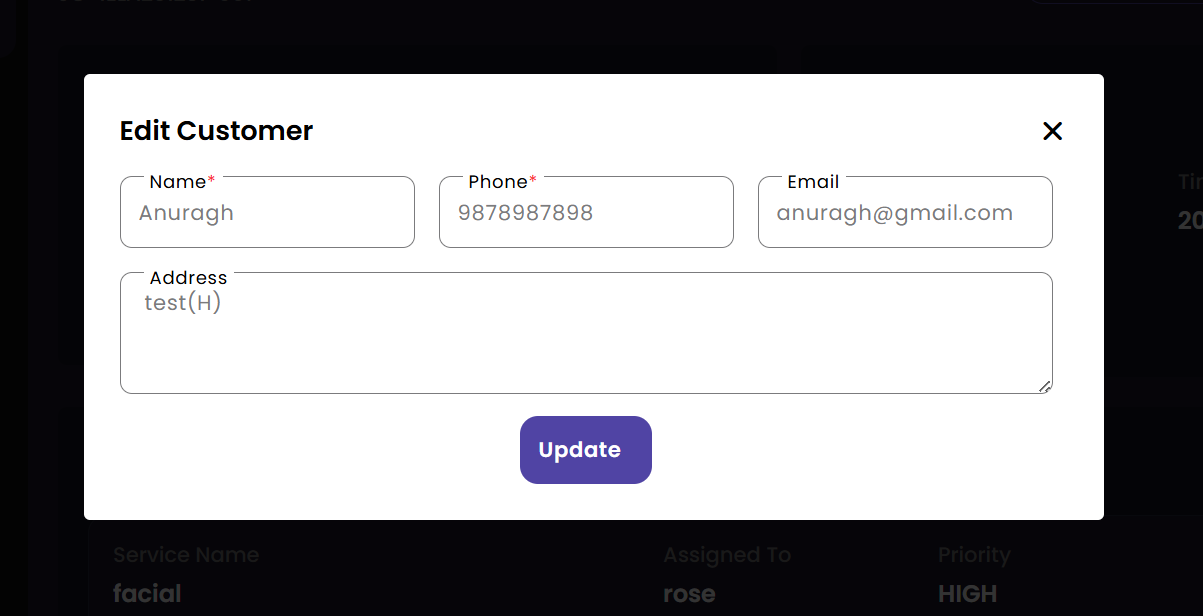
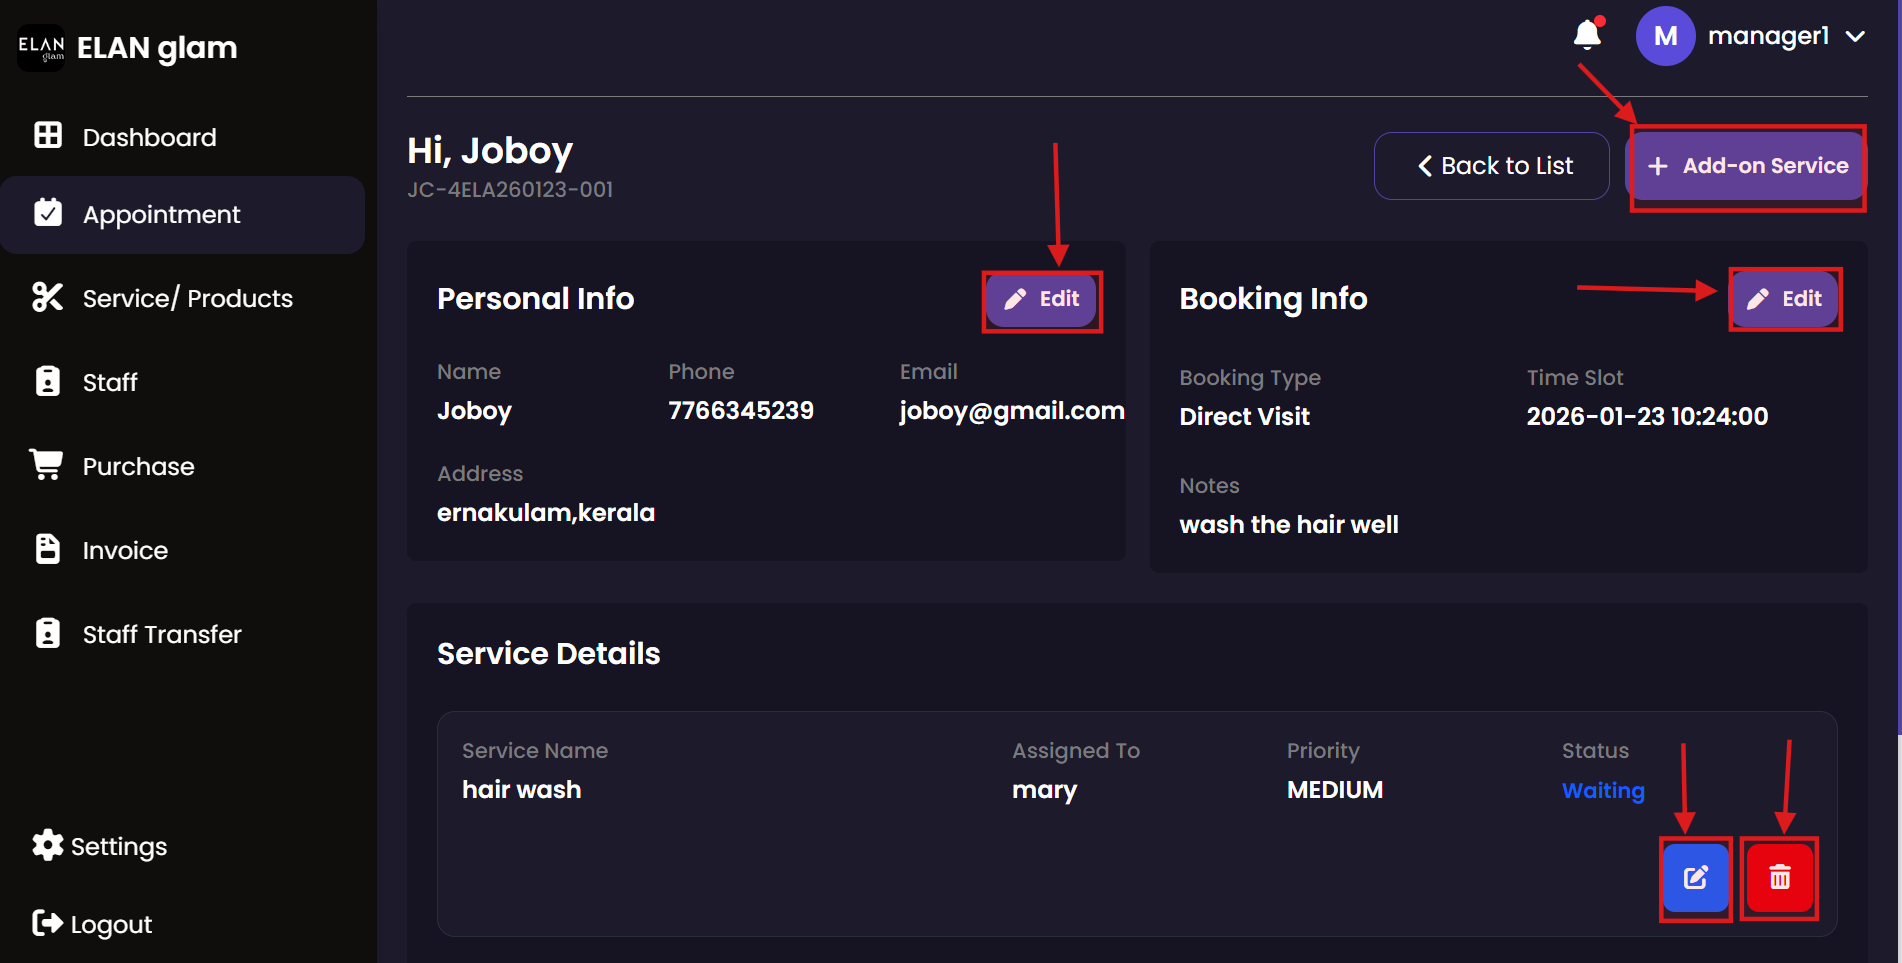 Customer Info
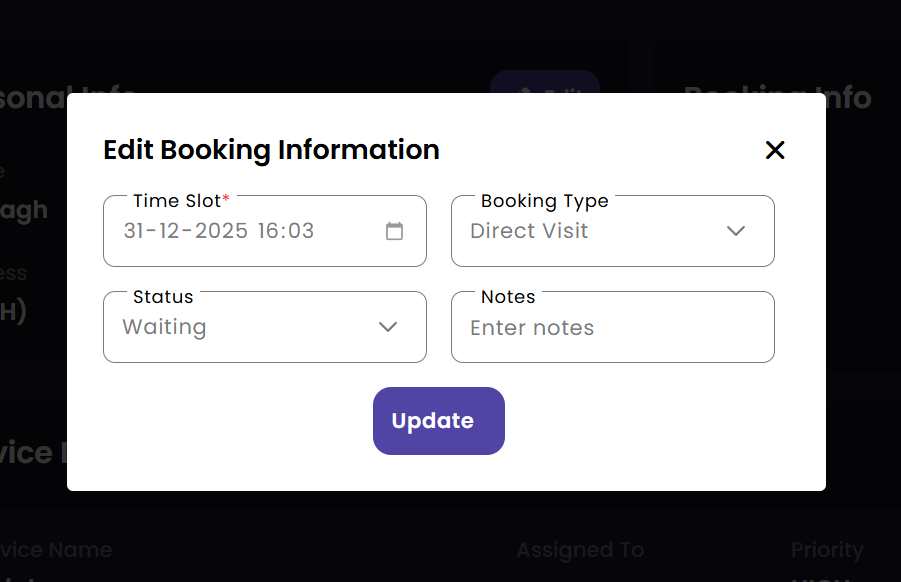
 Booking Info
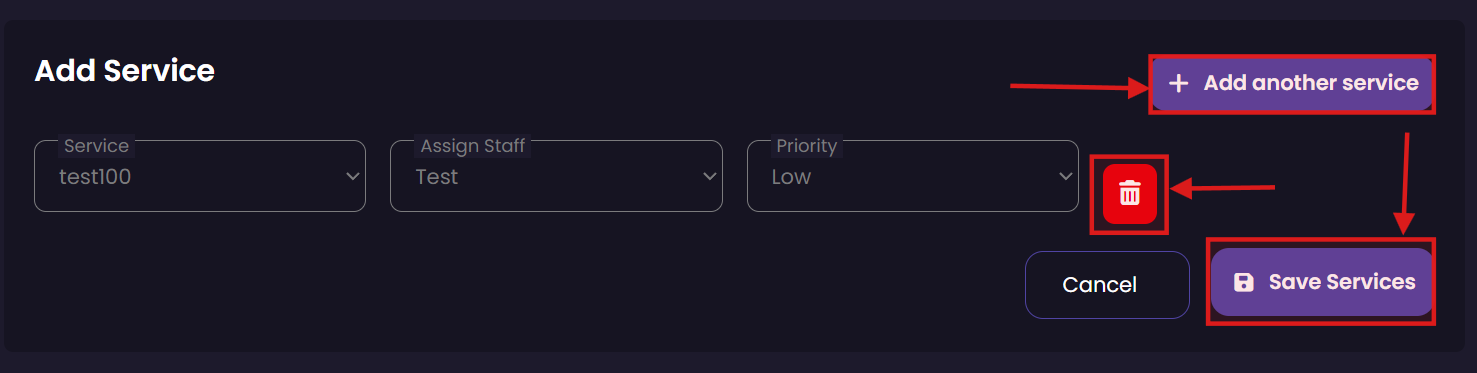
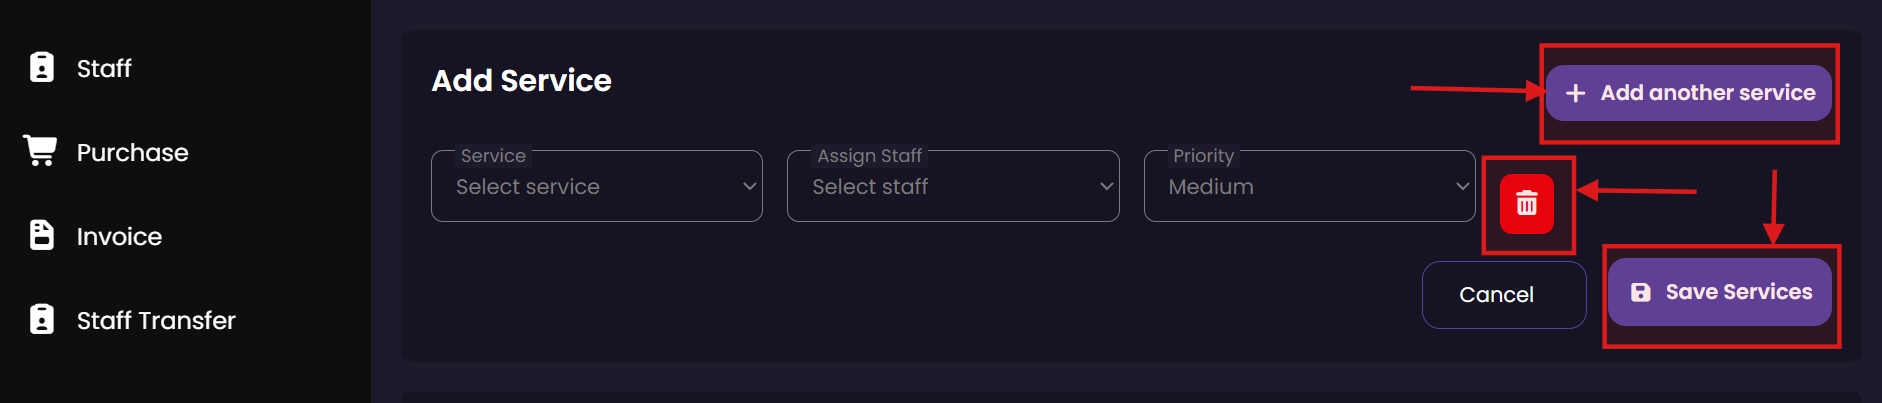
 Service Management
|
Create Appointments
View/Update Appointments
Delete Appointment
Search Appointment
|
Products/Services
Monitor the products and services available at your branch. Managers can review item details, map items to specific services, and ensure that the branch offering is aligned with current demand and inventory.
Branch Menu
 Create Entry
 Update Entry
|
Create Product/Services
Update Product/Services
Delete Product/Service
Search Product/Service
Service Item Mapping Product/Service
|
Staff
Manage the team at your branch. This section allows you to review staff profiles, monitor their schedules, and ensure that all service roles are properly filled by qualified personnel.
Staff Overview
 Create Record
 Edit Details
 Security Settings
|
Create Staff
Update Staff
Delete Staff
Search Staff
Staff Password
|
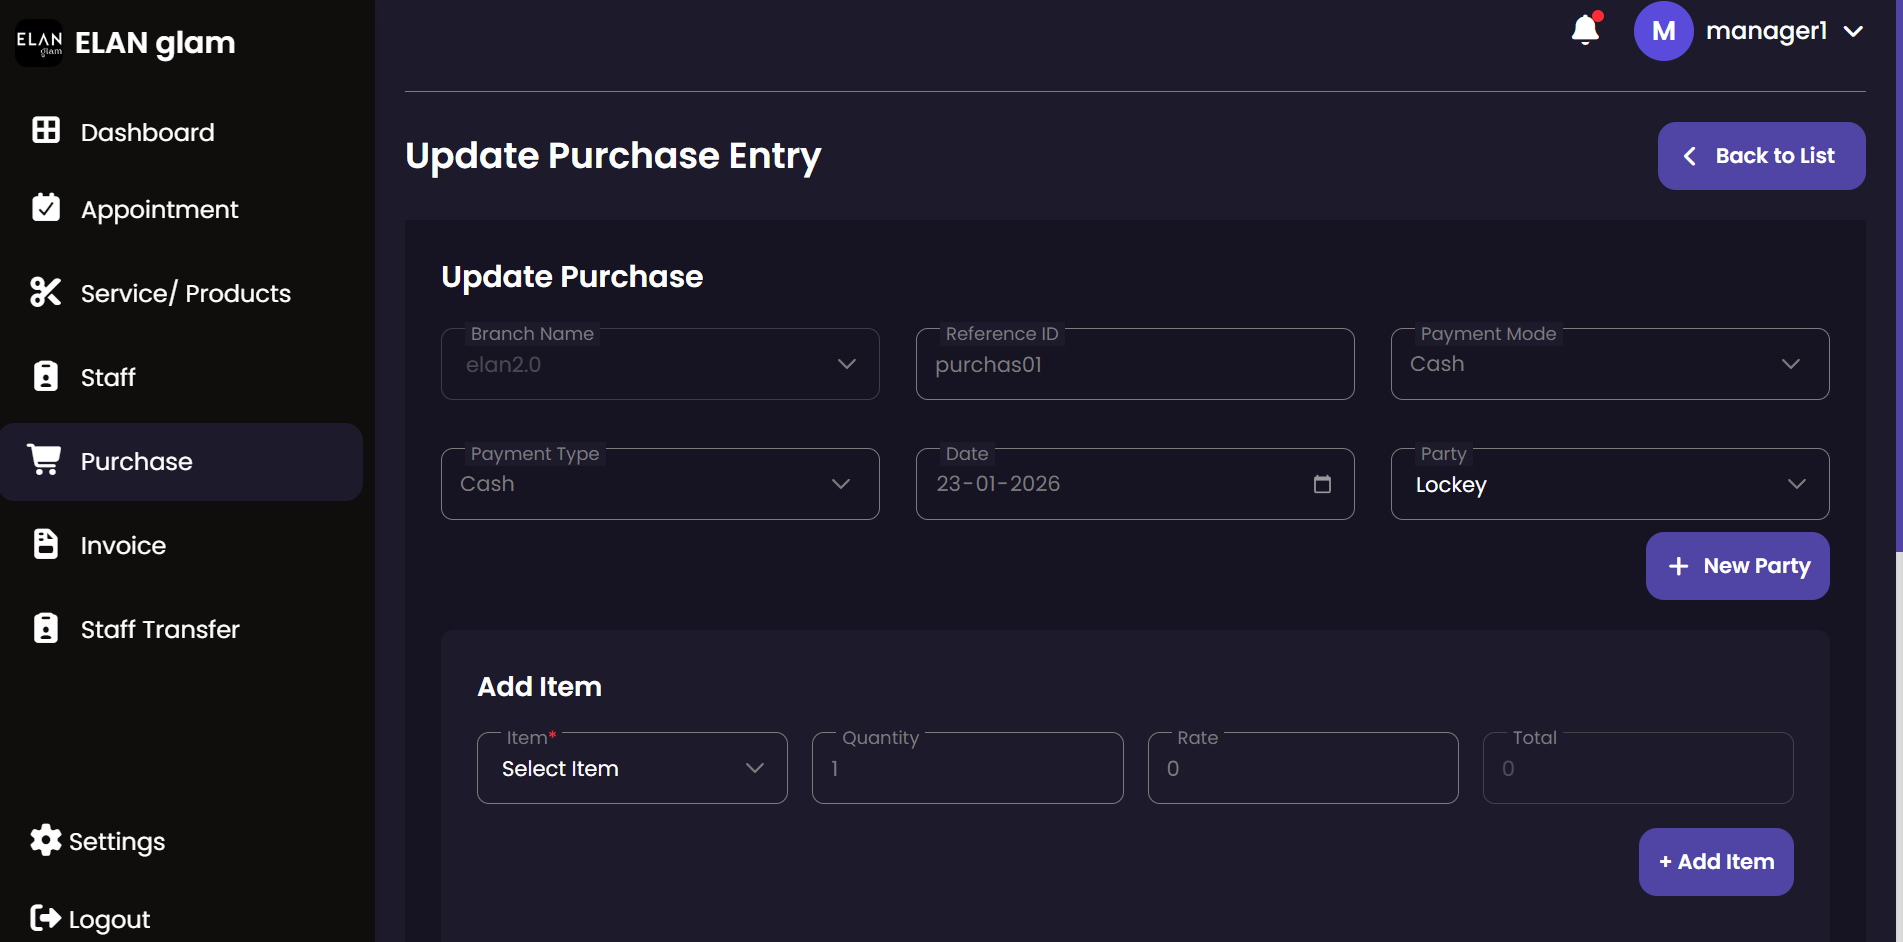
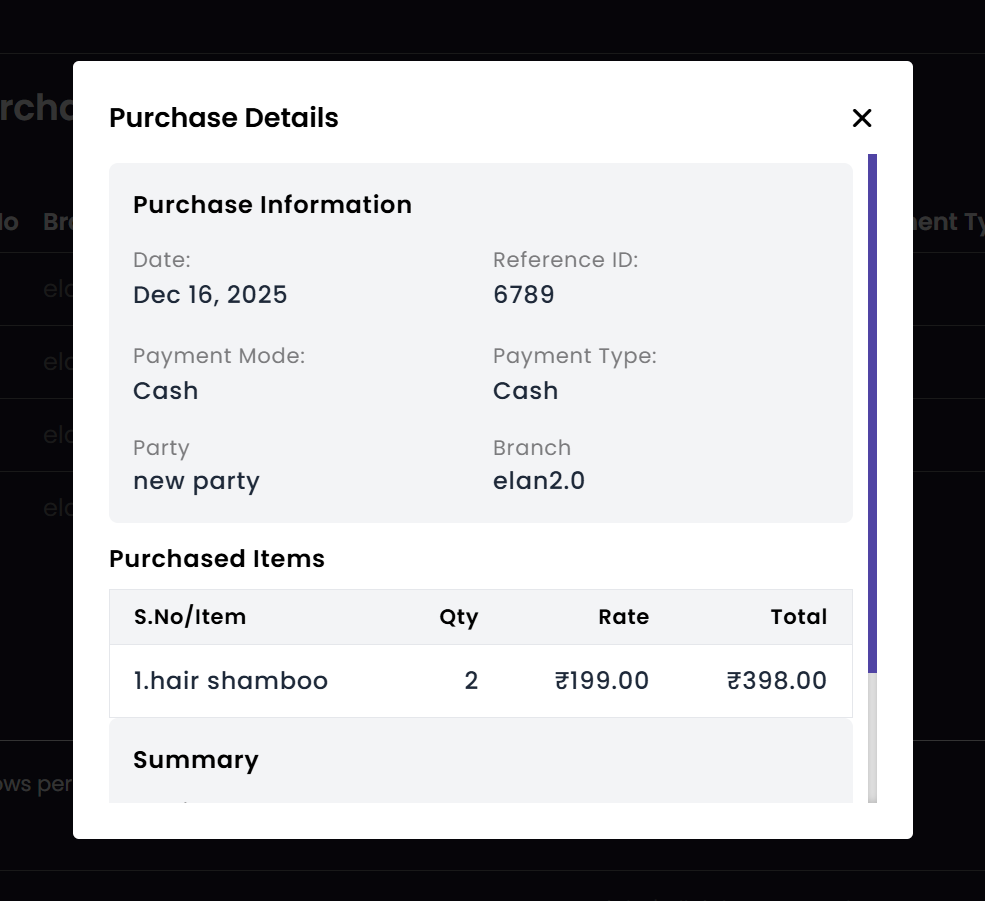
Purchase
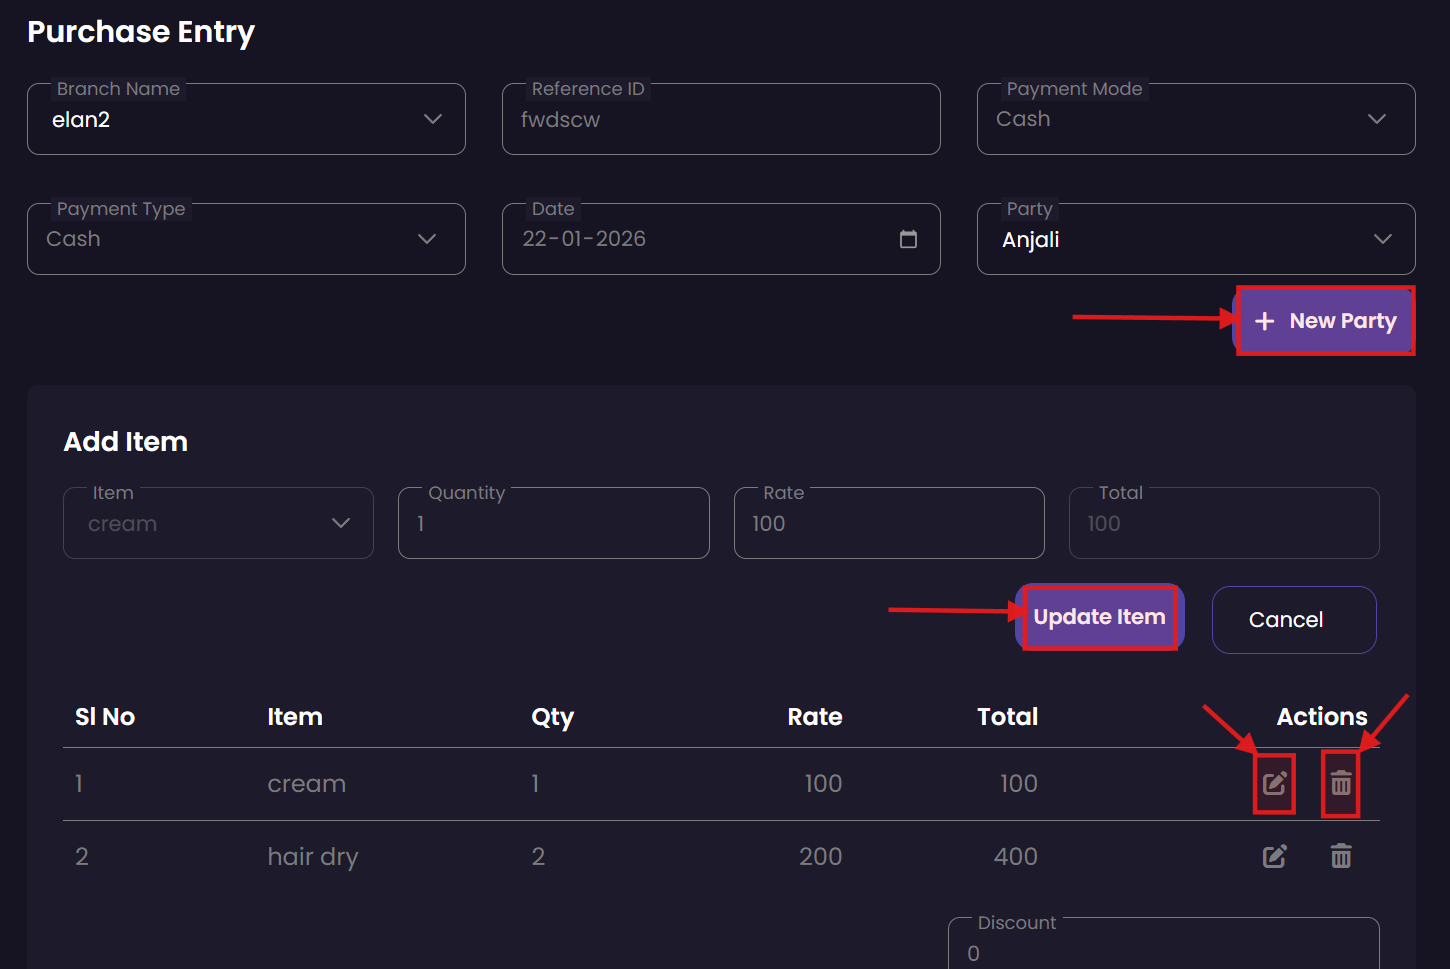
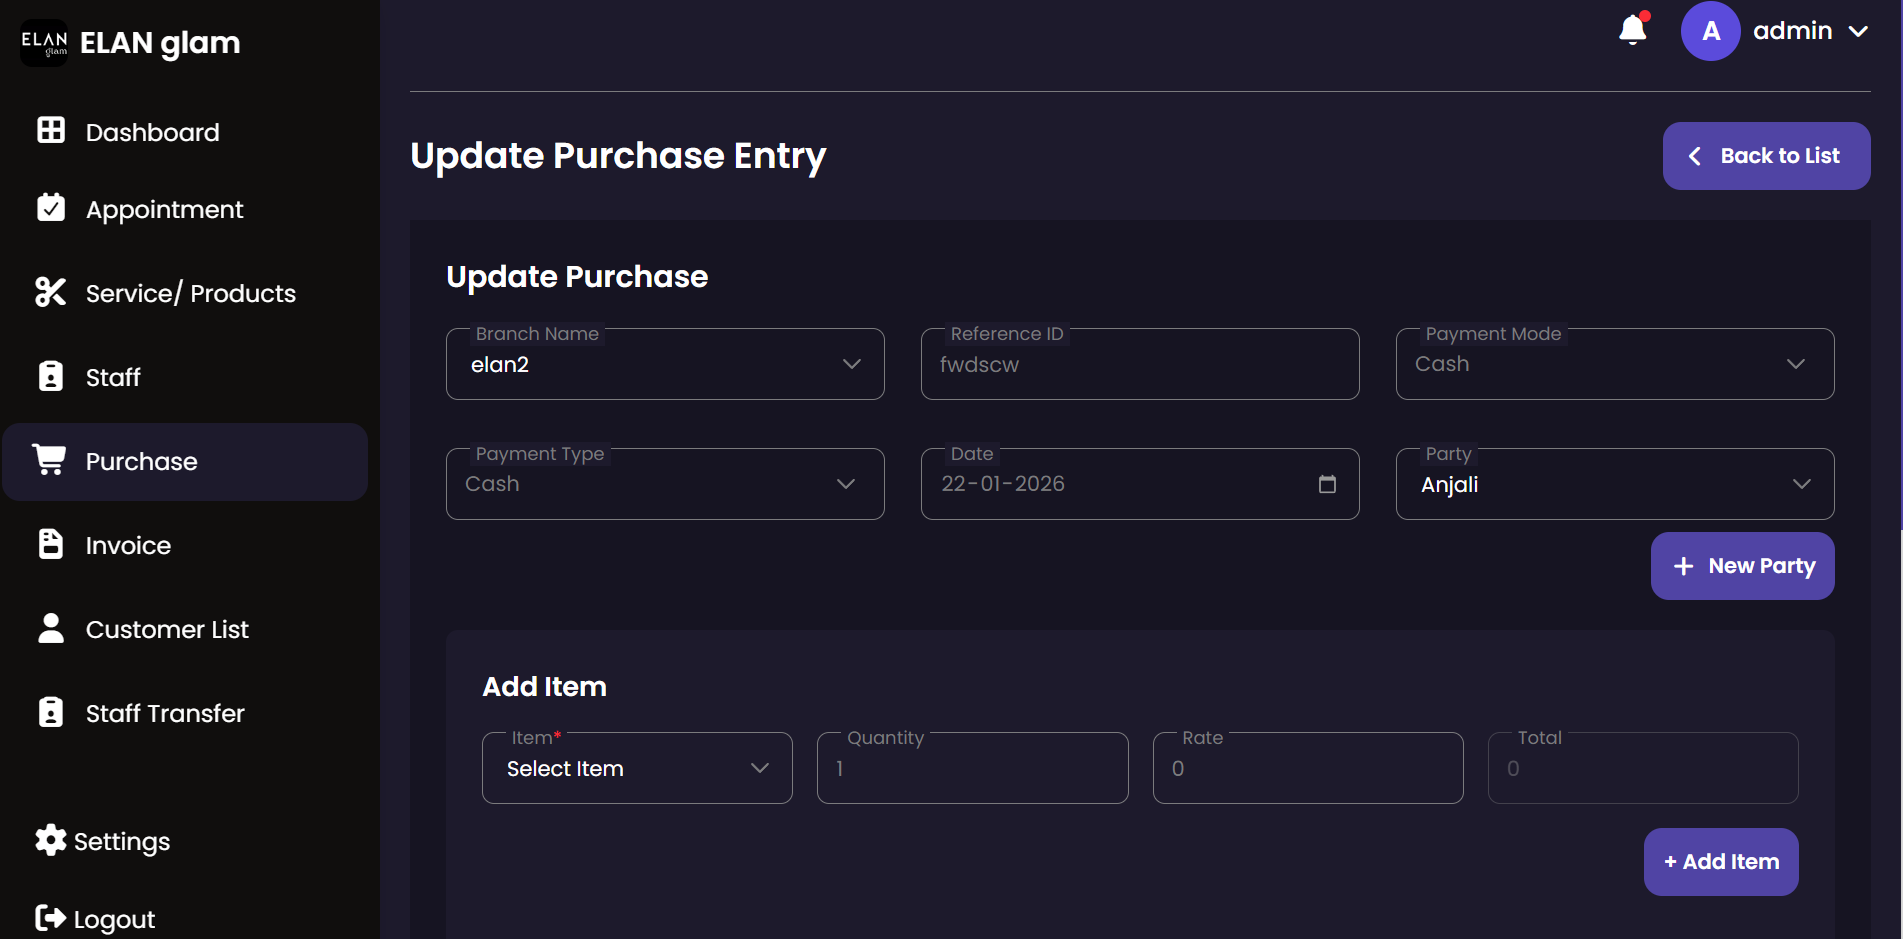
Record and track branch-level inventory purchases. This tool helps managers document stock arrivals from vendors, ensuring that the branch has the necessary products and supplies for all scheduled services.
Purchase List
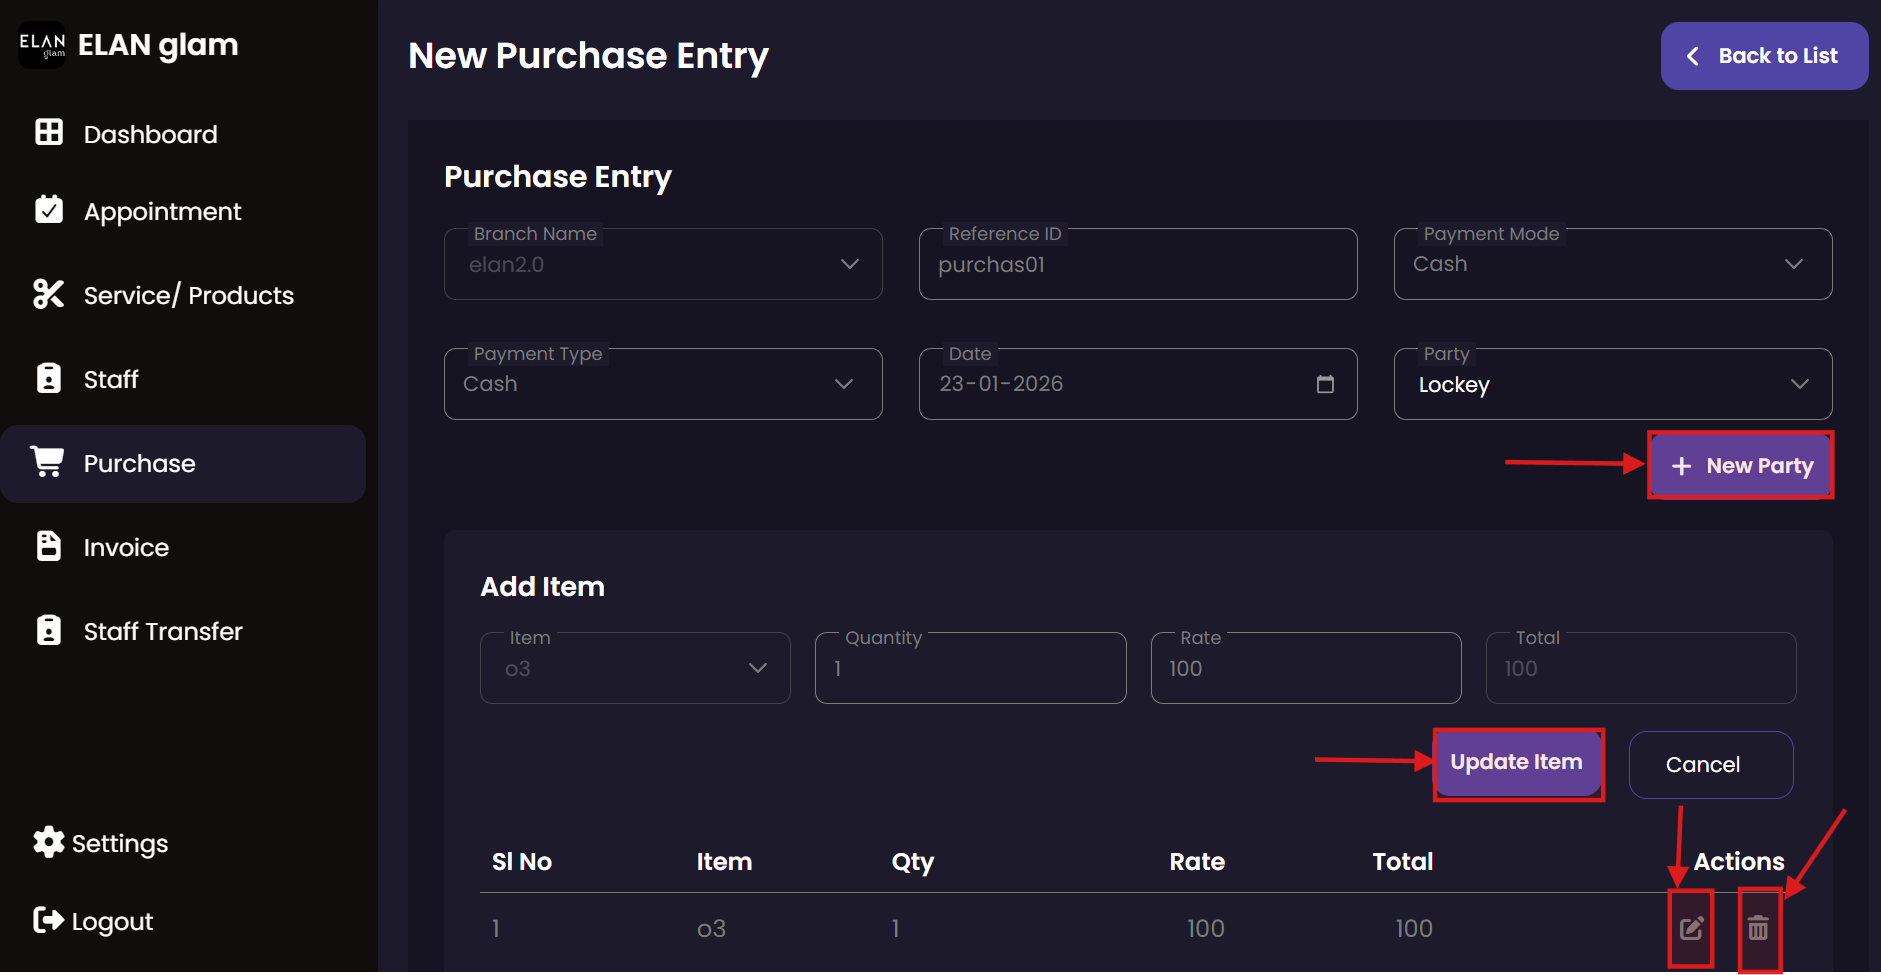
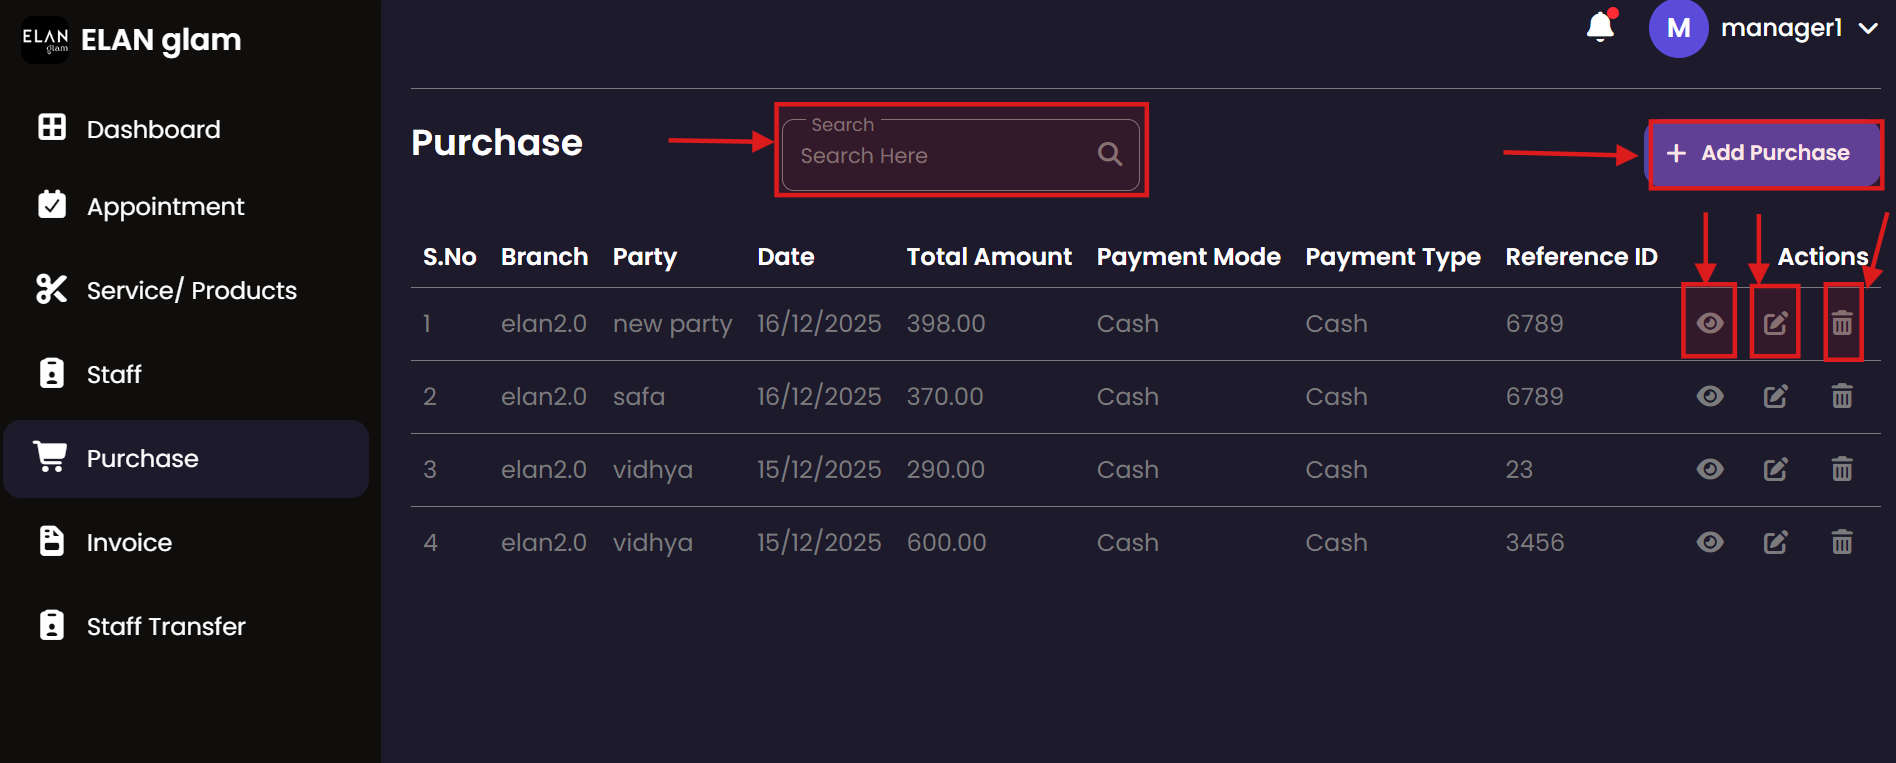 New Entry
 Edit Purchase
 Entry Details
|
Create Purchase
|
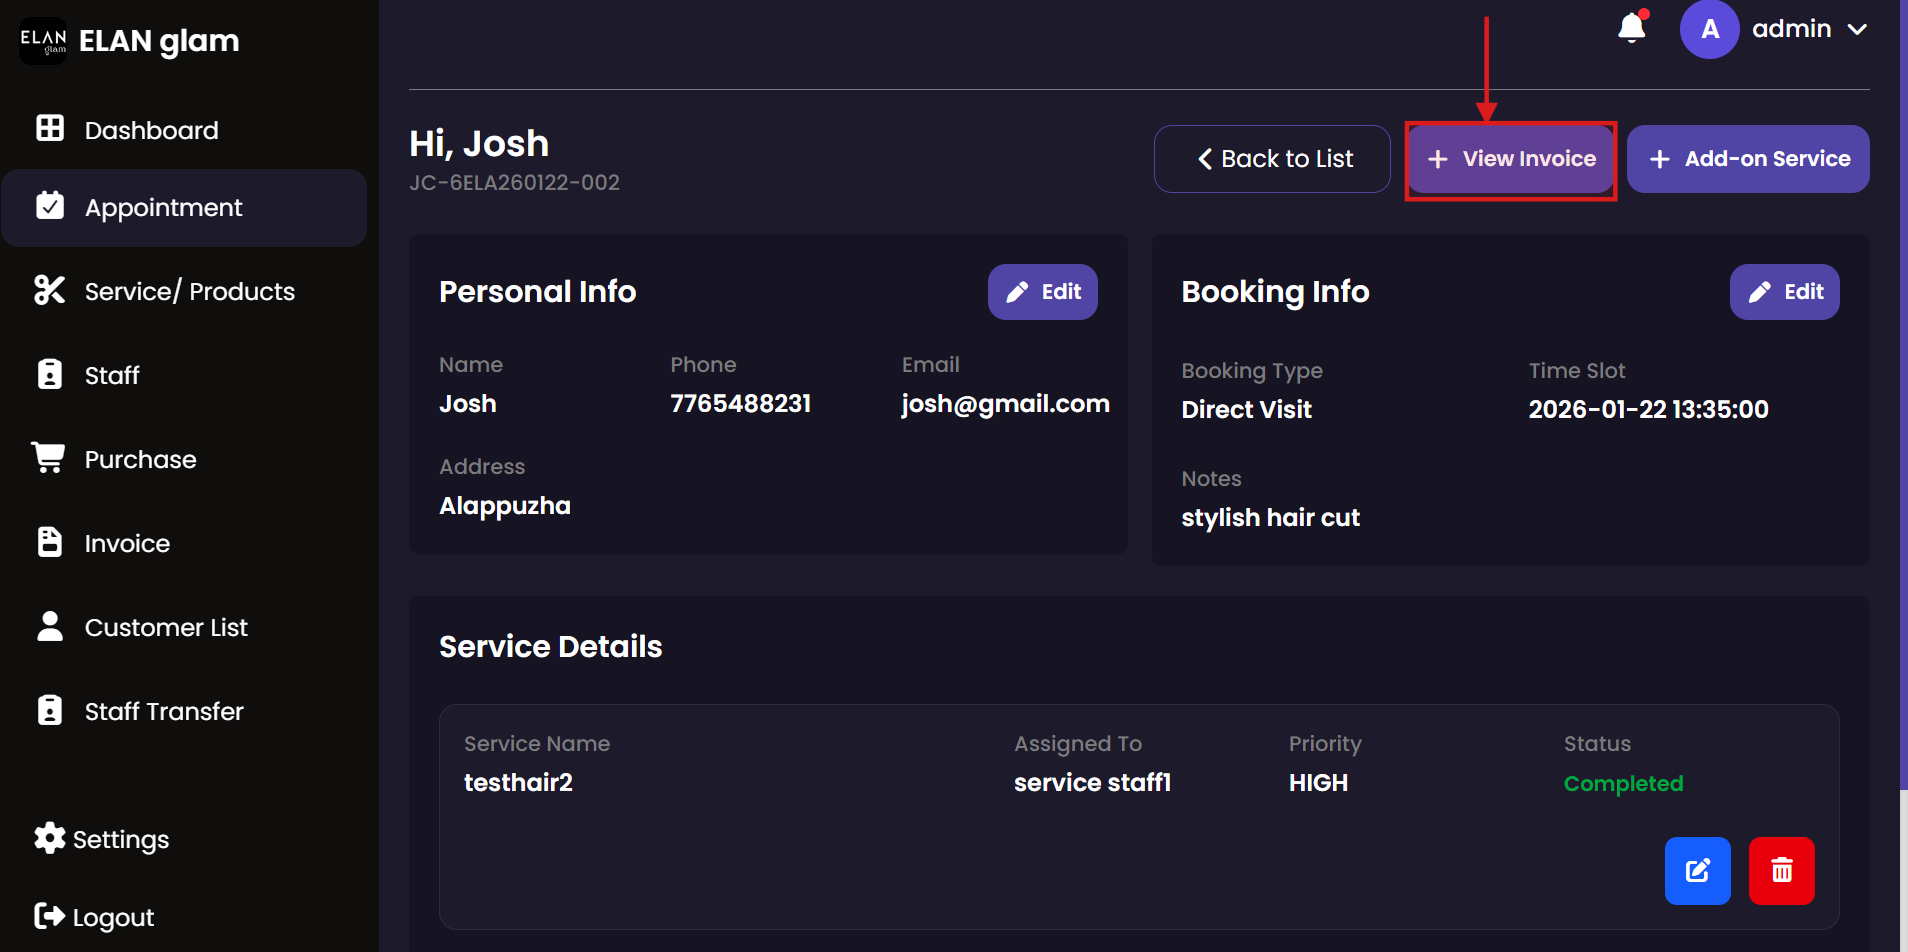
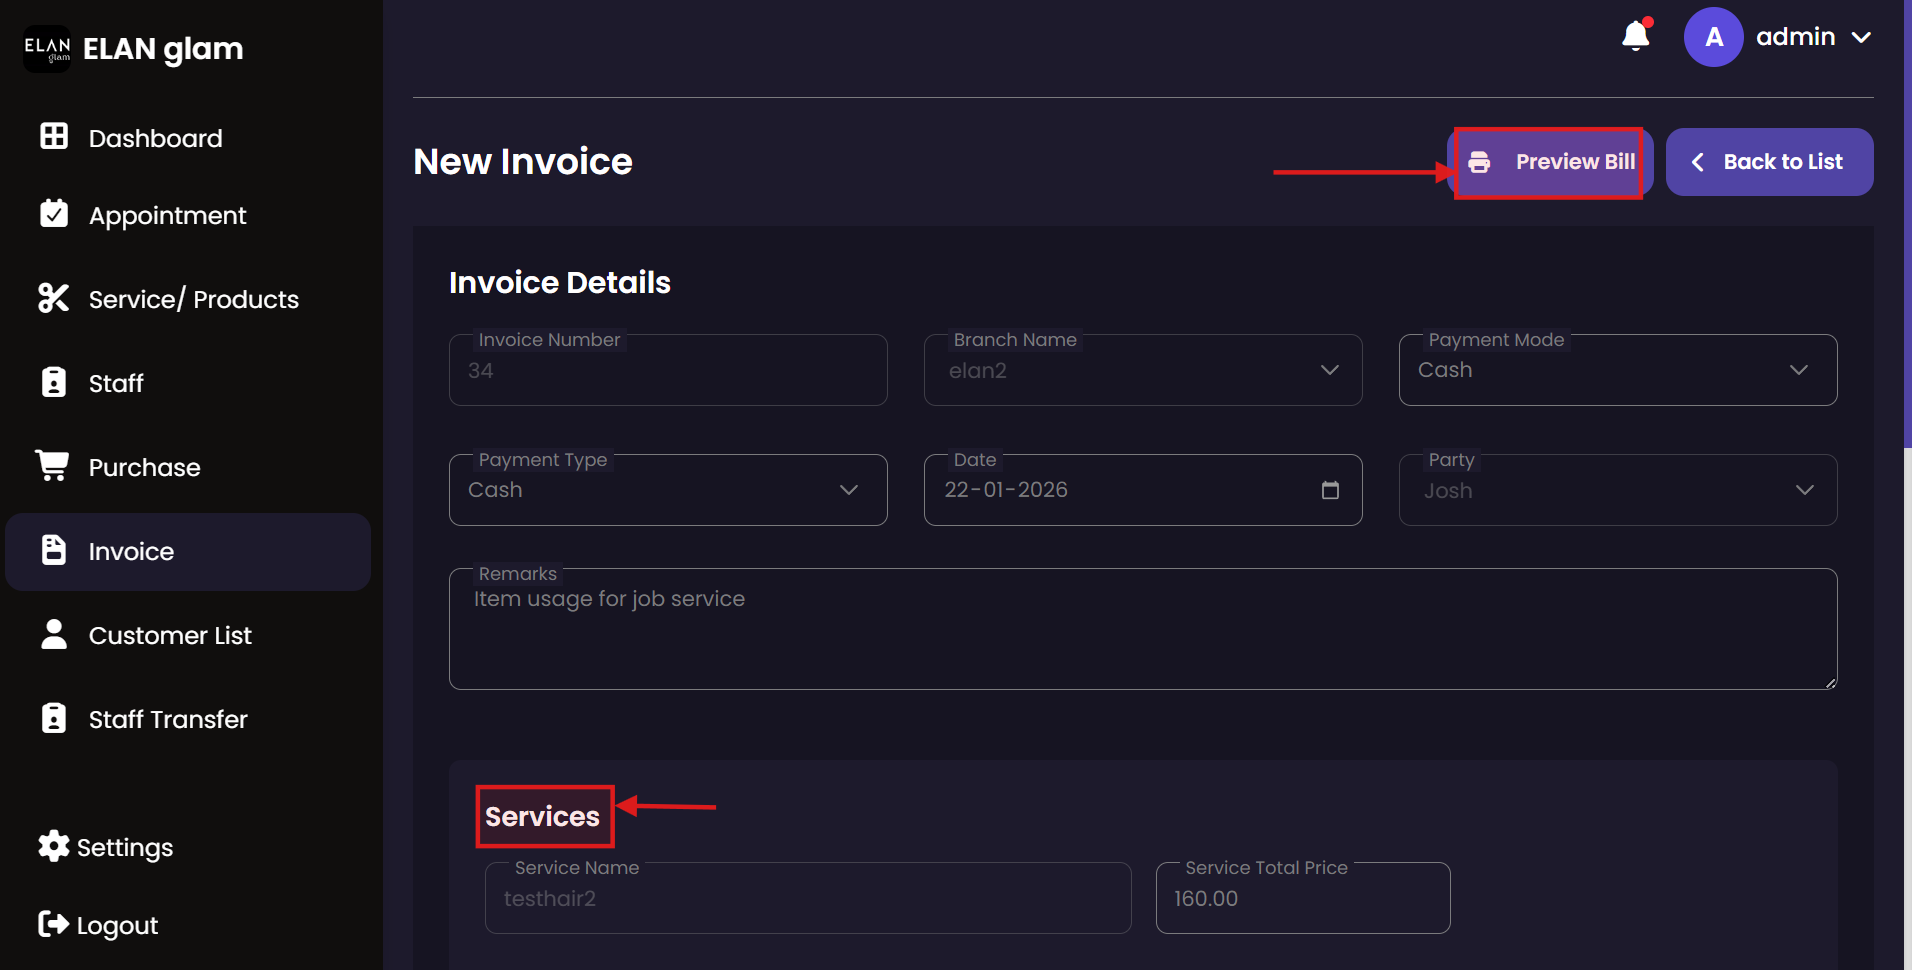
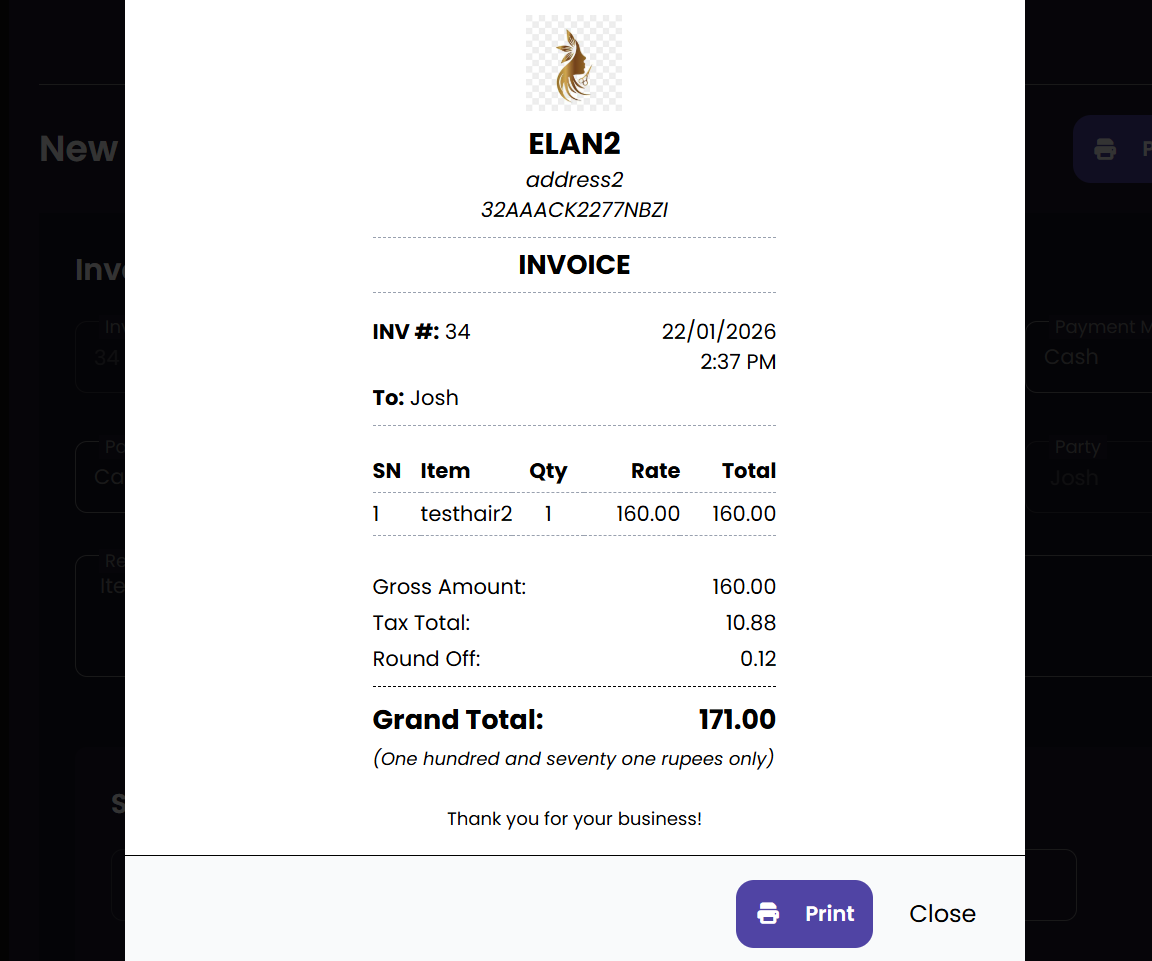
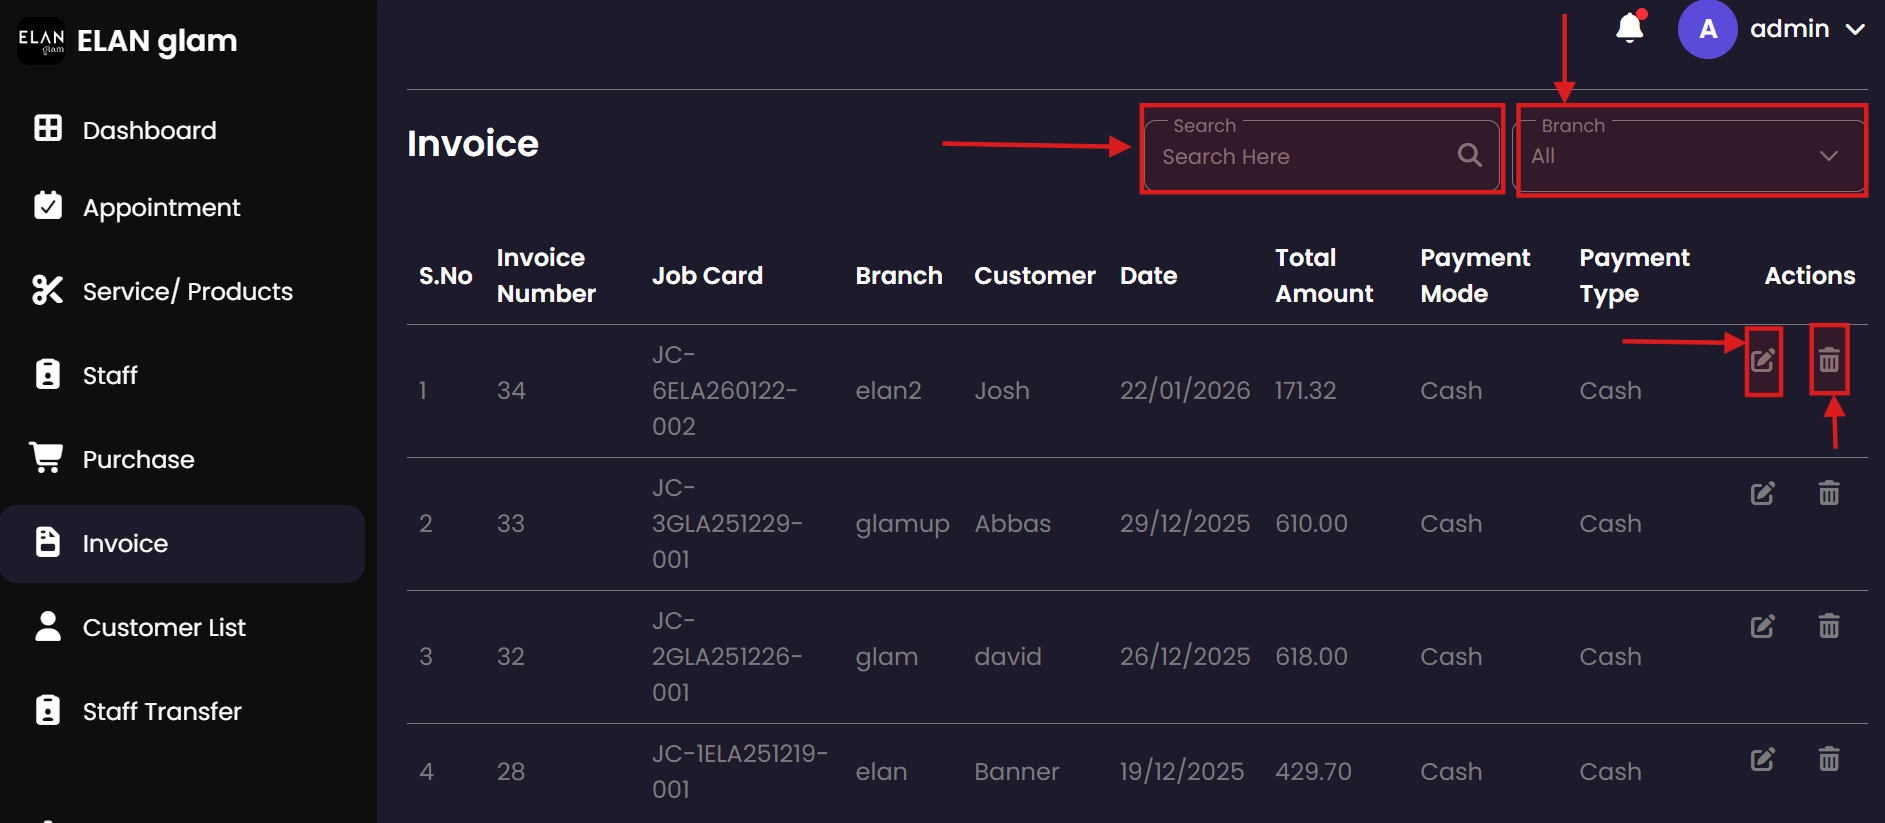
Invoice
fig:manager_Invoice1 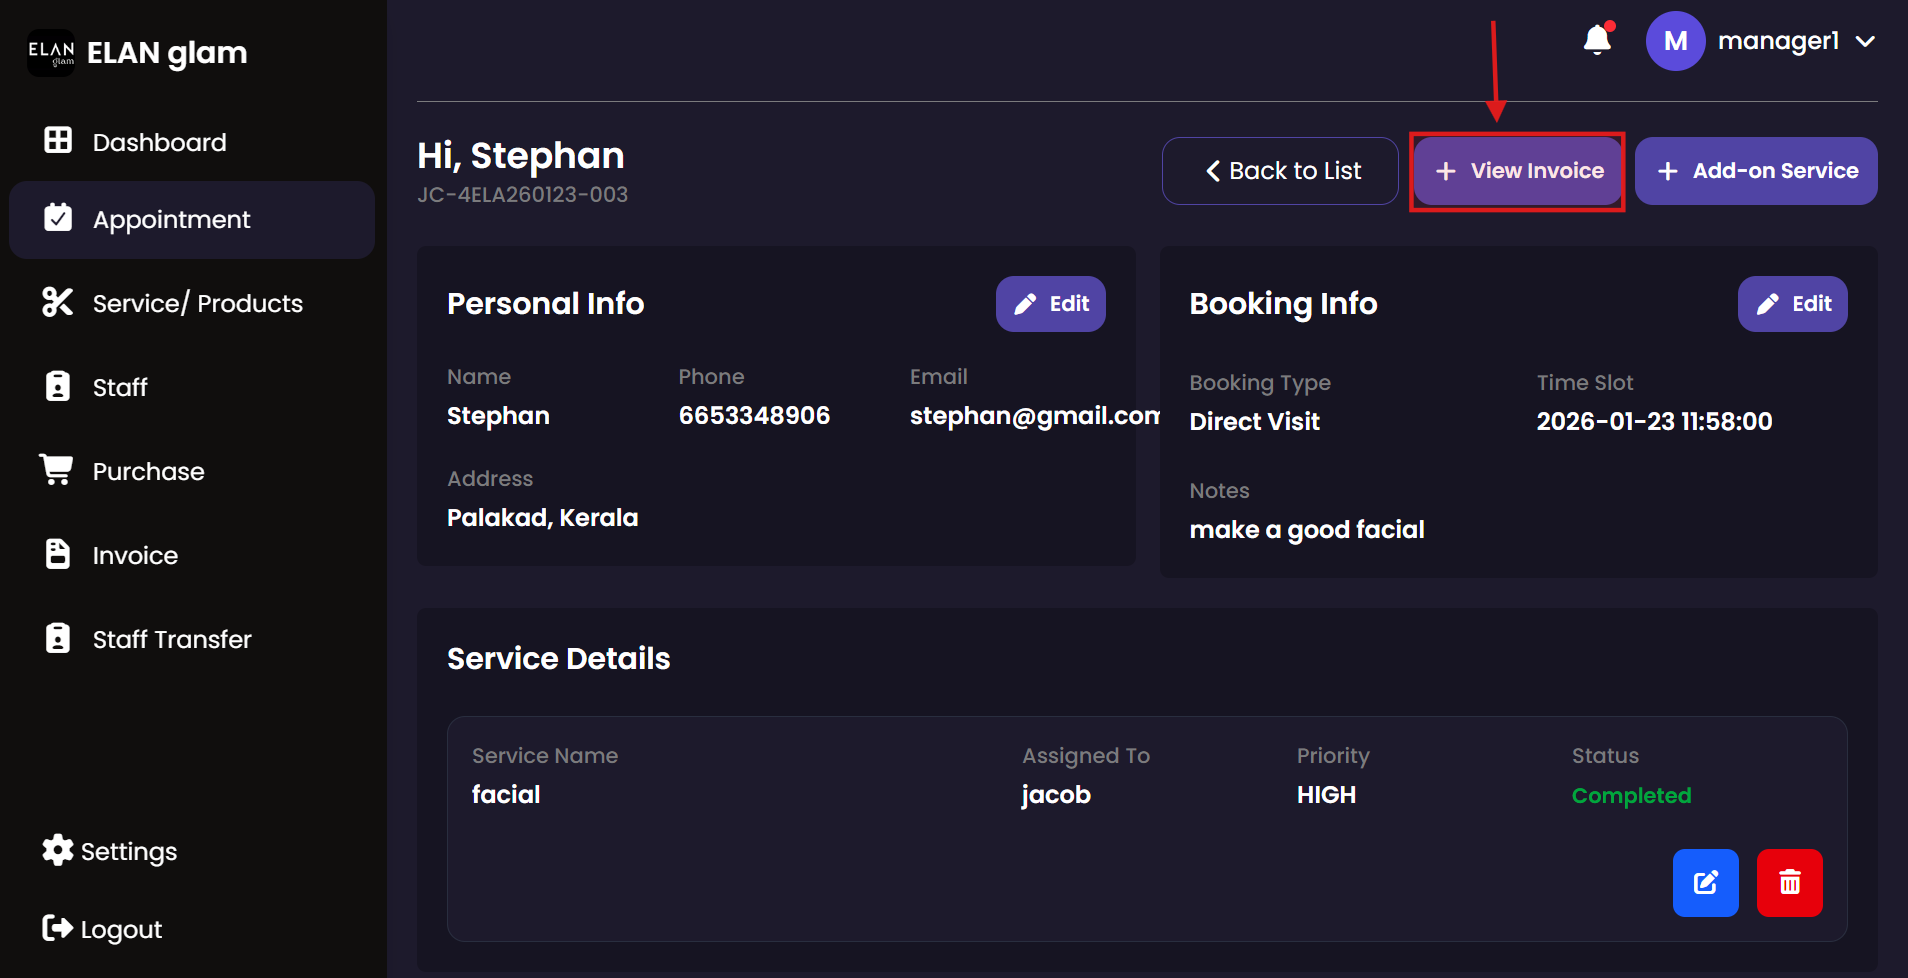 fig:manager_Invoice2
 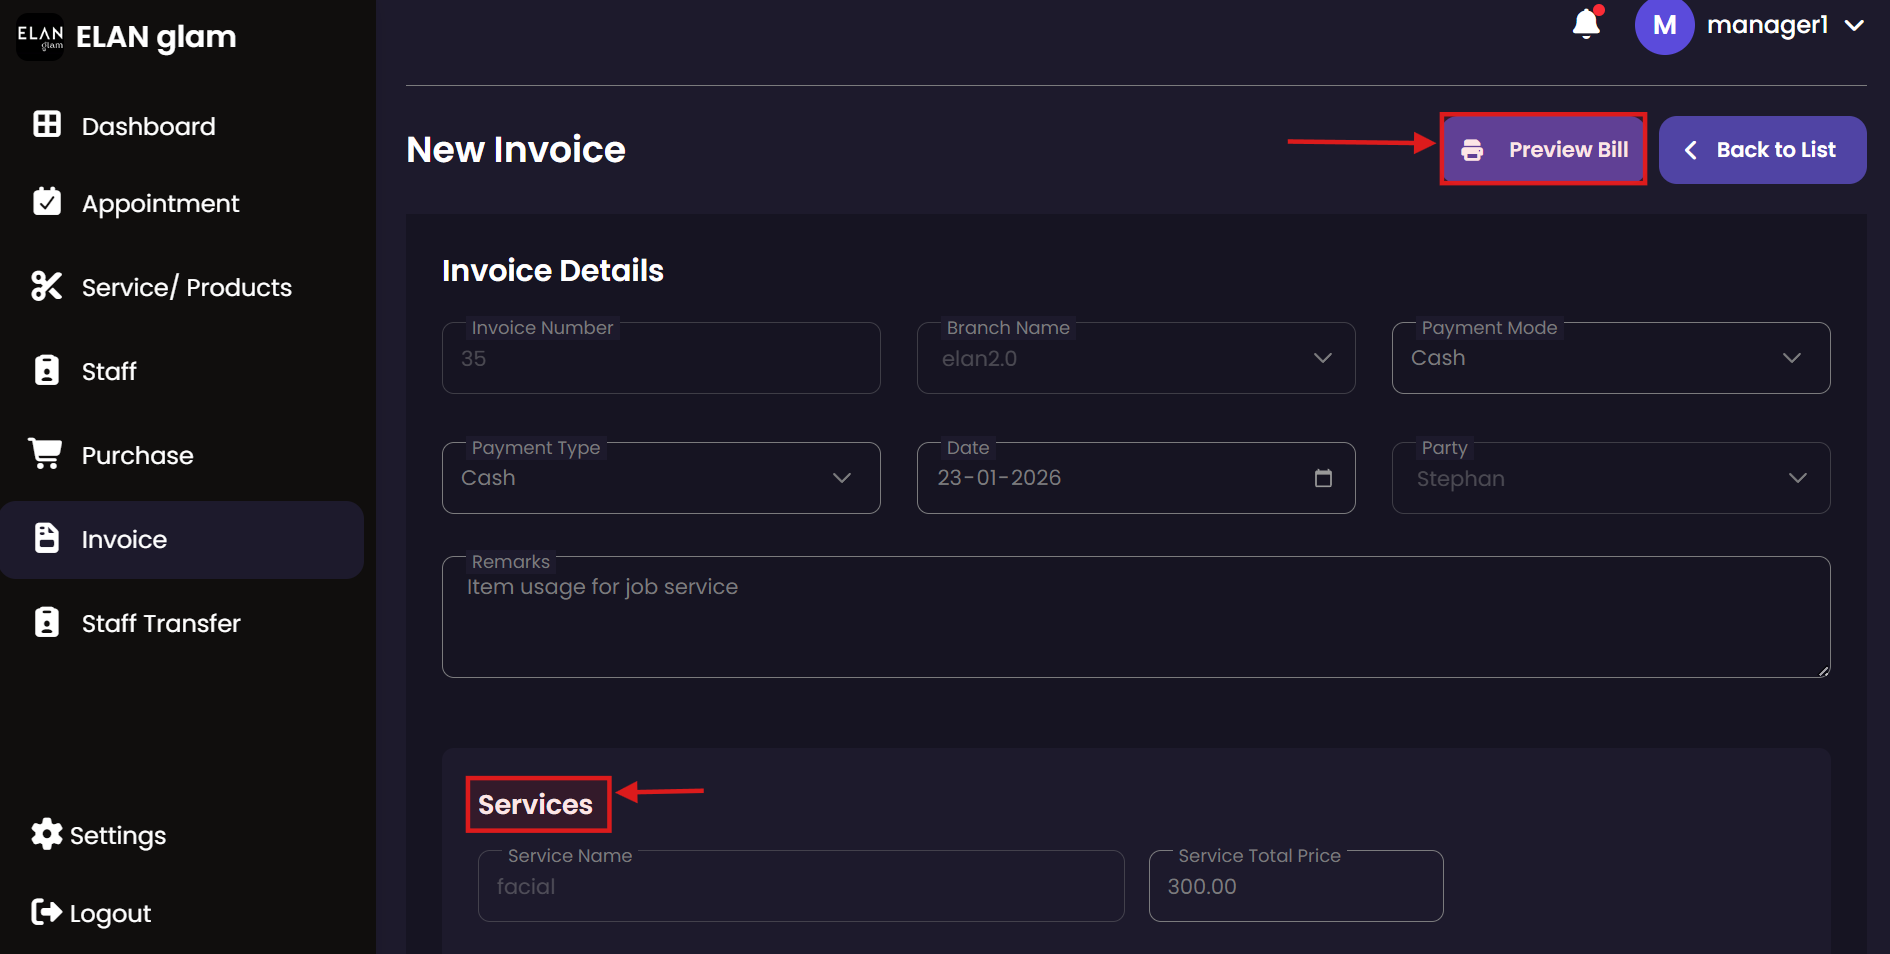 fig:manager_Invoice3
 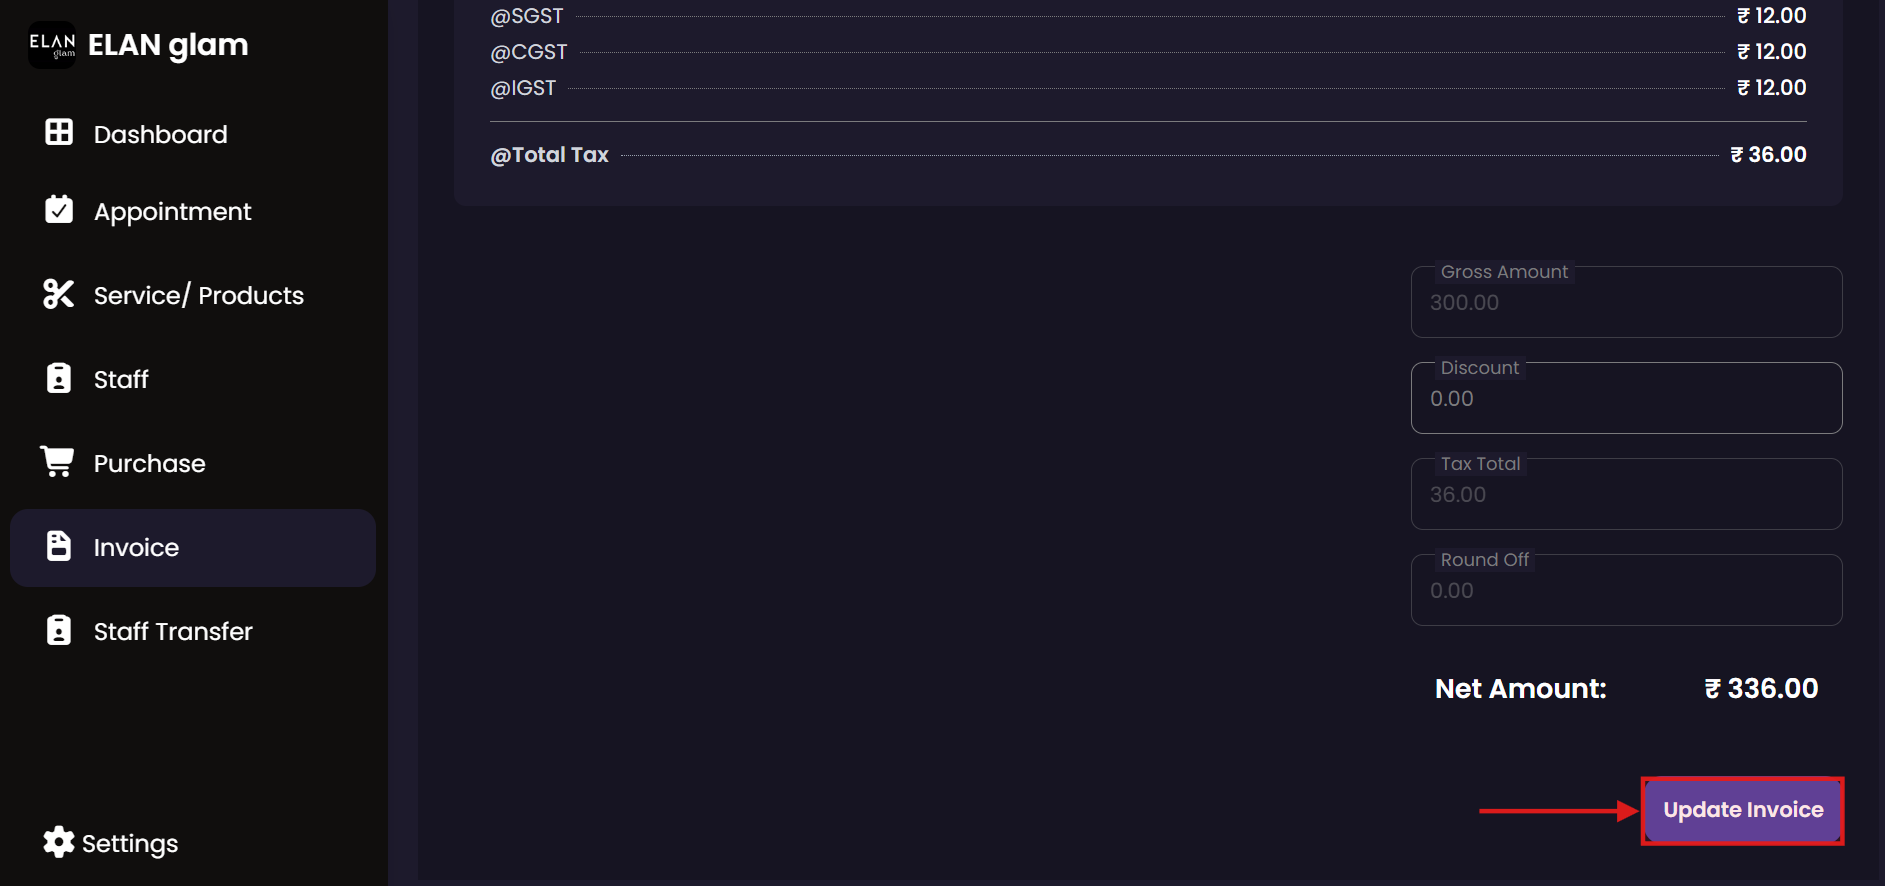 fig:manager_Invoice4
fig:manager_Invoice5
fig:manager_Invoice4
fig:manager_Invoice5 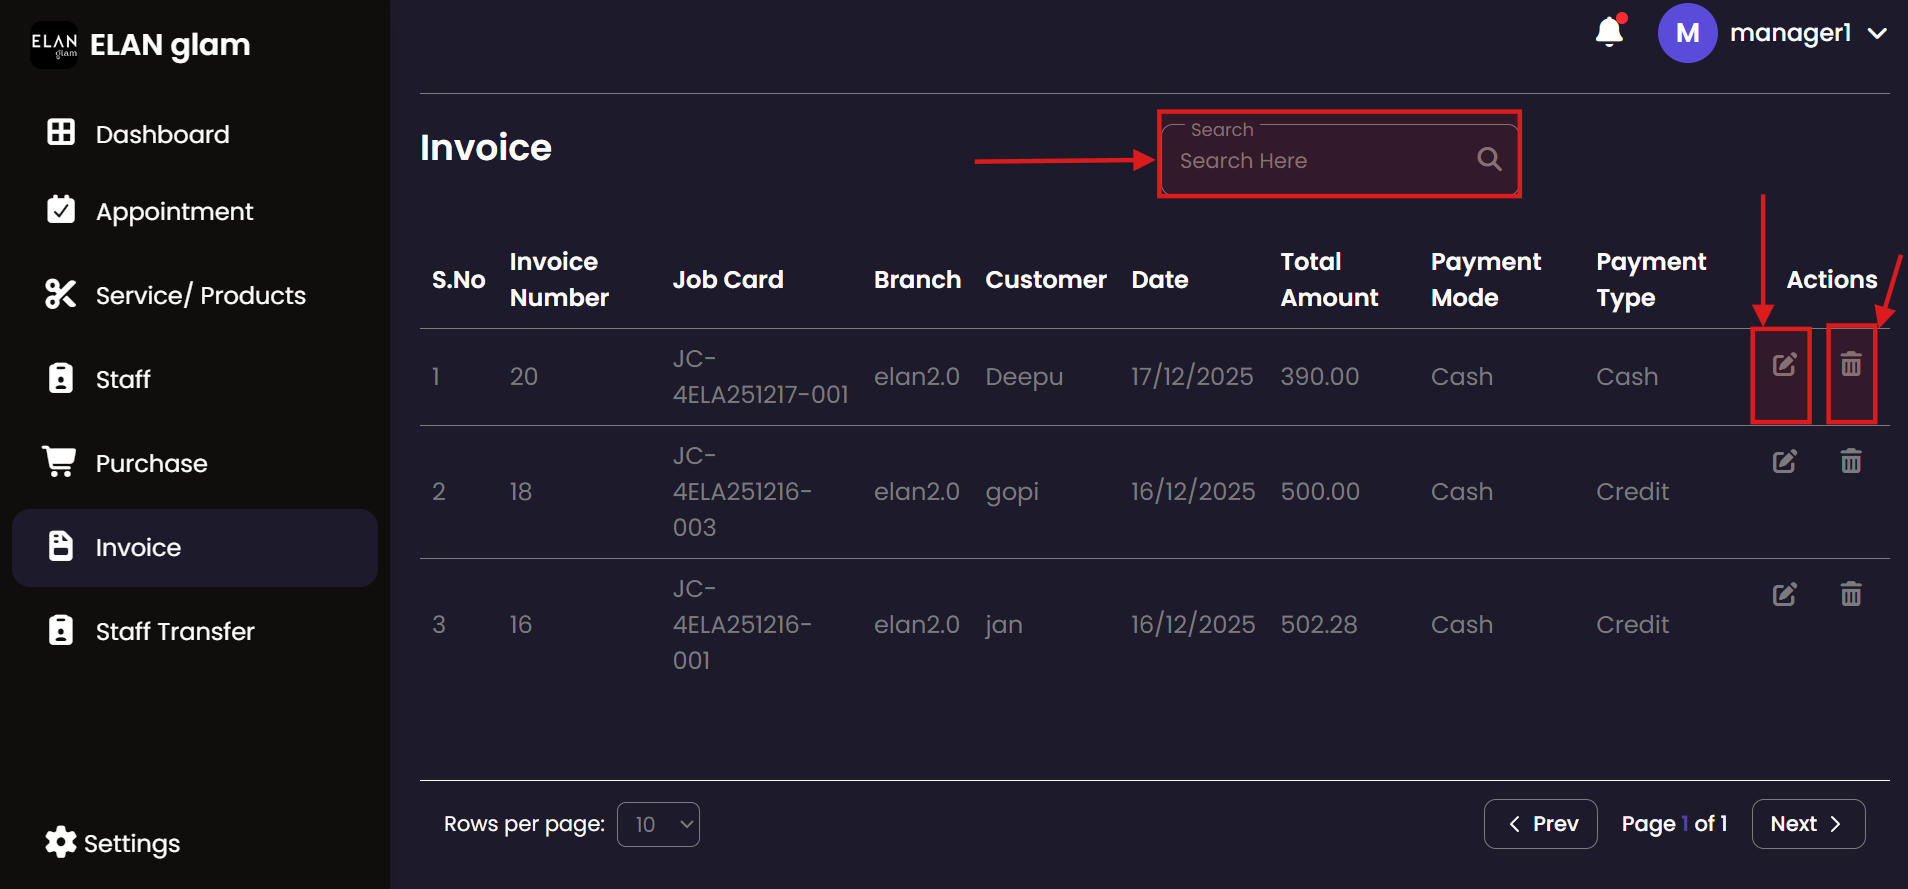
|
Invoice
Generate invoice of the appointment
Print Invoice
Update Invoice
Delete Invoice
Search Invoice
|
Staff Transfer
| fig:manager_Staff-Transfer1 |
Create Staff Transfer
Cancel Staff Transfer
|
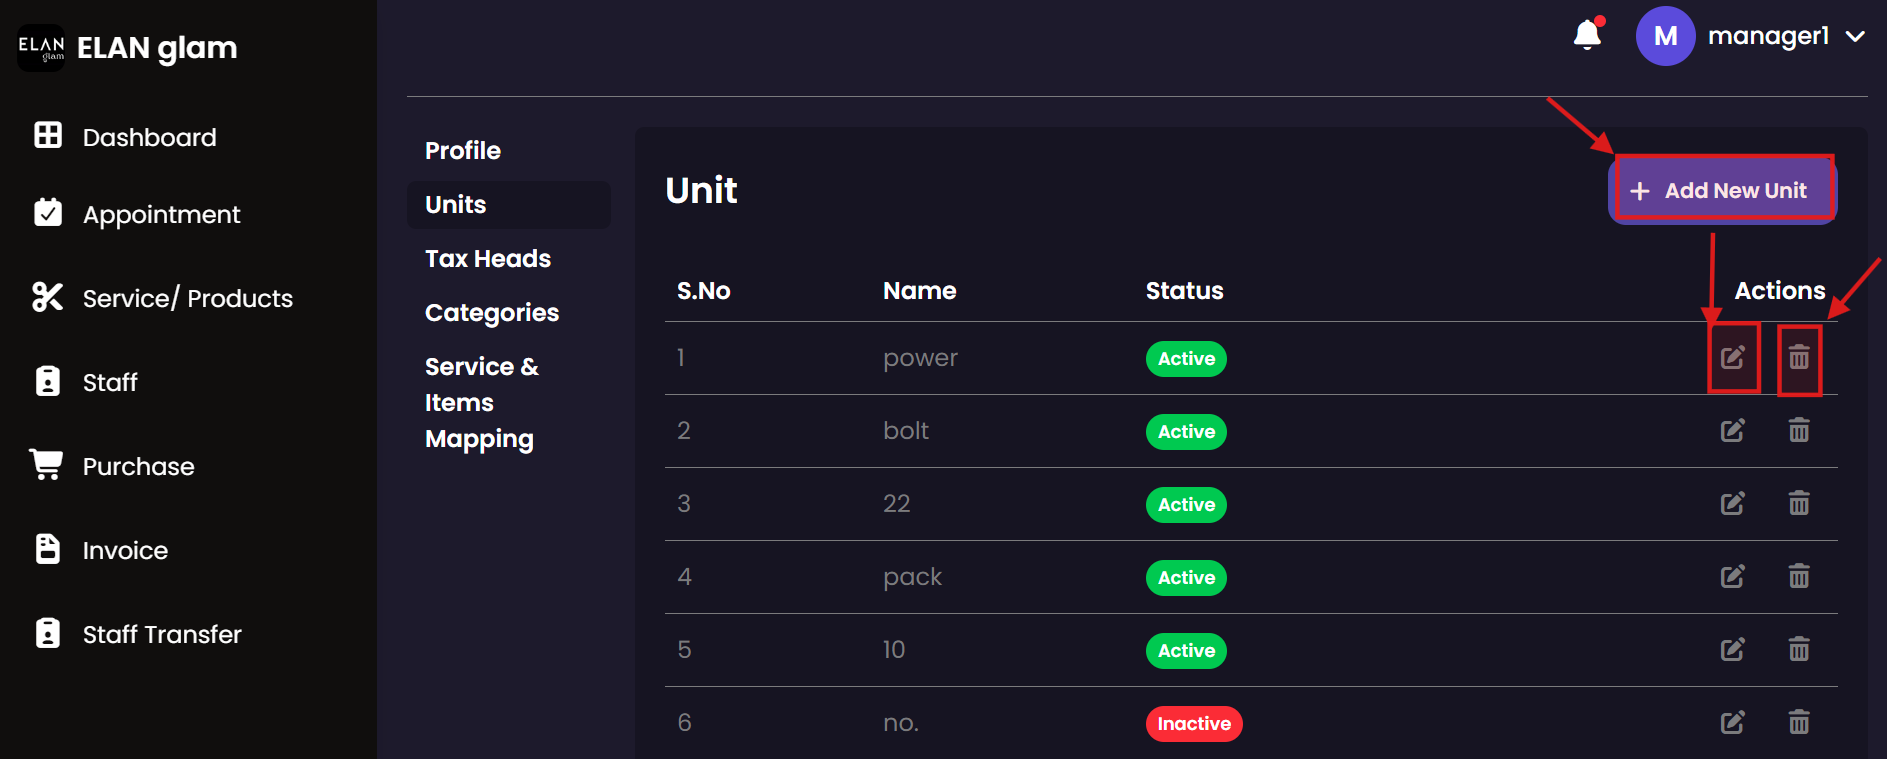
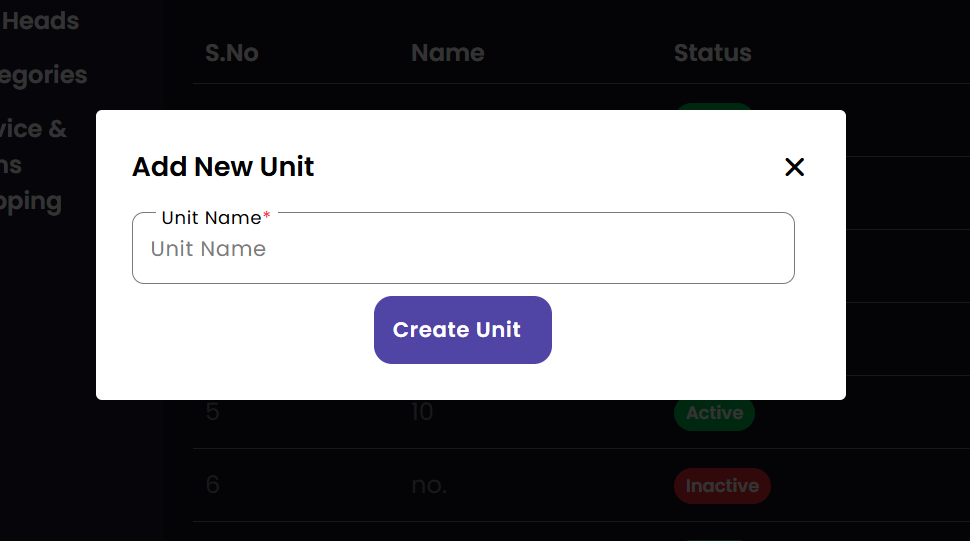
Units
Track the units of measurement available for your branch operations. Managers can review standard units to ensure that all stock entries and service records are consistent with organizational standards.
Branch Units
 Create Unit
 Update Unit
|
Create Unit
Update Unit
Delete Unit
|
Tax Head
Monitor the tax configurations applicable to your branch. This section allows managers to review tax rates and structures for localized services and products, ensuring compliance with general policies.
Tax Settings
 New Tax Head
 Edit Tax Rate
|
Create Tax Head
Update Tax Head
Delete Tax Head
Search Tax Head
|
Category
Review and manage organizational categories for your branch's offerings. Ensuring that all local services and products are correctly categorized helps in maintaining an organized menu and facilitates accurate local reporting.
Branch Categories
 Create Category
 Edit Category
|
Create Category
Update Category
Delete Category
Search Category
|
Service Item Mapping
Ensure that all branch services have the necessary inventory items associated with them. The mapping system automates the assignment of products to services, streamlining the job card process for service staff.
Mapping Overview
 Create Mapping
 Update Mapping
|
Create Service Item Mapping
Update Service Item Mapping
Delete Service Item Mapping
Search Service Item Mapping
|
Profile
Access and update your branch manager profile. Manage your regional contact information and security credentials to ensure uninterrupted access to the management dashboard.
Profile Management

|
View Profile
|
Dashboard
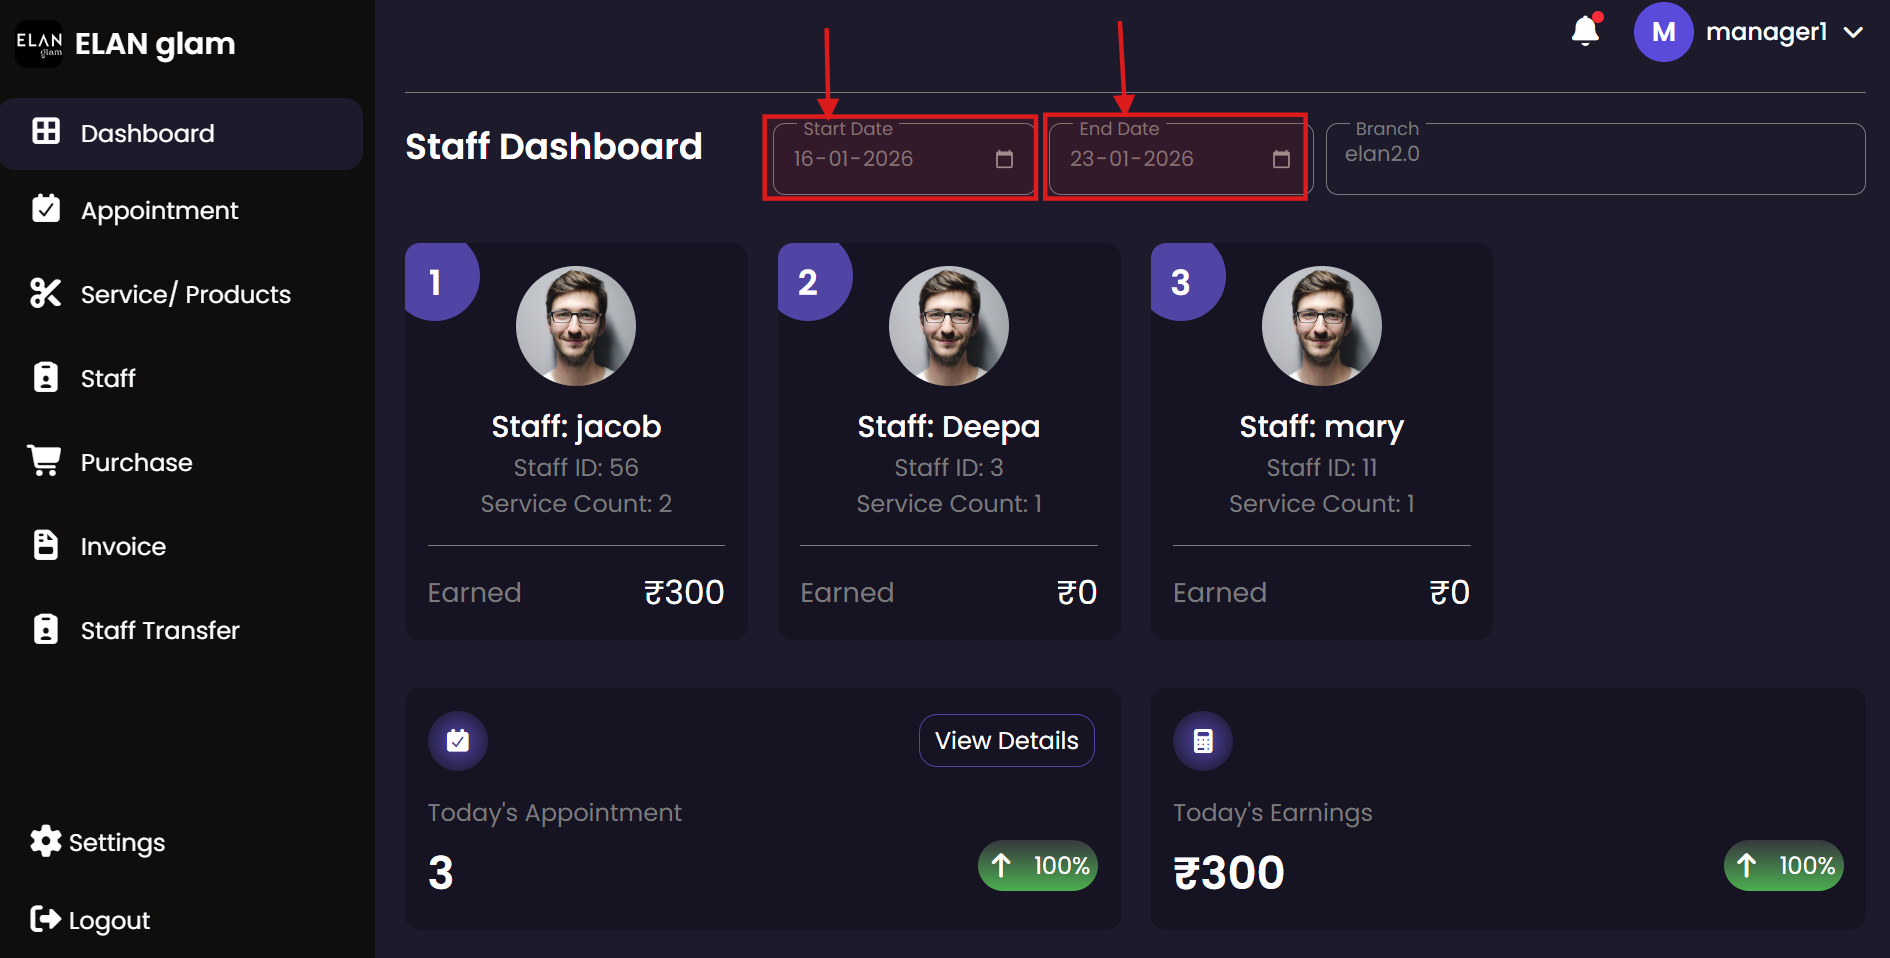
Track your branch's performance metrics in real-time. The Manager dashboard highlights key indicators of success, including customer volume, service efficiency, and financial targets for the current period.
Performance Overview

|
Dashboard
|
Billing Staff Module
The Billing Staff module focuses on the customer's front-desk experience. Billing staff are responsible for booking appointments, processing sales, and generating accurate invoices, ensuring a professional and efficient checkout process.
Appointment
Manage the daily appointment flow at the front desk. Billing staff can quickly book new appointments for walk-in customers and update existing bookings to reflect changes in service requests or customer preferences.
Appointments View
 New Booking
 Update Appointment
 Customer Info
Booking Info
Service List
Customer Info
Booking Info
Service List
|
Create Appointments
View/Update Appointments
Delete Appointment
Search Appointment
|
Products/Services
Browse the salon's menu of offerings. Billing staff can use this view to check prices, availability, and service durations when assisting customers with their bookings and inquiries.
Catalog View
 New Service Entry
Update Service Details
New Service Entry
Update Service Details
|
Create Product/Services
Update Product/Services
Delete Product/Service
Search Product/Service
Service Item Mapping Product/Service
|
Purchase
Record stock acquisitions at the front desk. Billing staff can help maintain inventory levels by logging new product deliveries and ensuring that the branch records accurately reflect current stock on hand.
Purchase Logs
 Create Record
Update Record
Create Record
Update Record
 Record Details
|
Create Purchase
Update Purchase
Delete Purchase
View Purchase
Search Purchase
|
Invoice
Generate and process customer payments with ease. The Invoice module for billing staff ensures that all services and products consumed are correctly billed, discounts are applied, and professional receipts are provided to every customer.
Billing Dashboard
 Create Invoice
 Final Review
 Print Receipt
Invoice History
Print Receipt
Invoice History
|
Invoice
Generate invoice of the appointment
Print Invoice
Update Invoice
Delete Invoice
Search Invoice
|
Staff Transfer
Coordinate branch transfers and temporary assignments. Billing staff can use this module to track employee movements, ensuring that staffing levels are optimized for the front desk and service areas.
|
Transfers List
|
Create Staff Transfer
Cancel Staff Transfer
|
Units
Review the measurement units used for billing and inventory. Billing staff can verify 'Units' to ensure that customers are billed correctly for variable services like hair care or massage durations.
Units Registry
 Create Unit
Modify Unit
Create Unit
Modify Unit
|
Create Unit
Update Unit
Delete Unit
|
Tax Head
Monitor the tax regulations applicable to your billing transactions. Billing staff can review active tax heads to explain price breakdowns and inclusive/exclusive tax components to customers.
Tax Overview
 New Tax Head
Update Tax Head
New Tax Head
Update Tax Head
|
Create Tax Head
Update Tax Head
Delete Tax Head
Search Tax Head
|
Category
Ensure that all billed items are correctly categorized according to the salon's menu. Proper categorization by billing staff ensures that revenue reports are accurate and reflect the correct business segments.
Billing Categories
 New Category
Update Category
New Category
Update Category
|
Create Category
Update Category
Delete Category
Search Category
|
Service Item Mapping
Review the automatic item assignments for each service. Billing staff can verify these mappings to ensure that all necessary consumable items are correctly accounted for in the customer's final invoice.
Mapping Dashboard
 Create Mapping
Update Mapping
Create Mapping
Update Mapping
|
Create Service Item Mapping
Update Service Item Mapping
Delete Service Item Mapping
Search Service Item Mapping
|
Profile
Manage your billing workstation user profile. Keep your contact details current and ensure your session security is maintained to provide interrupted service at the front desk.
|
Personal Profile
|
View Profile
|
Dashboard
Monitor real-time billing activity and front-desk metrics. The Billing Staff dashboard provides a quick view of today's appointments, total sales, and pending invoices to help you stay organized.
Daily Billing Metrics
|
Dashboard
|
Inventory Staff Module
The Inventory Staff module is dedicated to stock and supply management. Inventory staff can track product levels, manage purchase entries from vendors, and handle stock transfers between branches to maintain optimal inventory levels.
Products/Services
Track the products and services available in the salon's central inventory. Inventory staff can review stock levels, examine product details, and ensure that all items are correctly categorized for easy retrieval.
Inventory View
 New Product/Service
Update Stock Details
New Product/Service
Update Stock Details
|
Create Product/Services
Update Product/Services
Delete Product/Service
Search Product/Service
Service Item Mapping Product/Service
|
Purchase
The primary tool for inventory replenishment. Inventory staff use this module to log all incoming product shipments, verify quantities from vendors, and ensure the stock database is updated upon arrival.
Purchase Records
 Enter New Stock
Modify Purchase
Purchase Details
Enter New Stock
Modify Purchase
Purchase Details
|
Create Purchase
Update Purchase
Delete Purchase
View Purchase
Search Purchase
|
Staff Transfer
Manage the movement of stock and staff between branches. This module is essential for inventory staff to ensure that branch resources are balanced and that all transfer requests are properly documented.
|
Transfer Records
|
Create Staff Transfer
Cancel Staff Transfer
|
Units
Standardize how product volumes and quantities are recorded. Inventory staff ensure that all stock items use the correct units of measurement to maintain precision in inventory counts and usage tracking.
|
Measurement Units
Create Unit
Update Unit
|
Create Unit
Update Unit
Delete Unit
|
Tax Head
Track the tax classification for inventory and supply items. This helps inventory staff ensure that product costs are recorded with appropriate tax considerations for the salon's procurement reports.
|
Tax Classifications
New Tax Head
Modify Tax Head
|
Create Tax Head
Update Tax Head
Delete Tax Head
Search Tax Head
|
Category
Organize the salon's stock room by classifying all items into logical categories. Effective categorization allows inventory staff to perform faster audits and maintain better control over specialized product lines.
|
Inventory Categories
New Category
Update Details
|
Create Category
Update Category
Delete Category
Search Category
|
Service Item Mapping
Maintain the link between services and the products required for them. This mapping helps inventory staff anticipate stock usage patterns based on the salon's appointment schedule.
|
Stock Mapping
Update Mapping
|
Create Service Item Mapping
Update Service Item Mapping
Delete Service Item Mapping
Search Service Item Mapping
|
Profile
Access your inventory specialist profile. Keep your professional information up-to-date to ensure clear communication with branch managers and vendors regarding procurement and stock needs.
|
User Profile
|
View Profile
|
Dashboard
Track warehouse performance and critical stock alerts. The Inventory dashboard highlights low-stock items, pending transfers, and overall supply trends to ensure the salon never runs out of essentials.
|
Inventory Analytics
|
Dashboard
|
Service Staff Module
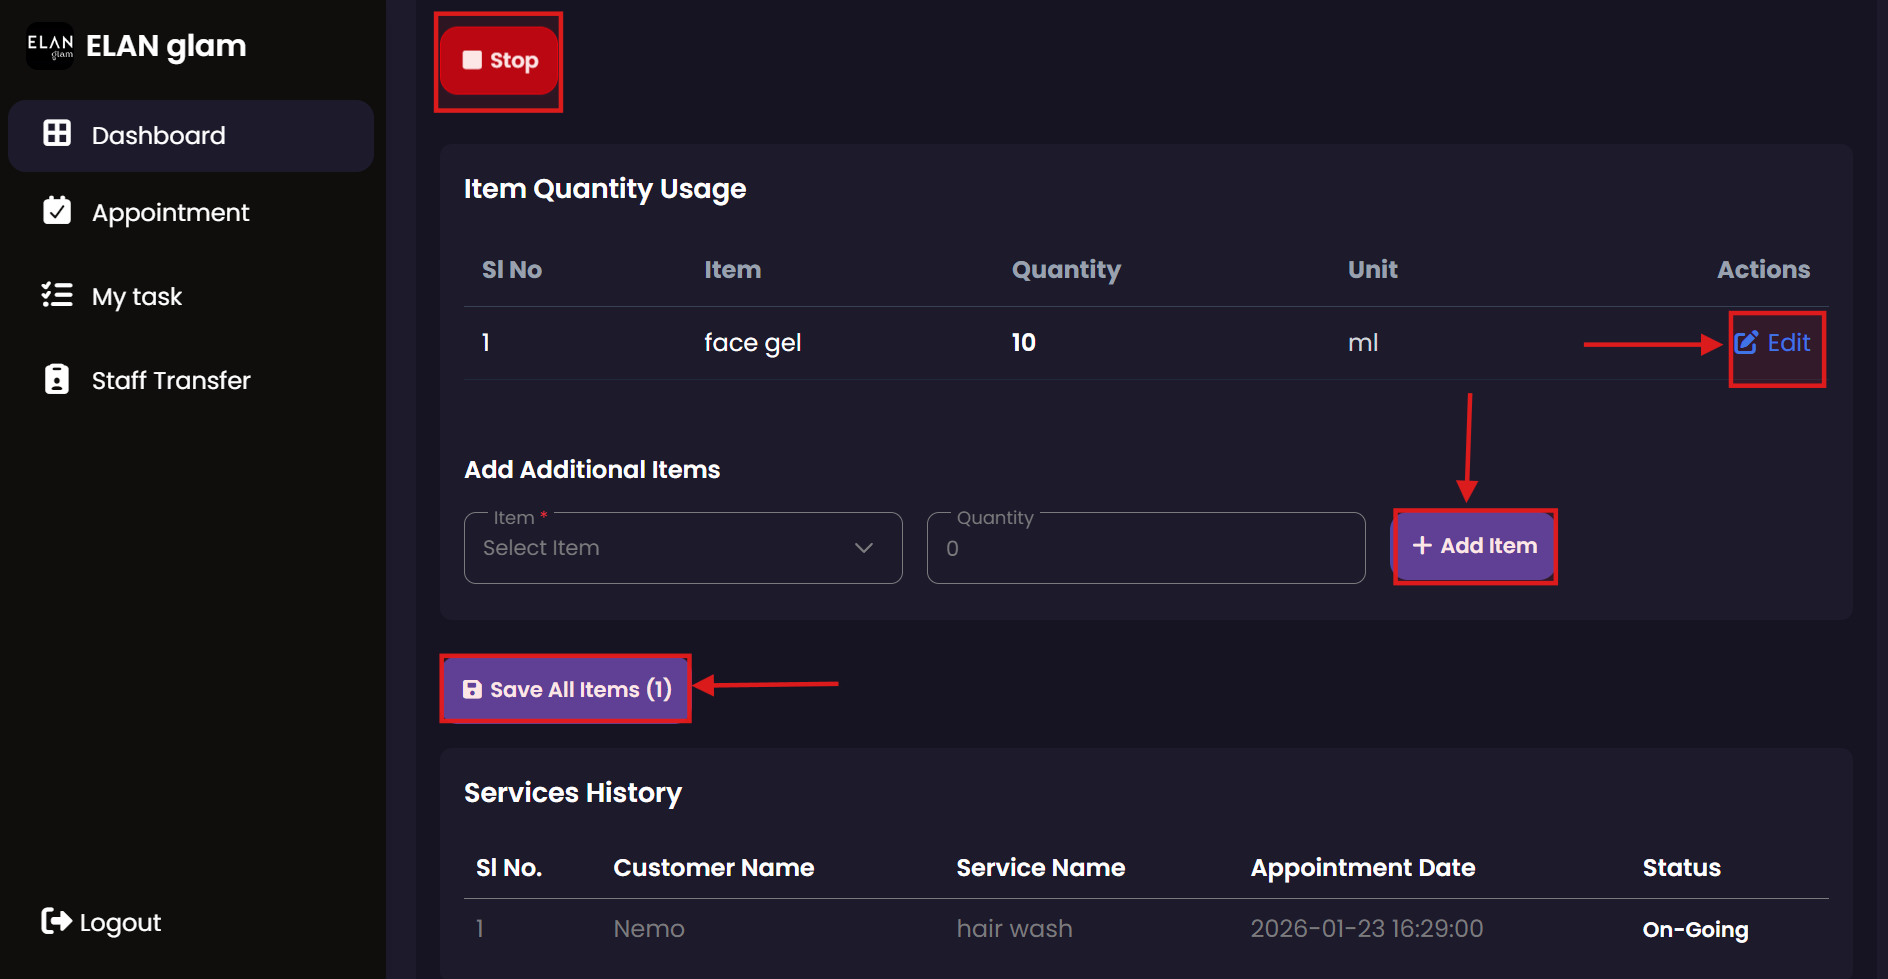
The Service Staff module is designed for the practitioners performing the salon services. Service staff can view their assigned tasks, track service duration, record product usage during treatments, and manage their daily performance.
Job Service
Manage your daily service tasks from start to finish. This module allows service staff to see assigned bookings, record the commencement of a service, and log the completion once the customer has been served.
Tasks Overview
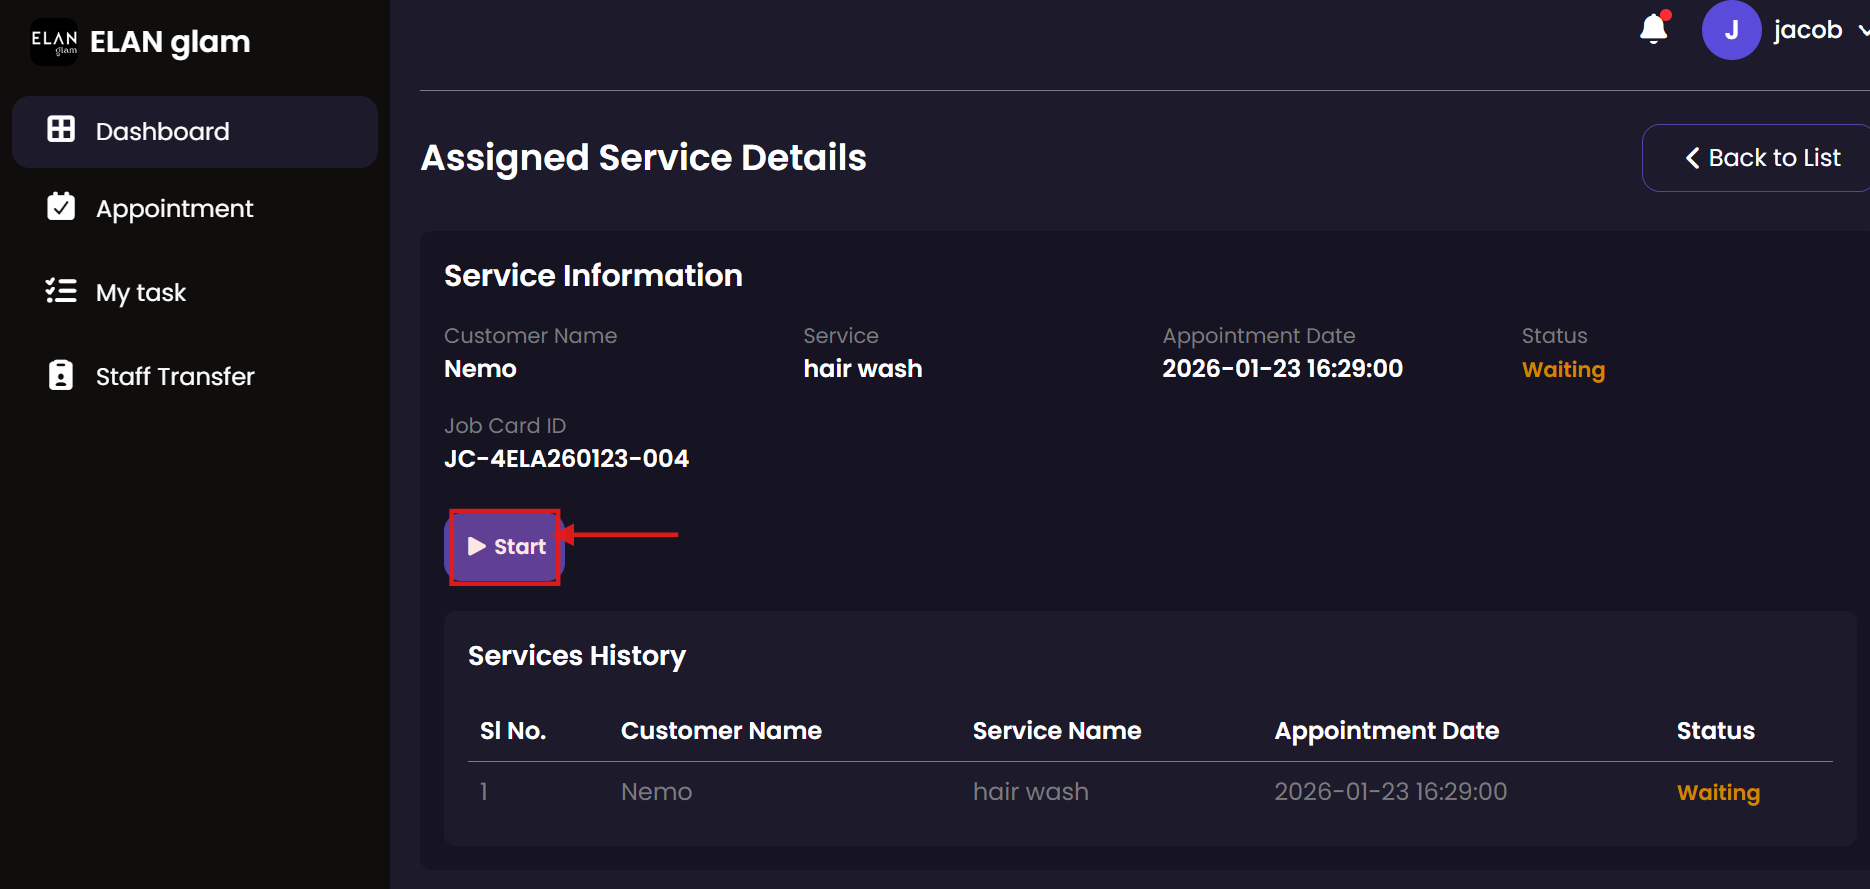
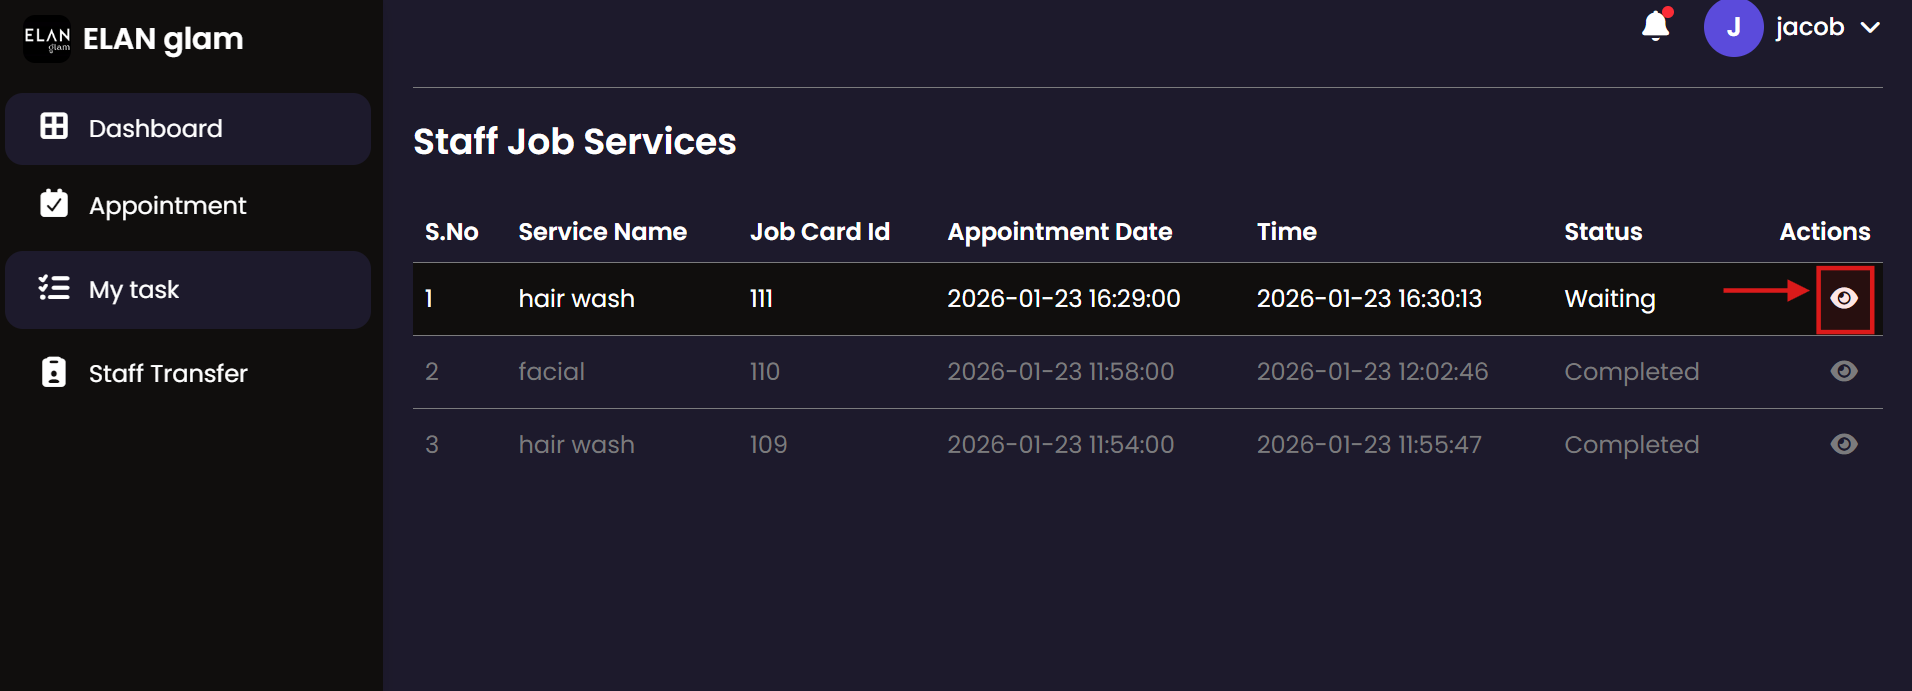 Commence Service
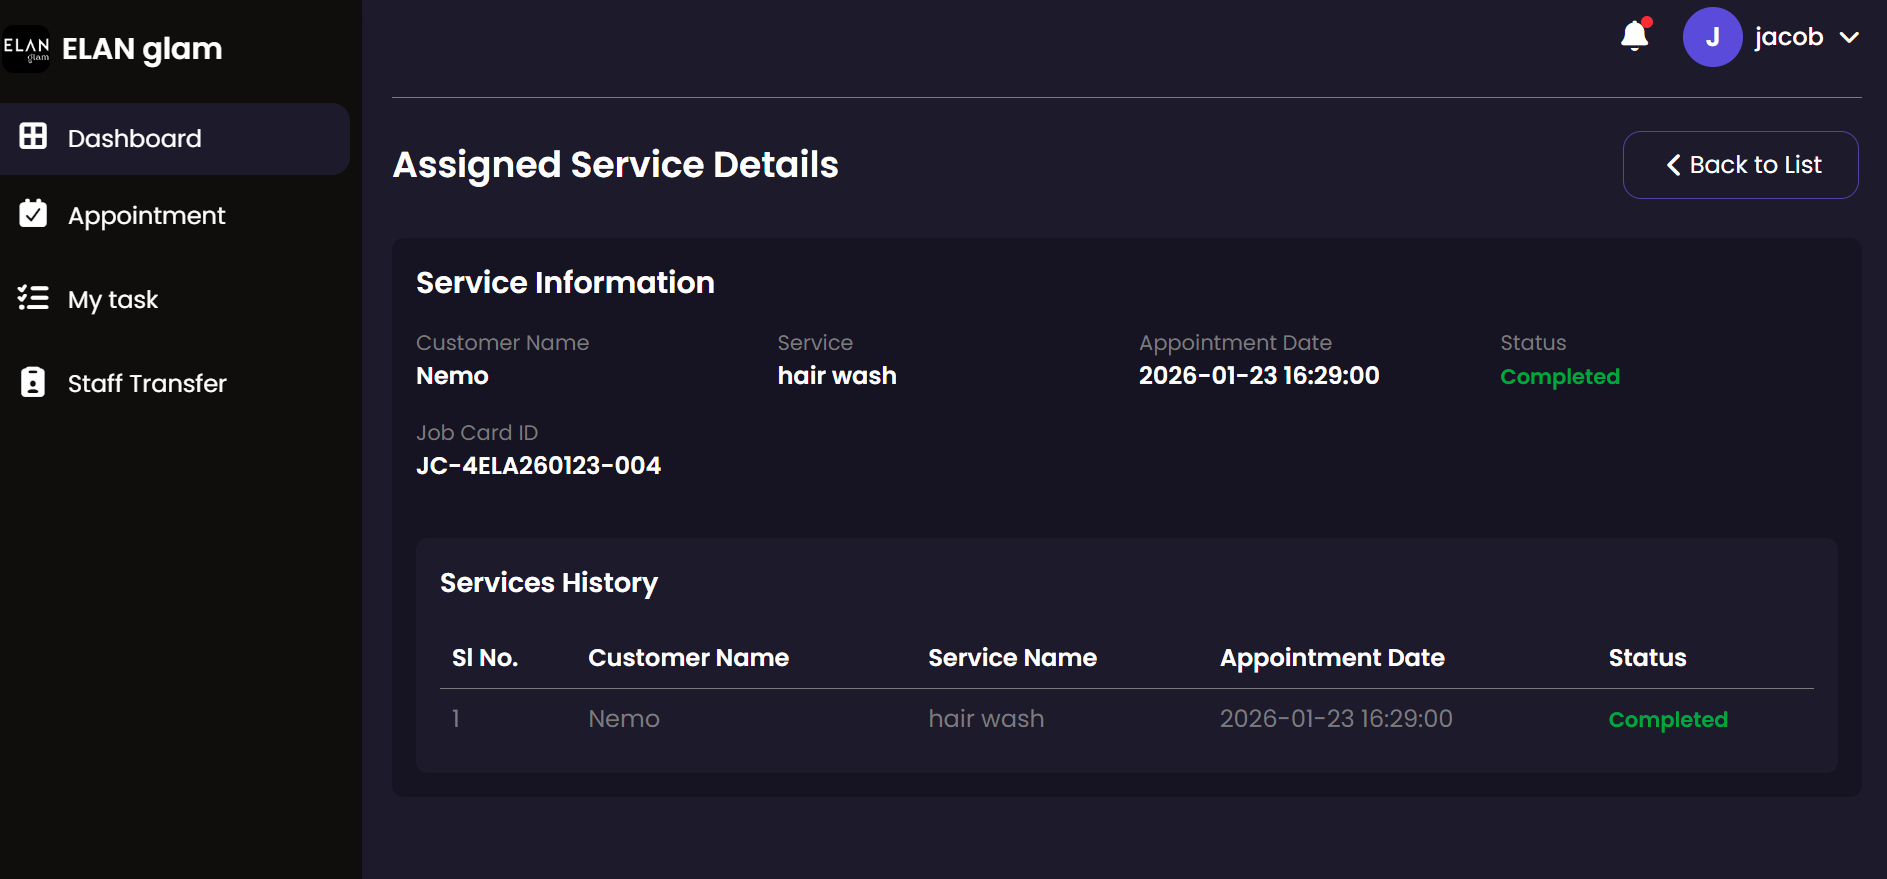
 Record Completion
 Success Notification
|
Start Service
Assign Item and Stop Service
|
Staff Transfer
Track your individual branch assignments and transfer history. As service staff, this module keeps you informed about your current location assignments and any upcoming transfers scheduled by management.
|
My Transfers
|
Create Staff Transfer
Cancel Staff Transfer
|
Dashboard
Monitor your professional activity and performance targets. The Service Staff dashboard provides personal insights into your completed tasks, hours logged, and contributions to the salon's overall service delivery.
|
Performance Dashboard
|
Dashboard
|